
Your engine breathes through a single opening no bigger than a coffee mug. When that opening gets clogged with carbon deposits and grime, your 300 horsepower machine starts wheezing like a chain smoker climbing stairs.
The throttle body, positioned strategically between your air filter and intake manifold, controls every molecule of air entering your engine, yet it's often the most neglected component in routine maintenance schedules.
Here's the reality check that most drivers need: a dirty throttle body can rob your engine of up to 10% of its power and fuel efficiency. I've seen throttle bodies so caked with carbon that they looked like they belonged in a coal mine rather than under a hood. The good news? This is one maintenance task that delivers immediate, noticeable results and costs less than a tank of premium fuel.
Recognizing When Your Throttle Body Needs Attention
Your vehicle will tell you when something's wrong. You've heard that saying before, right? Well, the throttle body speaks louder than most components when it needs cleaning.
The telltale signs appear gradually. First, you'll notice rough idling at traffic lights. The engine feels like it's struggling to maintain a steady rhythm. Then comes the sluggish acceleration response when you press the gas pedal. Many drivers dismiss this as "normal aging," but that's rarely the case.
Watch for these specific symptoms that indicate throttle body contamination:
- Inconsistent idle speeds that fluctuate between 500-1200 RPM
- Reduced fuel efficiency where your usual commute suddenly requires more frequent fill-ups
- Hesitation during acceleration especially from a complete stop
- Check engine light activation often accompanied by diagnostic codes P0121 or P0122
- Stiff or unresponsive gas pedal that requires more pressure than usual
According to Berryman Products, most vehicle manufacturers recommend throttle body service every 60,000 to 100,000 miles. However, vehicles driven in dusty conditions, stop and go traffic, or areas with poor air quality may require more frequent attention.
The carbon buildup process is insidious. It starts with microscopic particles from the PCV system mixing with fuel vapors and environmental contaminants. Over time, this sticky mixture hardens into deposits that restrict airflow and disrupt the precise air fuel mixture your engine requires for optimal combustion.
Essential Tools and Safety Preparations
Safety isn't negotiable when working around fuel systems. Before touching any components, ensure your vehicle is parked on level ground with the engine completely cool. Heat can cause burns, and residual pressure in fuel lines can create dangerous situations.
Gather these specific tools and materials:
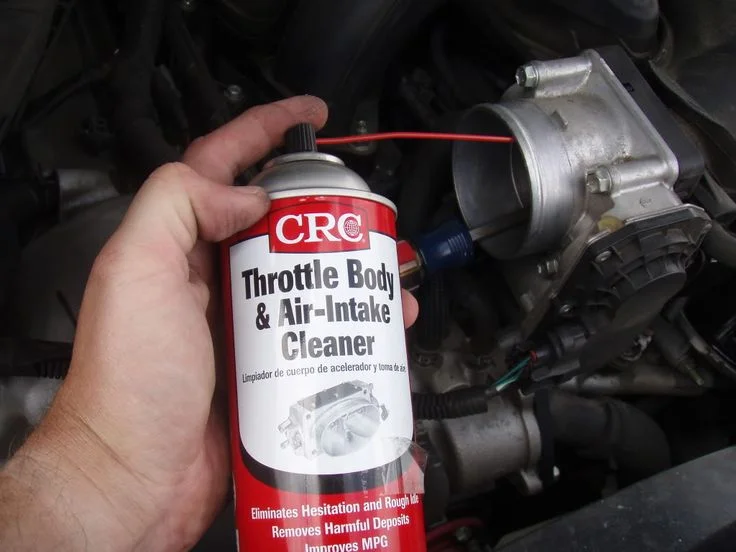
- Throttle body cleaner (CRC Throttle Body & Air Intake Cleaner or WD-40 Specialist Carb/Throttle Body Cleaner are professional-grade options)
- Safety glasses and nitrile gloves for protection against chemical splashes
- Socket wrench set with extensions for accessing tight spaces
- Flat head screwdriver for clamp removal
- Soft bristled toothbrush for gentle scrubbing action
- Lint free shop rags or paper towels
- Compressed air for final debris removal
- New throttle body gasket (vehicle specific replacement)
Never use brake cleaner or carburetor cleaner as substitutes. These products are too aggressive and can damage sensitive throttle body coatings or electronic components. Castrol recommends using cleaners specifically formulated for throttle body applications to avoid component damage.
Disconnect the negative battery terminal first. This prevents electrical shorts and allows the engine control module to reset its learned idle parameters after cleaning. You'll appreciate this step when the engine runs smoother immediately after reassembly.
Step by Step Professional Cleaning Process
Location matters more than you might think. The throttle body sits between the air intake boot and intake manifold, usually secured by four bolts in a square pattern. On most vehicles, you'll find it directly behind the air intake assembly, connected by a large rubber hose.
- Begin with systematic disassembly. Remove the air intake boot by loosening the hose clamps with your flat head screwdriver. Slide the clamps away from the throttle body connections, then carefully work the boot free. Take photos during disassembly if you're uncertain about reassembly order.
- Disconnect electrical connections next. Most throttle bodies have one or two electrical connectors secured by plastic tabs. Press the release tabs firmly and pull the connectors straight off. Never yank on the wires themselves.
- Remove the throttle body carefully. Support the component with one hand while removing the final mounting bolt. The throttle body is heavier than it appears, and dropping it can crack the housing or damage internal components.
- The cleaning process requires patience and thoroughness. Spray throttle body cleaner liberally inside both ends of the housing. The cleaner will dissolve carbon deposits and sticky residues that accumulate over thousands of miles of operation.
- Open the throttle plate manually by reaching inside and gently pushing it to the fully open position. Insert a screwdriver handle to prop it open, freeing both hands for cleaning. This reveals the areas where the heaviest carbon buildup typically occurs.
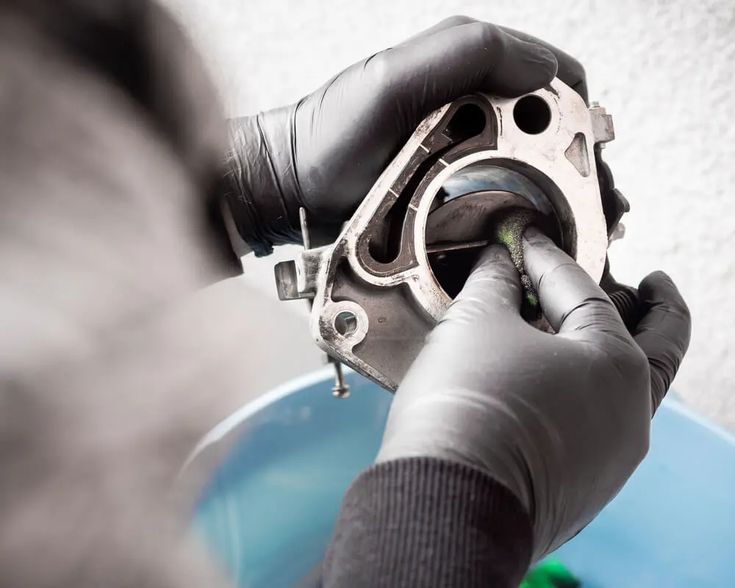
- Scrub gently but persistently. Use your soft bristled toothbrush to work around the throttle plate edges and bore surfaces. You'll see black carbon residue dissolving and loosening as you work. Focus extra attention on the throttle plate shaft area where deposits commonly cause sticking.
- Clean the gasket surfaces meticulously. Both the throttle body mounting surface and the intake manifold must be completely free of old gasket material and debris. Scrape carefully with a plastic scraper to avoid scratching aluminum surfaces.
- Final inspection and compressed air cleaning removes any remaining particles or loose debris. Blow out all bolt holes and internal passages thoroughly.
Reassembly and System Reset Procedures
- Installation reverses the removal process with critical attention to torque specifications and gasket placement. Position the new gasket properly before securing the throttle body to prevent vacuum leaks that cause rough idling.
- Tighten mounting bolts in a crisscross pattern to ensure even gasket compression. Over tightening can warp the throttle body housing or crack the intake manifold, while insufficient torque creates vacuum leaks.
- Reconnect electrical connections and air intake components systematically. Ensure all clamps are properly positioned and tightened to prevent loose connections that can cause performance issues.
- The engine relearning process begins immediately after starting. Modern engines use adaptive strategies to optimize idle speed and throttle response. Some drivers notice slight irregularities for the first few minutes of operation as the computer adjusts to the clean throttle body.
- Test drive evaluation confirms success. You should notice improved throttle response, smoother acceleration, and more consistent idle quality within the first few miles. The engine may feel more responsive throughout the RPM range, and fuel economy improvements typically become apparent after several tankfuls.
- Common questions arise about post-cleaning adjustments. Most modern vehicles automatically adapt to the cleaned throttle body without manual intervention. However, some models benefit from an idle relearn procedure performed with a diagnostic scanner.
The investment in throttle body cleaning pays dividends in performance, efficiency, and engine longevity. This 30 minute maintenance task costs under $25 in materials while delivering results equivalent to more expensive performance modifications. When someone tells you "my car runs fine, why fix what ain't broken," remind them that preventive maintenance prevents expensive repairs and maintains peak performance.
Regular throttle body service, combined with quality fuel and proper air filter maintenance, keeps your engine breathing freely and performing at its designed potential. Your wallet and your driving experience will thank you for this simple but impactful maintenance routine.
Comments (0)
Please login to join the discussion
Be the first to comment on this article!
Share your thoughts and start the discussion