Do you know how to tighten the wheels of your car properly? You may think that it is a simple job, but it is actually very important to do it correctly. If you do not follow the wheel tightening sequence, you may damage your wheels, your car, or even yourself. In this article, we will explain what the wheel tightening sequence is, why it is important, and how to do it right.
What Is The Wheel Tightening Sequence?
The wheel tightening sequence is the order in which you should tighten the lug nuts or bolts that hold the wheel to the hub. The lug nuts or bolts are the metal pieces that you see around the center of the wheel. They are usually four, five, or six in number, depending on the type of wheel you have. It is not the same as the wheel rotation pattern. The wheel rotation pattern is the order in which you should switch the positions of the wheels on your car to make them wear evenly. The wheel tightening sequence is the order in which you should tighten the lug nuts or bolts on each wheel.

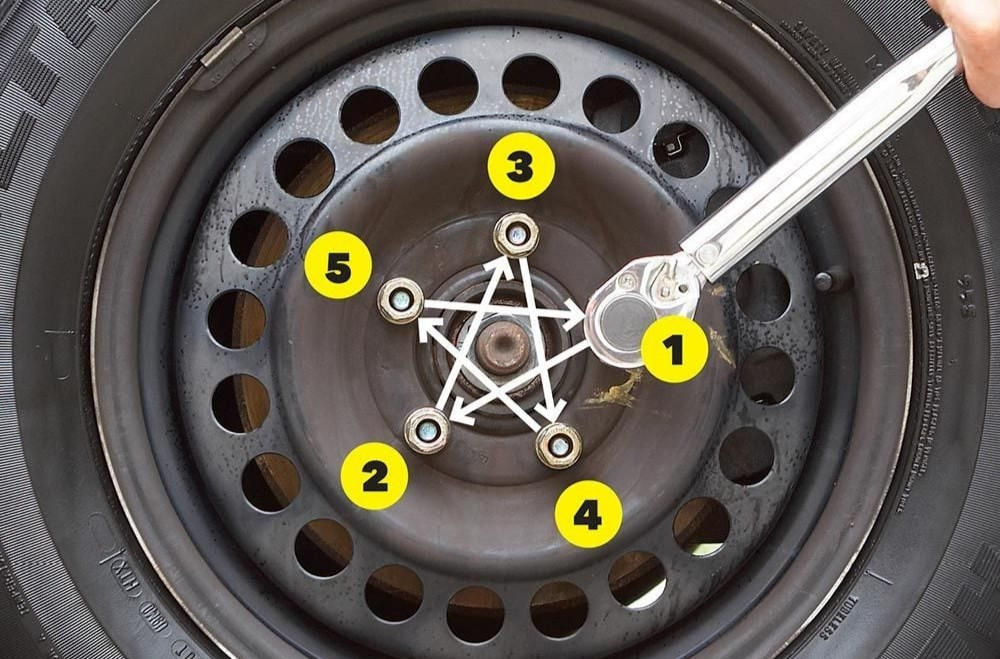
This pattern is usually a criss-cross or star pattern. This means that you should tighten the lug nuts or bolts opposite to each other, rather than going around the wheel in a circle. For example, if you have a four-lug wheel, you should tighten the lug nuts or bolts in this order: 1, 3, 2, 4. If you have a five-lug wheel, you should tighten them in this order: 1, 3, 5, 2, 4. If you have a six-lug wheel, you should tighten them in this order: 1, 4, 2, 5, 3, 6.
You can find the wheel tightening sequence for your car in the owner’s manual or online. You can also use the diagram below as a reference.
Why Is The Wheel Tightening Sequence Important?
The wheel tightening sequence is important for several reasons.
- First, it ensures that the wheel is seated evenly and firmly on the hub. This prevents the wheel from wobbling, vibrating, or making noises while you drive. It also prevents the lug nuts or bolts from loosening over time, which can cause the wheel to fall off.

- Second, it prevents the wheel from being damaged by excessive or uneven pressure. If you tighten the lug nuts or bolts in a circle, you may create a gap between the wheel and the hub on one side, and a bulge on the other side. This can cause the wheel to bend, crack, or break. It can also damage the lug nuts or bolts, the hub, or the brake components.
- Third, it protects you and others from injury or accident. If the wheel is not tightened properly, it can come off while you are driving, causing you to lose control of the car. This can result in a collision, injury, or death. It can also endanger other drivers, pedestrians, or animals on the road.

How To Follow The Wheel Tightening Sequence
To follow the wheel tightening sequence, you will need a lug wrench and a torque wrench. A lug wrench is a tool that you use to loosen or tighten the lug nuts or bolts. A torque wrench is a tool that you use to measure the amount of force that you apply to the lug nuts or bolts. The amount of force is called the torque, and it is measured in newton-meters (N⋅m) or foot-pounds (ft⋅lb).
You can find the recommended torque for your car in the owner’s manual or online. It depends on the type of car, wheel, and lug nut or bolt that you have. It is usually between 110 N⋅m and 120 N⋅m, or between 80 ft⋅lb and 90 ft⋅lb.

To follow the wheel tightening sequence, you should do the following steps:
- Step 1: Park your car on a flat and level surface. Put your car in first gear and apply the handbrake. Make sure the car is stable and secure.
- Step 2: Loosen the lug nuts or bolts slightly with the lug wrench. Do not remove them completely. You may need to use a jack to lift the car slightly to access the lug nuts or bolts.
- Step 3: Remove the wheel and replace it with a new or spare one. Align the holes on the wheel with the studs on the hub. Push the wheel onto the hub until it is flush with the hub.
- Step 4: Put the lug nuts or bolts back on the studs. Hand-tighten them with the lug wrench. Do not use too much force. Follow the wheel tightening sequence for your wheel type.
- Step 5: Set the torque wrench to the recommended torque for your car. Attach the torque wrench to the lug nuts or bolts. Tighten them one by one in the wheel tightening sequence. Turn the torque wrench clockwise until you hear or feel a click. This means that you have reached the desired torque. Do not over-tighten or under-tighten the lug nuts or bolts.
- Step 6: Lower the car to the ground and remove the jack. Check the lug nuts or bolts again with the torque wrench. Make sure they are all tight and secure. Follow the wheel tightening sequence for your wheel type.
- Step 7: Drive your car for about 50 to 100 kilometers (30 to 60 miles). Stop and check the lug nuts or bolts again with the torque wrench. Retighten them if necessary. Follow the wheel tightening sequence for your wheel type.
Conclusion
The wheel tightening sequence is the order in which you should tighten the lug nuts or bolts that hold the wheel to the hub. It is important to follow the wheel tightening sequence to prevent the wheel from wobbling, vibrating, or falling off. It also prevents the wheel from being damaged by excessive or uneven pressure. It also protects you and others from injury or accident.
To follow the wheel tightening sequence, you will need a lug wrench and a torque wrench. You should tighten the lug nuts or bolts in a criss-cross or star pattern, according to the type of wheel you have. You should also check and retighten the lug nuts or bolts after driving for a while.
By following the wheel tightening sequence, you can ensure that your wheels are safe and secure. You can also enjoy a smooth and comfortable ride.
Comments (0)
Please login to join the discussion
Be the first to comment on this article!
Share your thoughts and start the discussion