Every year, diesel vehicle owners collectively spend millions replacing DPFs that could have been saved through proper maintenance. A staggering 58% of premature DPF failures could be prevented with correct cleaning procedures.
The difference between doing it yourself and seeking professional help isn't just financial, it could determine whether your vehicle goes another 100,000 miles or leaves you stranded on the roadside.
You've noticed your diesel isn't running quite right. Maybe the orange warning light has appeared on your dashboard, or you're watching your fuel economy decrease while black smoke pours from your exhaust. The cause? A clogged Diesel Particulate Filter (DPF). Now you face a crucial decision: tackle the cleaning yourself or pay a professional to handle it.
Understanding How Diesel Particulate Filters Work
Before diving into cleaning methods, let's understand what we're dealing with.
A DPF is an exhaust aftertreatment device installed in diesel engines to trap particulate matter (soot and ash) from the exhaust gas. As exhaust gases pass through the filter's porous ceramic walls, tiny particles as small as one micron are captured while allowing cleaned gases to escape. This system reduces harmful emissions by up to 85%, making it a critical environmental component.
The filter functions by capturing soot particles in its honeycomb-like ceramic structure. Over time, these trapped particles accumulate, eventually requiring removal through a process called regeneration. During regeneration, the trapped soot is burned off at high temperatures (usually above 600°C), converting it to carbon dioxide or ash.

There are three main types of regeneration:
- Passive regeneration: Occurs naturally during normal driving when exhaust temperatures are high enough
- Active regeneration: Triggered by the vehicle's computer, which injects additional fuel to raise exhaust temperatures
- Forced/manual regeneration: Initiated using diagnostic equipment when the first two methods fail
While regeneration handles soot buildup, ash accumulation (primarily from engine oil) cannot be burned away and eventually requires physical cleaning of the filter.
Signs Your DPF Needs Cleaning
Recognizing the early signs of DPF issues can save you from costly repairs. Watch for these warning signals:
- DPF warning light (usually orange) illuminated on your dashboard
- Reduced engine power or performance
- Engine unable to rev to high RPMs
- Starting difficulties
- Black smoke from the exhaust during acceleration
- Strong diesel odor in the cabin
- Decreased fuel economy
- Start-stop function malfunctioning
These symptoms indicate your filter has reached approximately 45% blockage. Don't ignore them—addressing the issue early can prevent complete blockage and potential damage to your engine.
DIY DPF Cleaning Methods and Costs
For the mechanically inclined or budget-conscious, several DIY approaches exist. Each method varies in complexity, cost, and effectiveness.
Method 1: Regeneration Through Driving
The simplest and least expensive approach is forcing regeneration through specific driving patterns.
- How to do it: Drive at a steady speed of 50+ mph in a lower gear (typically 4th) for 15-20 minutes to raise exhaust temperatures. This sustained high-temperature driving can trigger passive regeneration.
- Cost: Free (except for fuel)
- Effectiveness: 40-60% for light soot buildup, ineffective for ash accumulation
- Time required: 15-30 minutes
Method 2: Fuel Additives
Fuel additives can lower the temperature needed for soot combustion.
- How to do it: Add a DPF-specific cleaner to your fuel tank according to manufacturer instructions, then drive at highway speeds to activate regeneration.
- Cost: $20-$50 per treatment
- Effectiveness: 30-70% depending on blockage severity and product quality
- Time required: 1-2 hours of driving after application
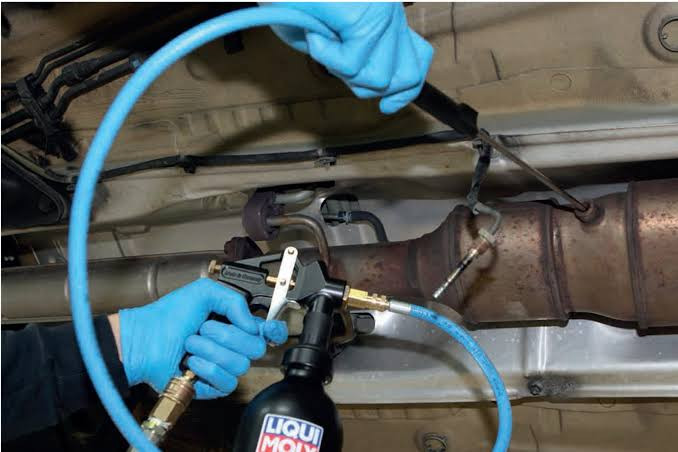
Method 3: Chemical Cleaning (On-Vehicle)
Chemical cleaners applied directly to the DPF can break down accumulated soot without filter removal.
- How to do it: Locate the DPF pressure sensor or temperature sensor access point. Using an applicator wand, spray the cleaner directly into the DPF and let it soak as directed before driving to burn off residue. You can see our DPF cleaners here
- Cost: $50-$150 for cleaning kit
- Effectiveness: 50-75% for moderate buildup
- Time required: 1-3 hours including application and driving
Method 4: Removal and Manual Cleaning
For more thorough cleaning, removing the DPF allows direct access for compressed air and water cleaning.
How to do it:
- Remove the DPF from the vehicle (requires mechanical knowledge)
- Use compressed air to blow out loose particles in the opposite direction of normal flow
- Rinse with water using moderate pressure until water runs clear
- Apply chemical cleaners if necessary
- Allow to dry completely before reinstallation
- Cost: $100-$200 (tools and chemicals)
- Effectiveness: 60-85% when done correctly
- Time required: 4-8 hours
- Risk level: High, improper handling can damage the filter
It's worth noting that DIY methods carry significant risks. According to REP Direct, high-pressure washing can permanently damage the filter substrate or wash away essential catalyst coatings. Improper removal can also damage sensors, mounting hardware, or the filter itself.
Professional DPF Cleaning Methods and Costs
Professional cleaning services utilize specialized equipment designed specifically for thorough DPF restoration.
Method 1: On-Vehicle Cleaning (Regeneration)
- Process: Technicians use diagnostic equipment to run a controlled regeneration cycle, burning off accumulated soot.
- Cost: $100-$300
- Effectiveness: 70-85% for soot removal, minimal impact on ash
- When to use: For regular maintenance when warning lights first appear
Method 2: Thermal Cleaning ("Bake and Blow")
- Process: The removed DPF is placed in a specialized oven at temperatures of 500-600°C to incinerate soot deposits. After heating, compressed air pulses remove residual ash.
- Cost: $300-$700
- Effectiveness: 85-95%
- When to use: For moderate to severe blockage with substantial ash buildup
Method 3: Aqueous Cleaning
- Process: Uses specialized cleaning solutions combined with water to dissolve and flush out contaminants, followed by drying and inspection.
- Cost: $250-$600
- Effectiveness: 80-95%
- When to use: For filters that may be sensitive to extreme heat
Method 4: Ultrasonic Cleaning
- Process: The DPF is submerged in a cleaning solution while ultrasonic waves create microscopic bubbles that implode against the filter surface, dislodging contaminants.
- Cost: $300-$700
- Effectiveness: 90-98%
- When to use: For high-value filters requiring maximum restoration
Professional services typically include comprehensive inspection and testing before and after cleaning, with documentation of filter condition and performance. According to DPF Filter, professional services typically guarantee their work, with success rates approaching 95% restoration of original capacity.
DIY vs. Professional: A Cost-Benefit Analysis
When deciding between DIY and professional approaches, consider these factors:
Initial Cost Comparison
- DIY methods: $0-$200
- Professional cleaning: $100-$700
- Full replacement: $1,000-$4,000+ (plus labor)
Long-Term Value Analysis
DIY Scenario:
A typical DIY chemical cleaning costs about $100 in materials. If performed correctly, it might restore 60-70% of filter functionality. However, due to incomplete cleaning (especially of ash deposits), you might need to repeat the process 2-3 times annually, with an expected filter lifespan of 100,000-150,000 miles.
Professional Scenario:
Professional cleaning at $400 might restore 90-95% of filter functionality. With proper maintenance, you'd likely need cleaning only once annually, with an expected filter lifespan of 200,000 - 250,000 miles.
Five-Year Cost Projection (150,000 miles):
- DIY approach: $1,200-$1,800 (plus potential replacement if damaged)
- Professional approach: $1,600-$2,000
- Replacement without cleaning: $3,000-$5,000
Risk Assessment
According to multiple sources including DPF Discounter, DIY cleaning carries significant risks:
- Filter damage: Improper pressure washing can destroy the ceramic substrate
- Catalyst removal: Harsh chemicals can strip away valuable catalyst coatings
- Sensor damage: Improper removal can damage delicate sensors
- Incomplete cleaning: DIY methods often leave behind ash deposits
- Void warranty: Some manufacturers void warranties if DIY cleaning is attempted
When to Clean vs. When to Replace
Not every DPF situation calls for the same solution. Here's guidance on making the right choice:
Choose Cleaning When:
- The DPF warning light has just appeared
- Vehicle performance is only slightly affected
- The filter has less than 120,000 miles
- No physical damage to the filter is visible
- The vehicle responds well to regeneration attempts
Consider Replacement When:
- Multiple cleaning attempts have failed
- The filter has visible cracks or melting
- The filter has exceeded 200,000 miles
- Backpressure readings remain high after cleaning
- Post-cleaning inspection shows structural damage
According to ECU Repairs, replacement becomes necessary when the DPF is heavily damaged, cracked, or has reached the end of its service life. Most manufacturers design DPFs to last around 100,000-120,000 miles before requiring serious cleaning, with complete replacement recommended at 200,000-250,000 miles under normal conditions.
Best Practices for DPF Maintenance
Preventative care can significantly extend your DPF's lifespan and reduce cleaning frequency.
Driving Habits
- Take regular highway drives (20+ minutes at 50+ mph) weekly
- Avoid excessive idling and short trips
- Complete active regeneration cycles without interruption
- Maintain steady speeds during regeneration
Maintenance Schedule
- Follow manufacturer-recommended oil change intervals using low-ash oil
- Have the DPF inspected at every major service
- Consider professional cleaning every 75,000-100,000 miles
- Monitor soot load levels via diagnostic tools if available
Fuel and Additives
- Use high-quality diesel fuel from reputable sources
- Consider periodic use of DPF-specific fuel additives
- Avoid biodiesel blends higher than manufacturer recommendations
- Address any fuel system issues promptly
Common Mistakes to Avoid
- Ignoring warning lights
- Interrupting active regeneration cycles
- Using incorrect engine oil (non-low-ash formulations)
- Delaying necessary maintenance
- Attempting high-pressure washing of DPF filters
When it comes to DPF maintenance, there's no one-size-fits-all solution. Your decision should be based on your vehicle's condition, your mechanical skills, budget constraints, and long-term ownership plans.
For those with moderate mechanical ability and budget concerns, a combined approach often works best: use driving techniques and fuel additives for regular maintenance, then seek professional cleaning when more thorough restoration is needed.
For fleet operators or high-mileage drivers, establishing a relationship with a professional DPF cleaning service and adhering to scheduled maintenance intervals typically provides the lowest total cost of ownership over time.
Whatever approach you choose, addressing DPF issues promptly is essential. Early intervention can mean the difference between a $200 cleaning and a $3,000 replacement. With proper maintenance and timely cleaning, your diesel particulate filter can remain effective throughout your vehicle's lifetime, keeping both your engine and the environment cleaner.
Remember: The most expensive DPF is the one you have to replace prematurely. Investing in proper maintenance now pays dividends in both performance and longevity.
Comments (0)
Please login to join the discussion
Be the first to comment on this article!
Share your thoughts and start the discussion