Interactive Explorer
Engine Cranking But Not Starting Diagnosis Guide
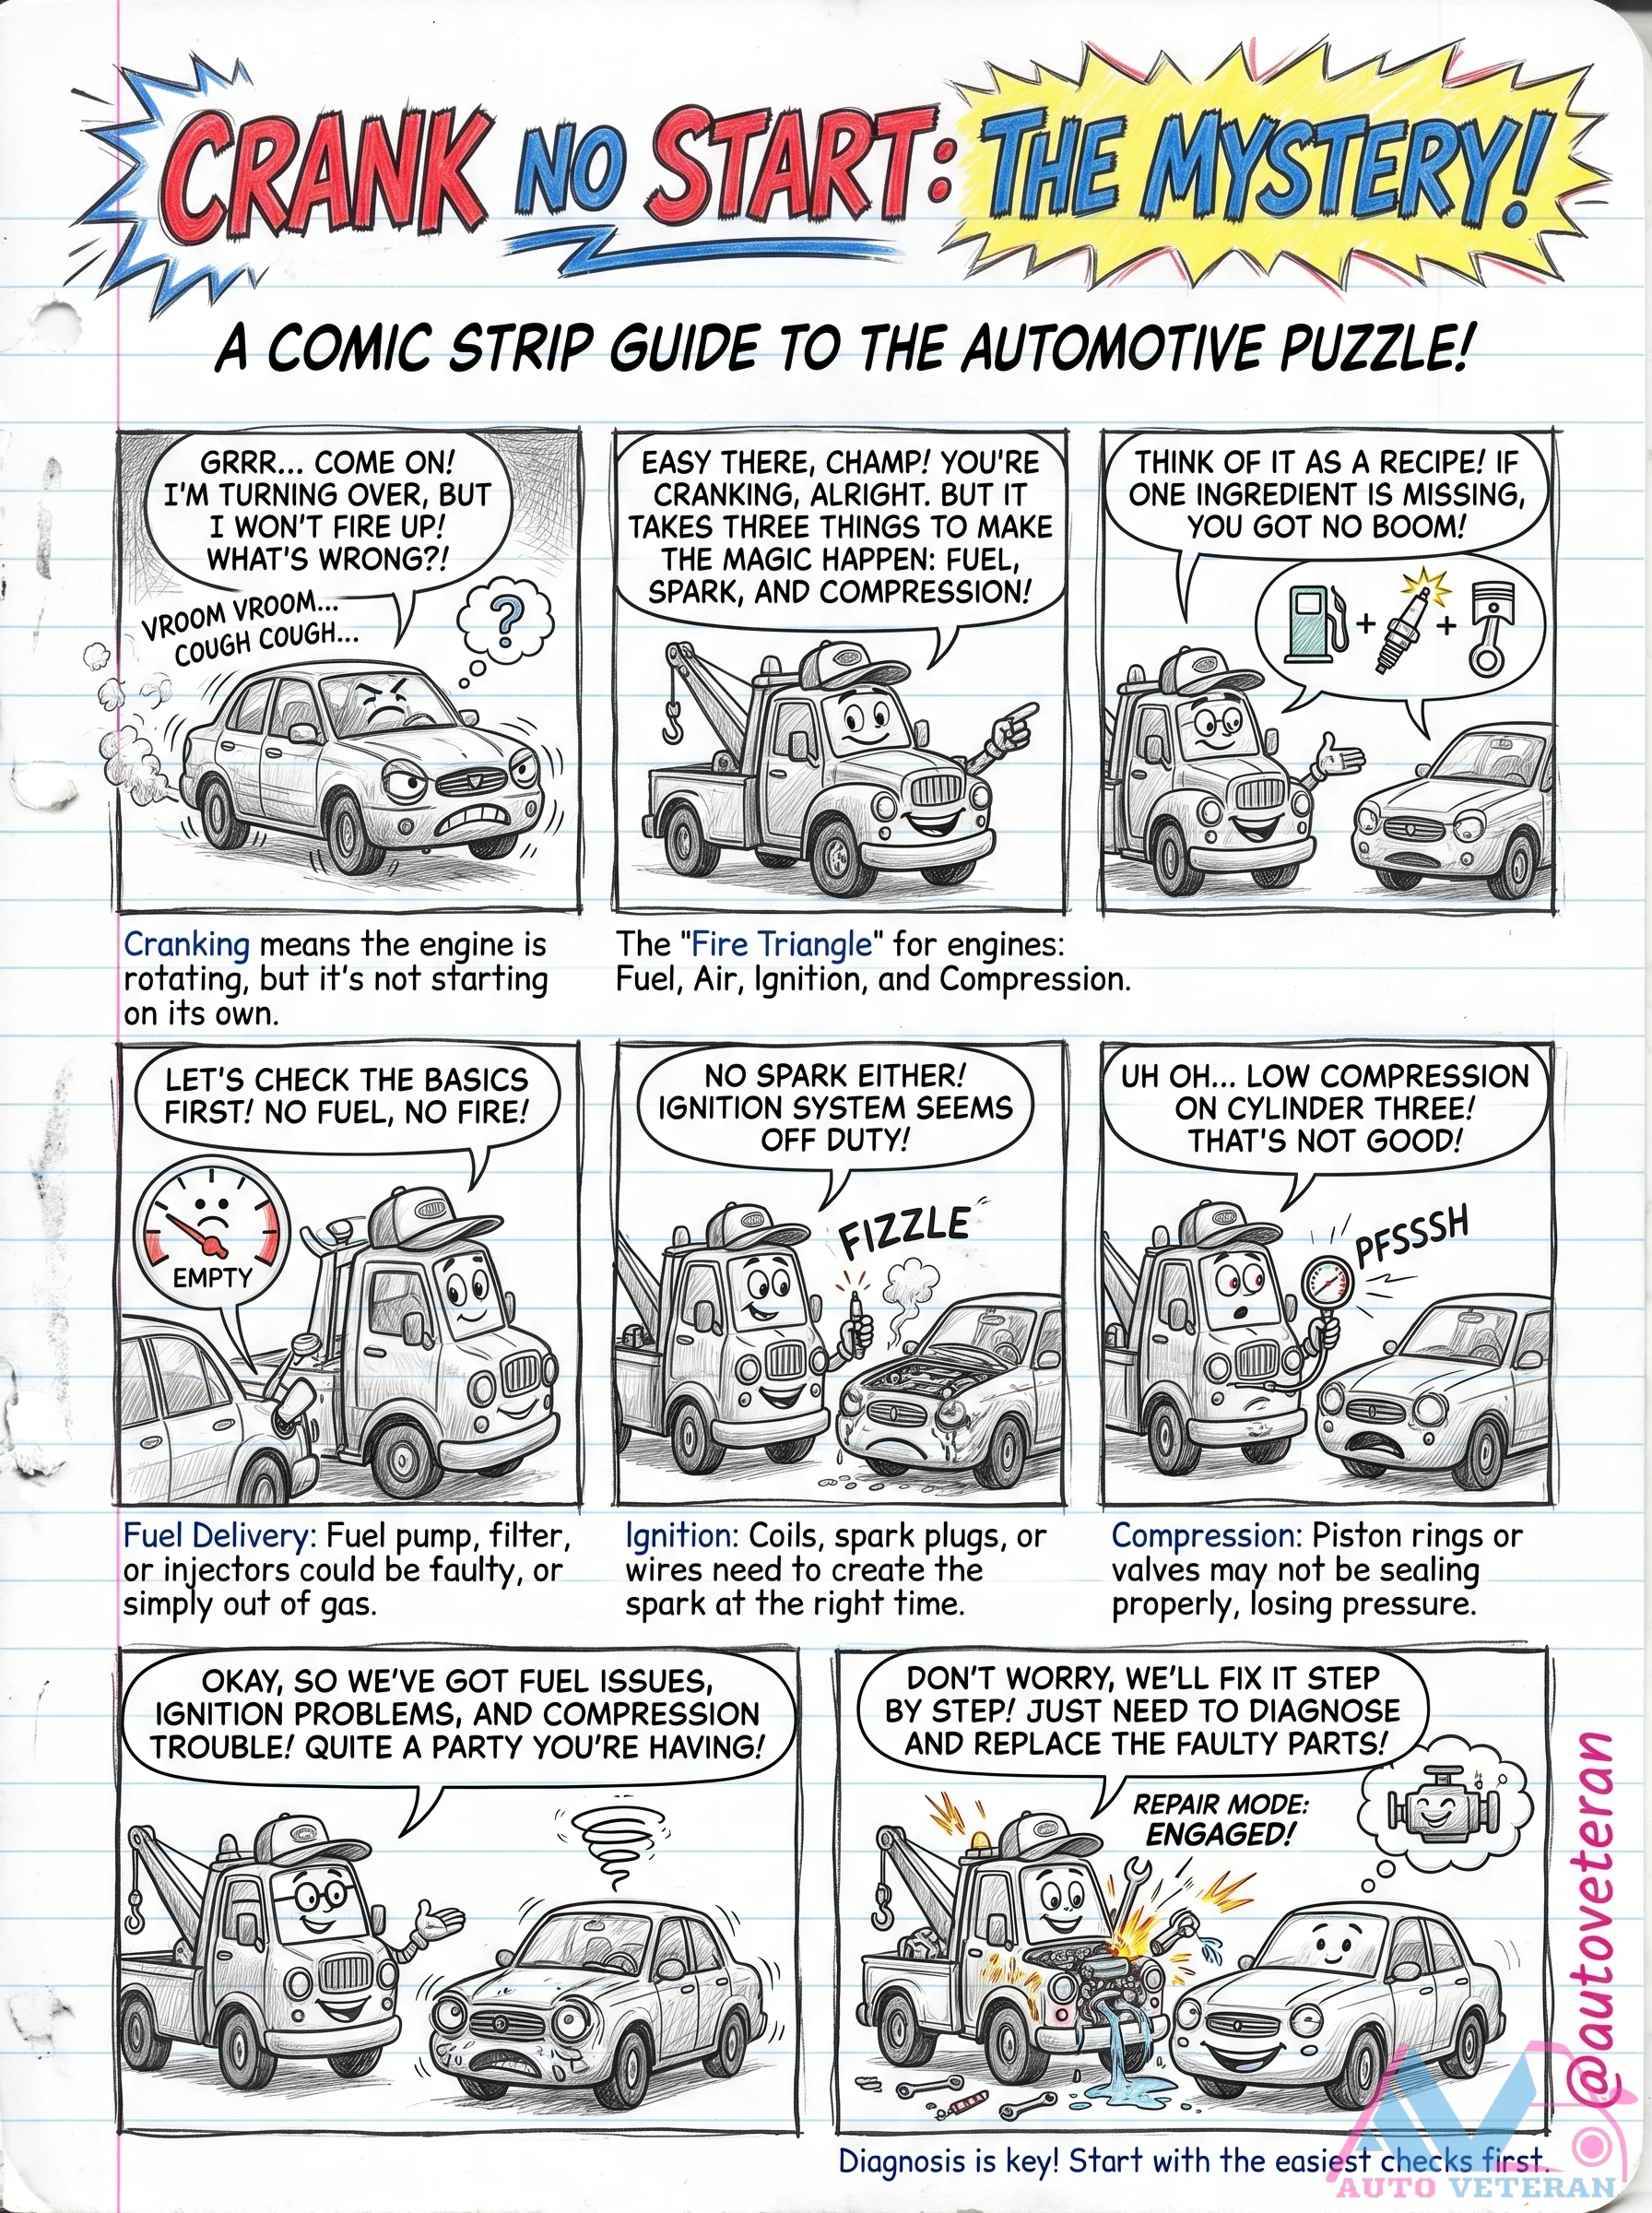
When your engine cranks normally but refuses to start, you're facing the classic automotive puzzle of the fire triangle: fuel, spark, and compression. This guide walks you through systematic diagnosis, starting with checking for fuel delivery issues like empty tanks or faulty pumps, then verifying ignition system components such as coils and spark plugs, and finally testing compression problems that might indicate piston ring or valve sealing failures. Each step builds on the basics to help you identify whether you have fuel issues, ignition problems, or compression trouble, leading you to replace faulty parts and get back on the road.
Engine Cranks But Won't Start Diagnostic Flowchart
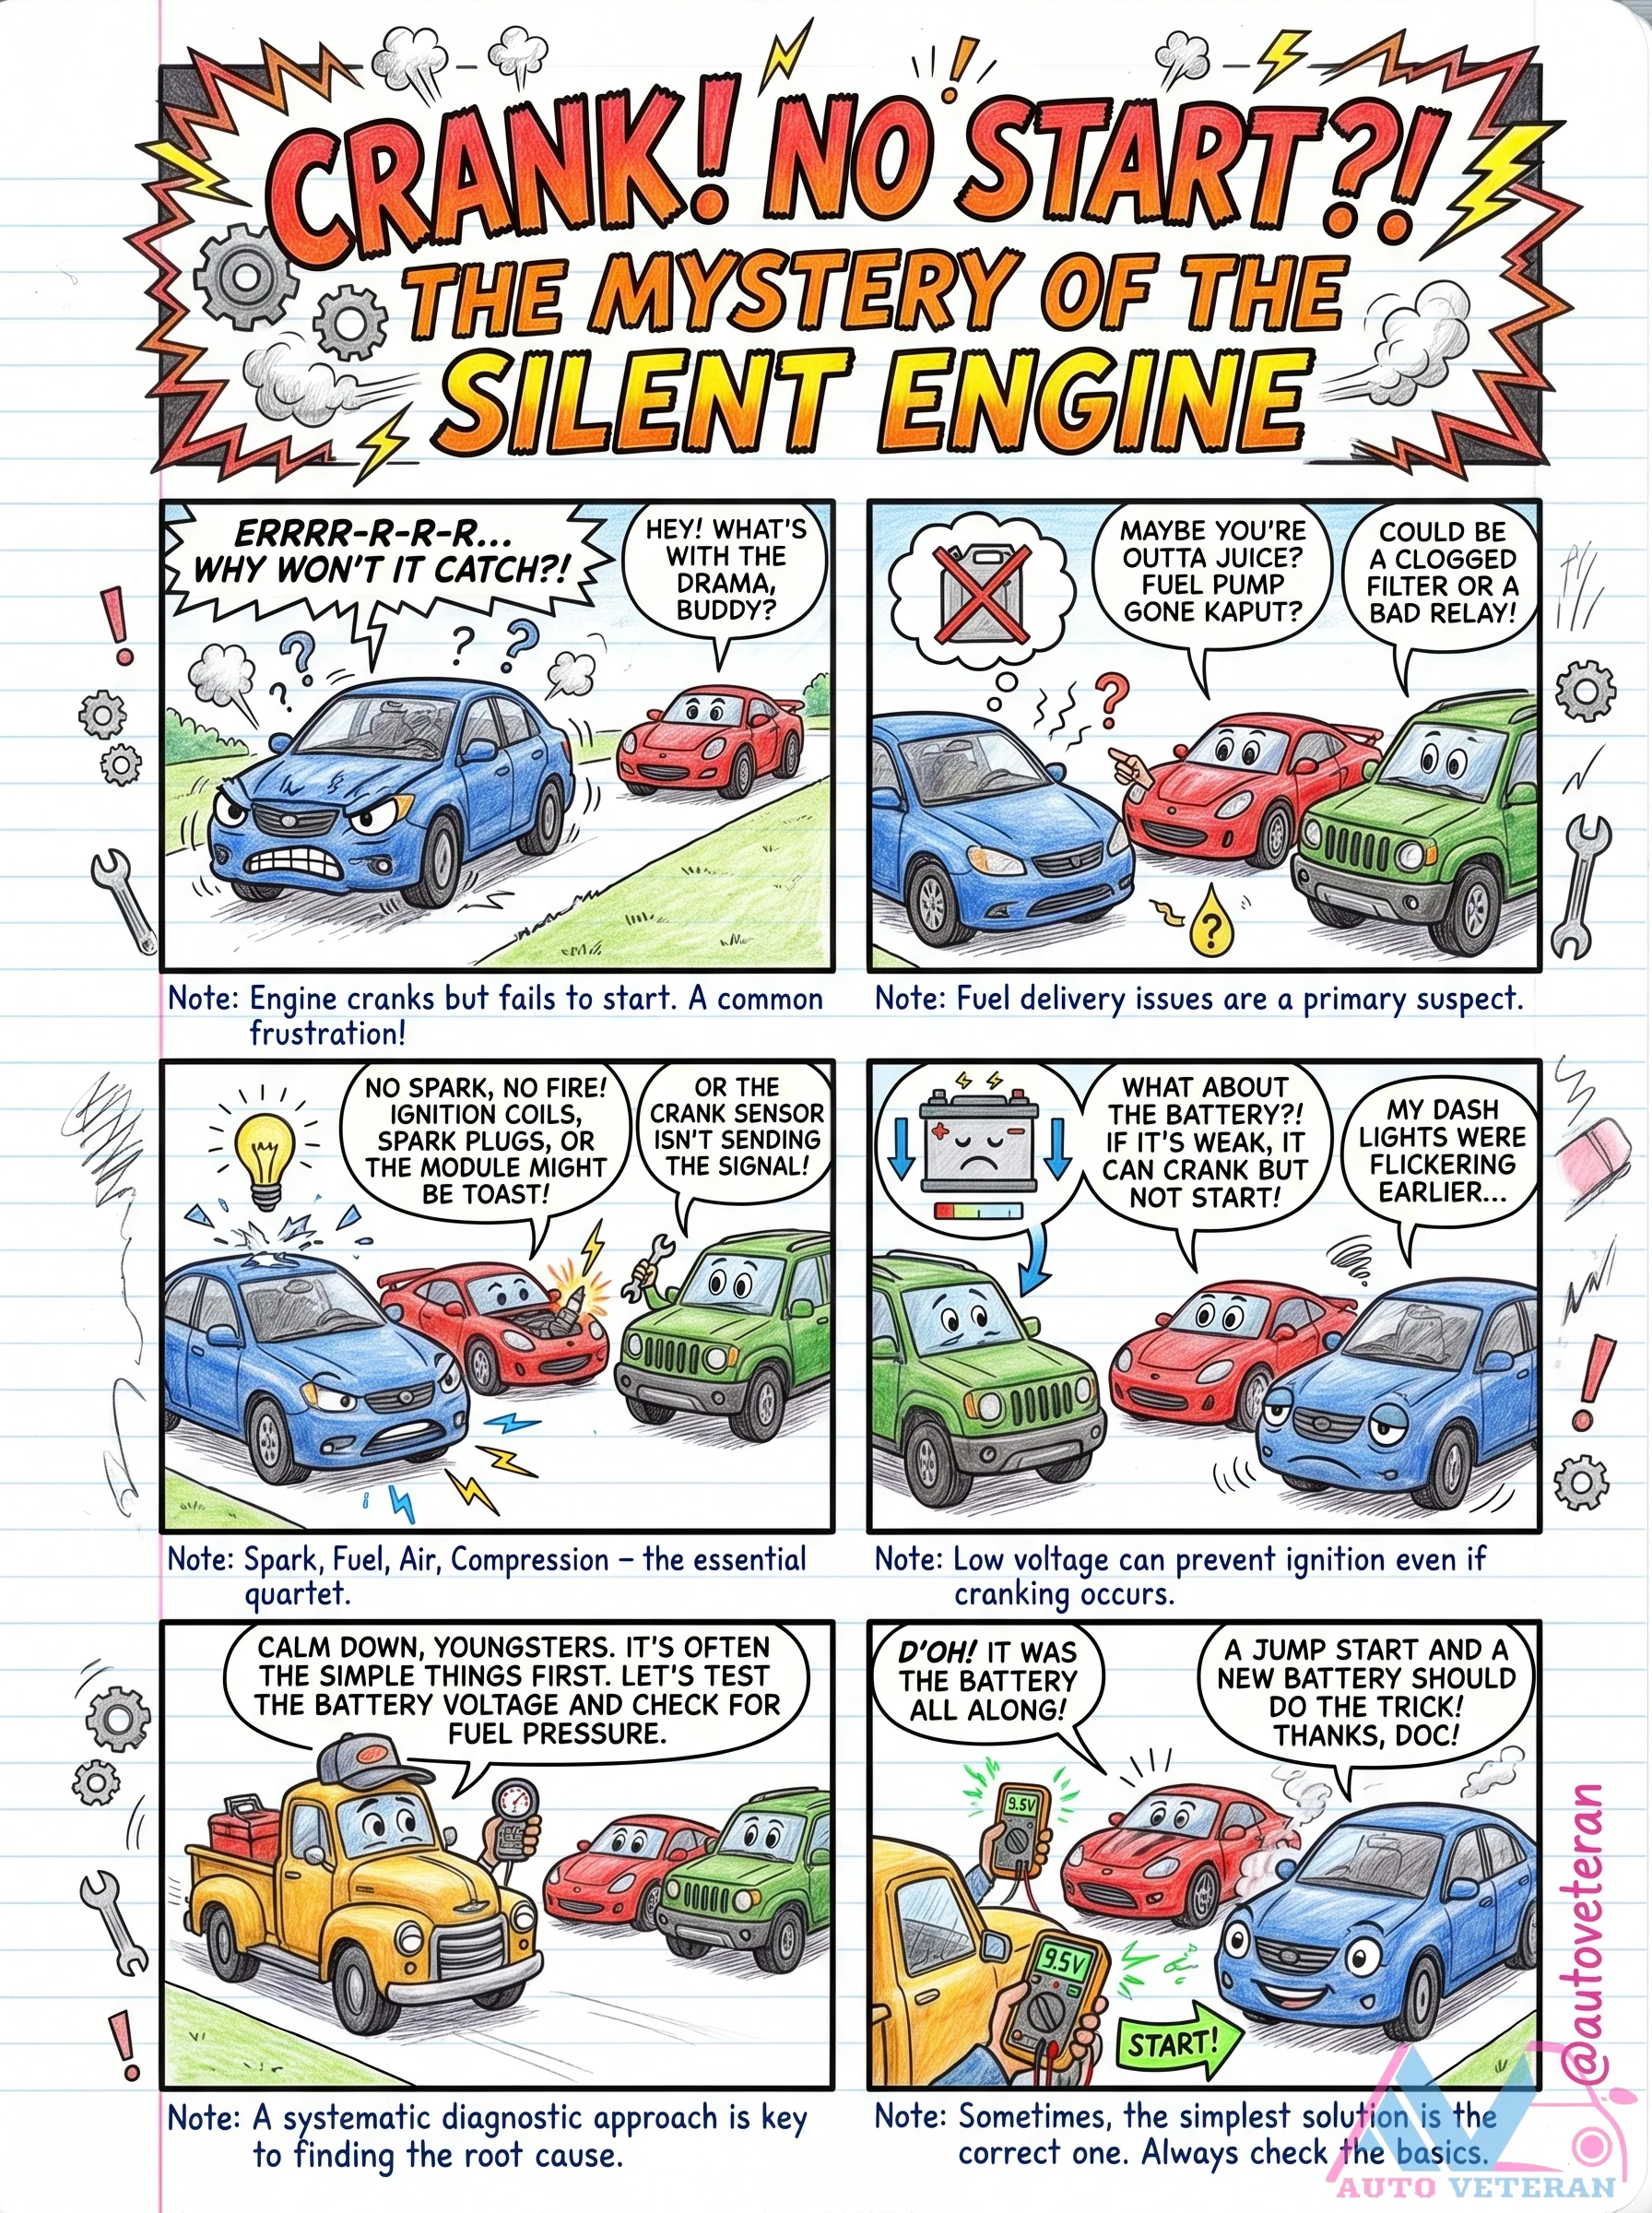
When your engine turns over but refuses to fire up, this systematic diagnostic flowchart guides you through the essential quartet of spark, fuel, air, and compression. It emphasizes checking the basics first, like battery voltage and fuel pressure, before investigating more complex issues such as clogged fuel filters, bad relays, or faulty ignition components. The approach helps solve the mystery of the silent engine by methodically eliminating potential causes, from simple battery problems to more involved electrical or fuel delivery failures.
Engine Cranks No Start Diagnostic Gauntlet
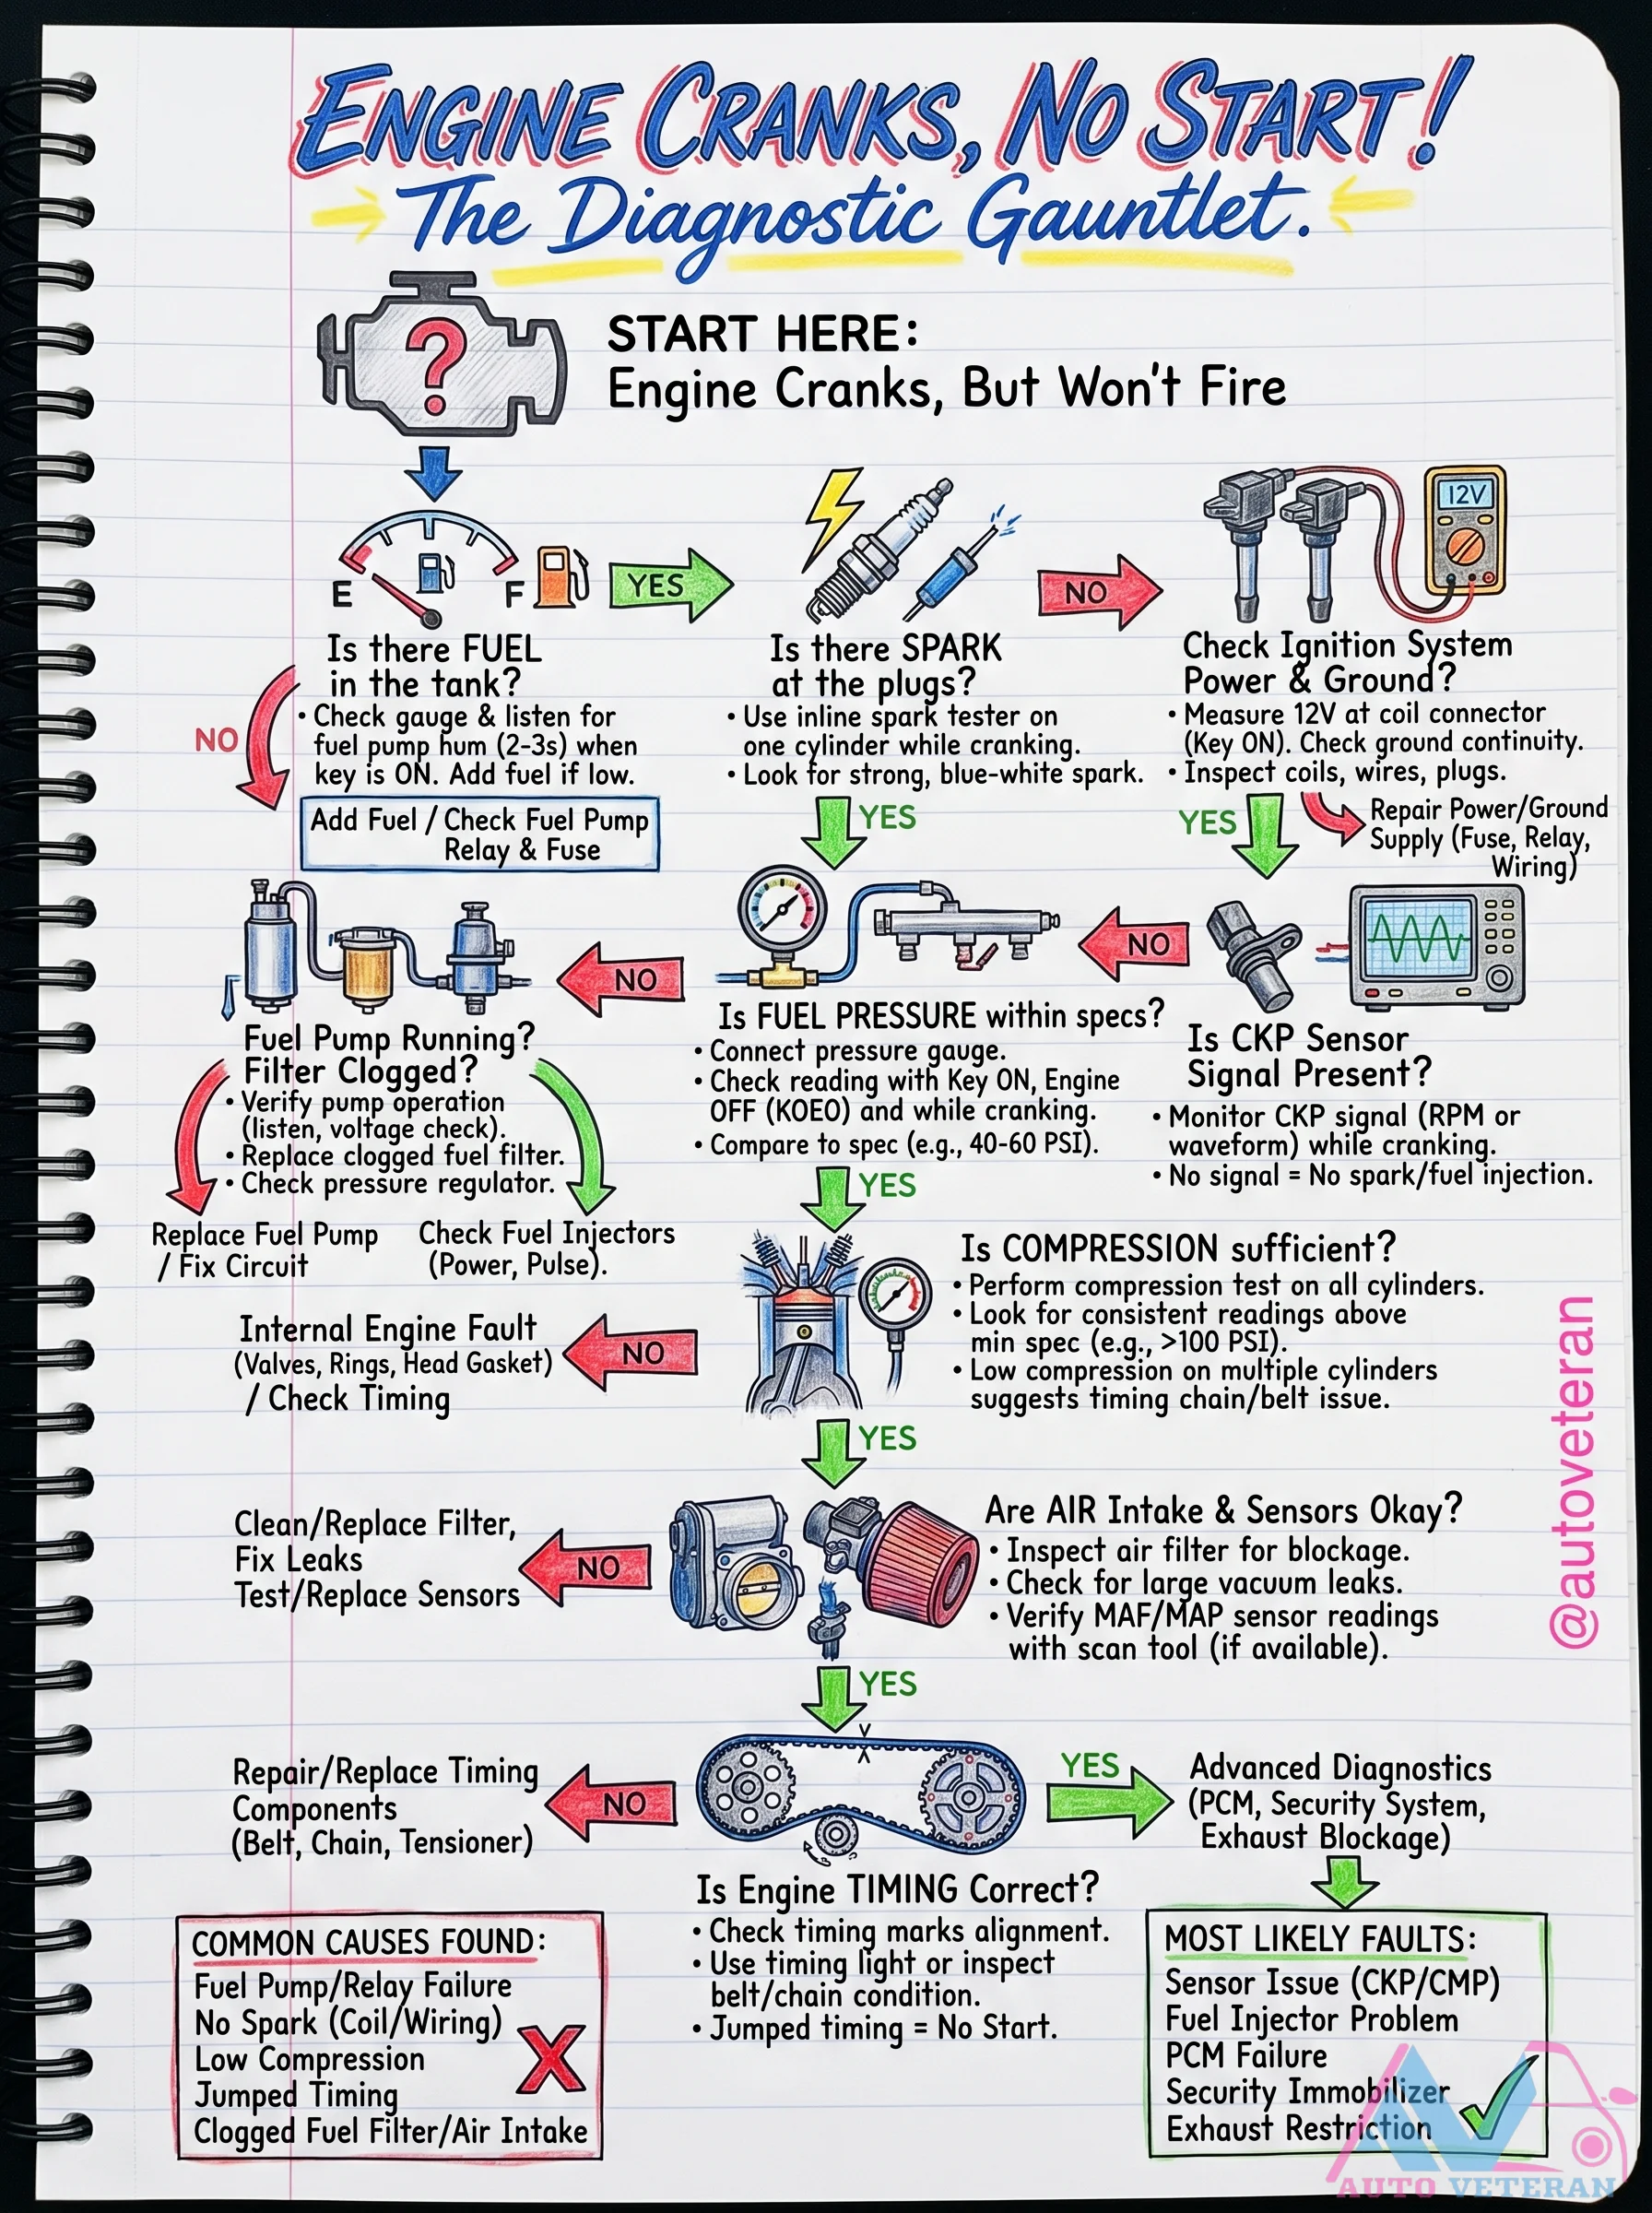
This diagnostic flow chart guides you through the systematic troubleshooting path when your engine cranks but refuses to start. Starting from verifying fuel and spark, it branches into checking fuel pump operation, fuel pressure, CKP sensor signal, compression, air intake and vacuum leaks, and finally engine timing and advanced PCM or security system issues. Common faults include fuel pump relay failure, bad CKP/CMP sensors, no spark from coil or wiring issues, jumped timing belt or chain, low compression from valve problems or head gasket failure, and clogged fuel injectors or air filters. Each step provides a clear yes/no path to isolate the root cause efficiently.
Engine Cranks No Start Overnight
You turn the key, the starter spins strongly, but your engine refuses to fire up after sitting all night. This classic symptom often points to a loss of fuel pressure, a failing coolant temperature sensor, or a vacuum leak that only appears when cold. Check for a slow leak in the fuel system, a bad check valve in the fuel pump, or a stuck injector. Also, a temperature sensor sending a false cold signal can flood the engine.
Engine Fluids Mixing Dangers and Symptoms
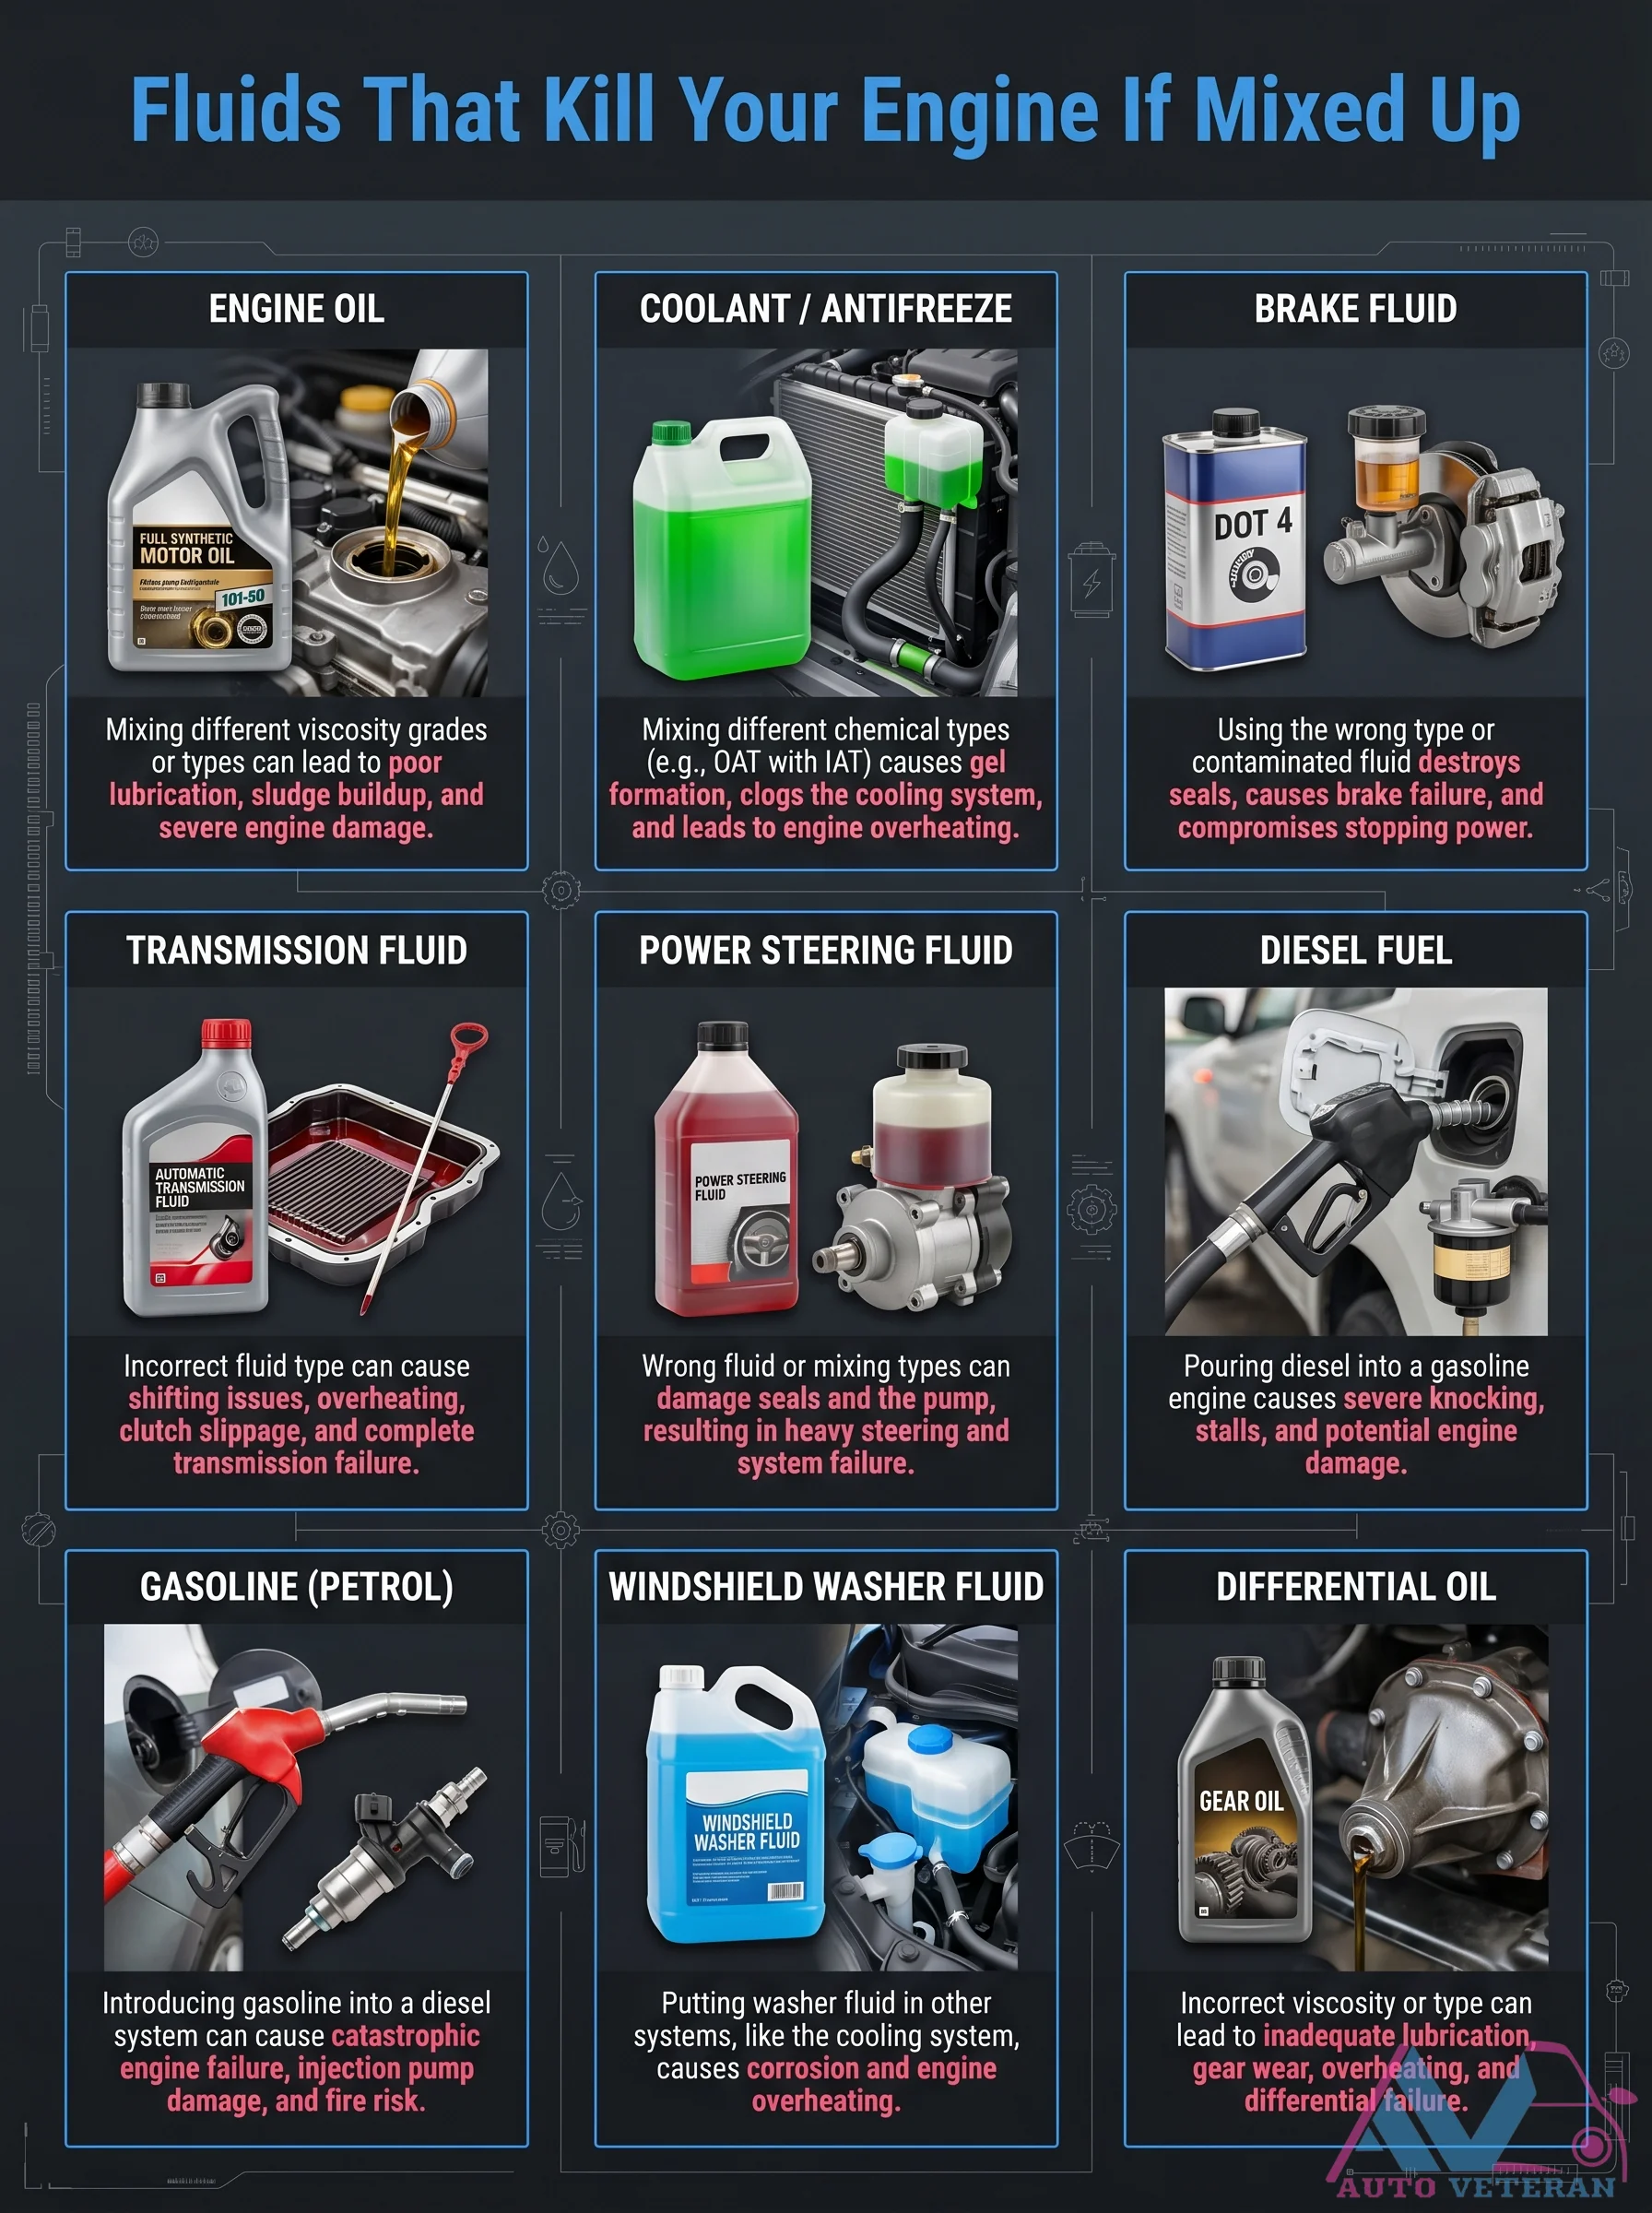
Mixing incompatible automotive fluids can lead to catastrophic engine and system failures. Using the wrong engine oil viscosity causes poor lubrication and sludge buildup, while mixing coolant types like OAT with IAT creates gel formation that clogs cooling systems. Contaminated brake fluid destroys seals and compromises stopping power, and incorrect transmission fluid leads to shifting issues and overheating. Pouring diesel into gasoline engines causes severe knocking and stalls, while gasoline in diesel systems risks fire and injection pump damage. Using washer fluid in cooling systems promotes corrosion, and wrong differential or gear oil viscosity results in inadequate lubrication, gear wear, and overheating.
Engine Lubrication Cycle Flow Diagram
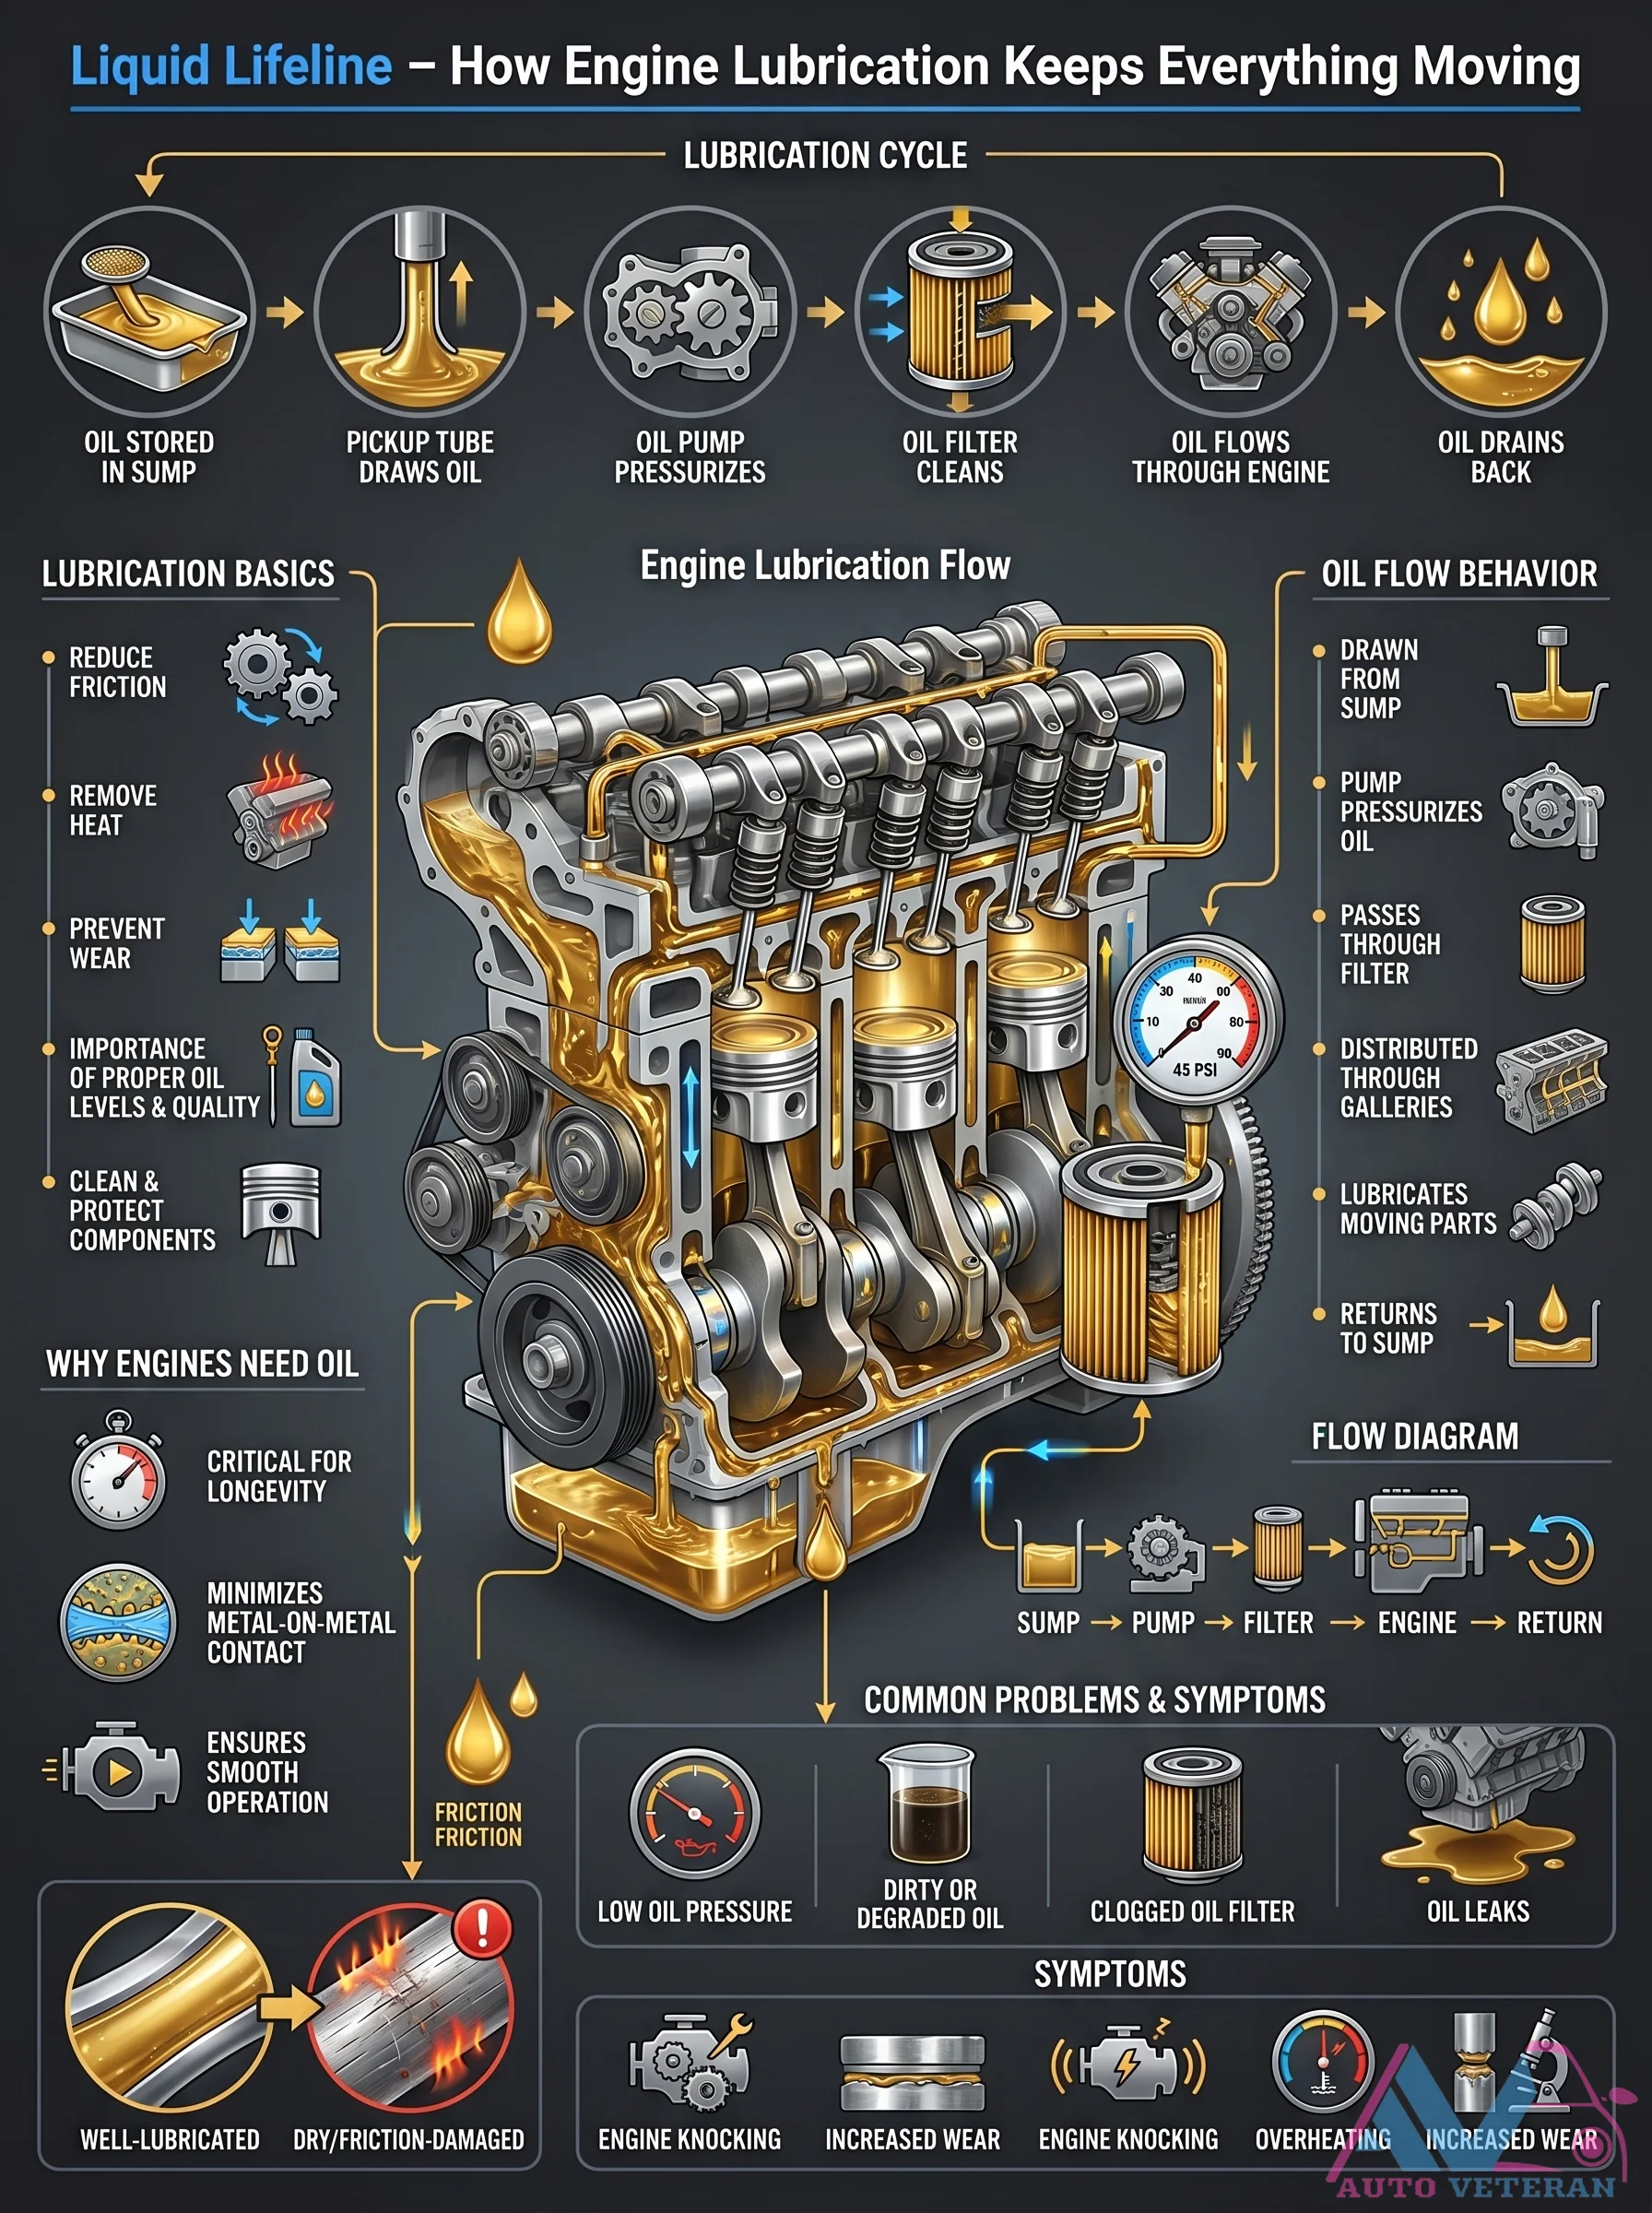
This diagram illustrates the complete engine lubrication cycle from oil stored in the sump drawn up through the pickup tube pressurized by the oil pump passed through the oil filter then distributed through oil galleries to lubricate and protect moving parts before returning to the sump. It highlights how proper oil levels quality and clean oil minimize friction remove heat prevent wear and ensure smooth operation while common issues like dirty or degraded oil clogged filters and leaks lead to symptoms such as engine knocking overheating and increased wear.
Engine Lubrication System Failures and Flow Diagram
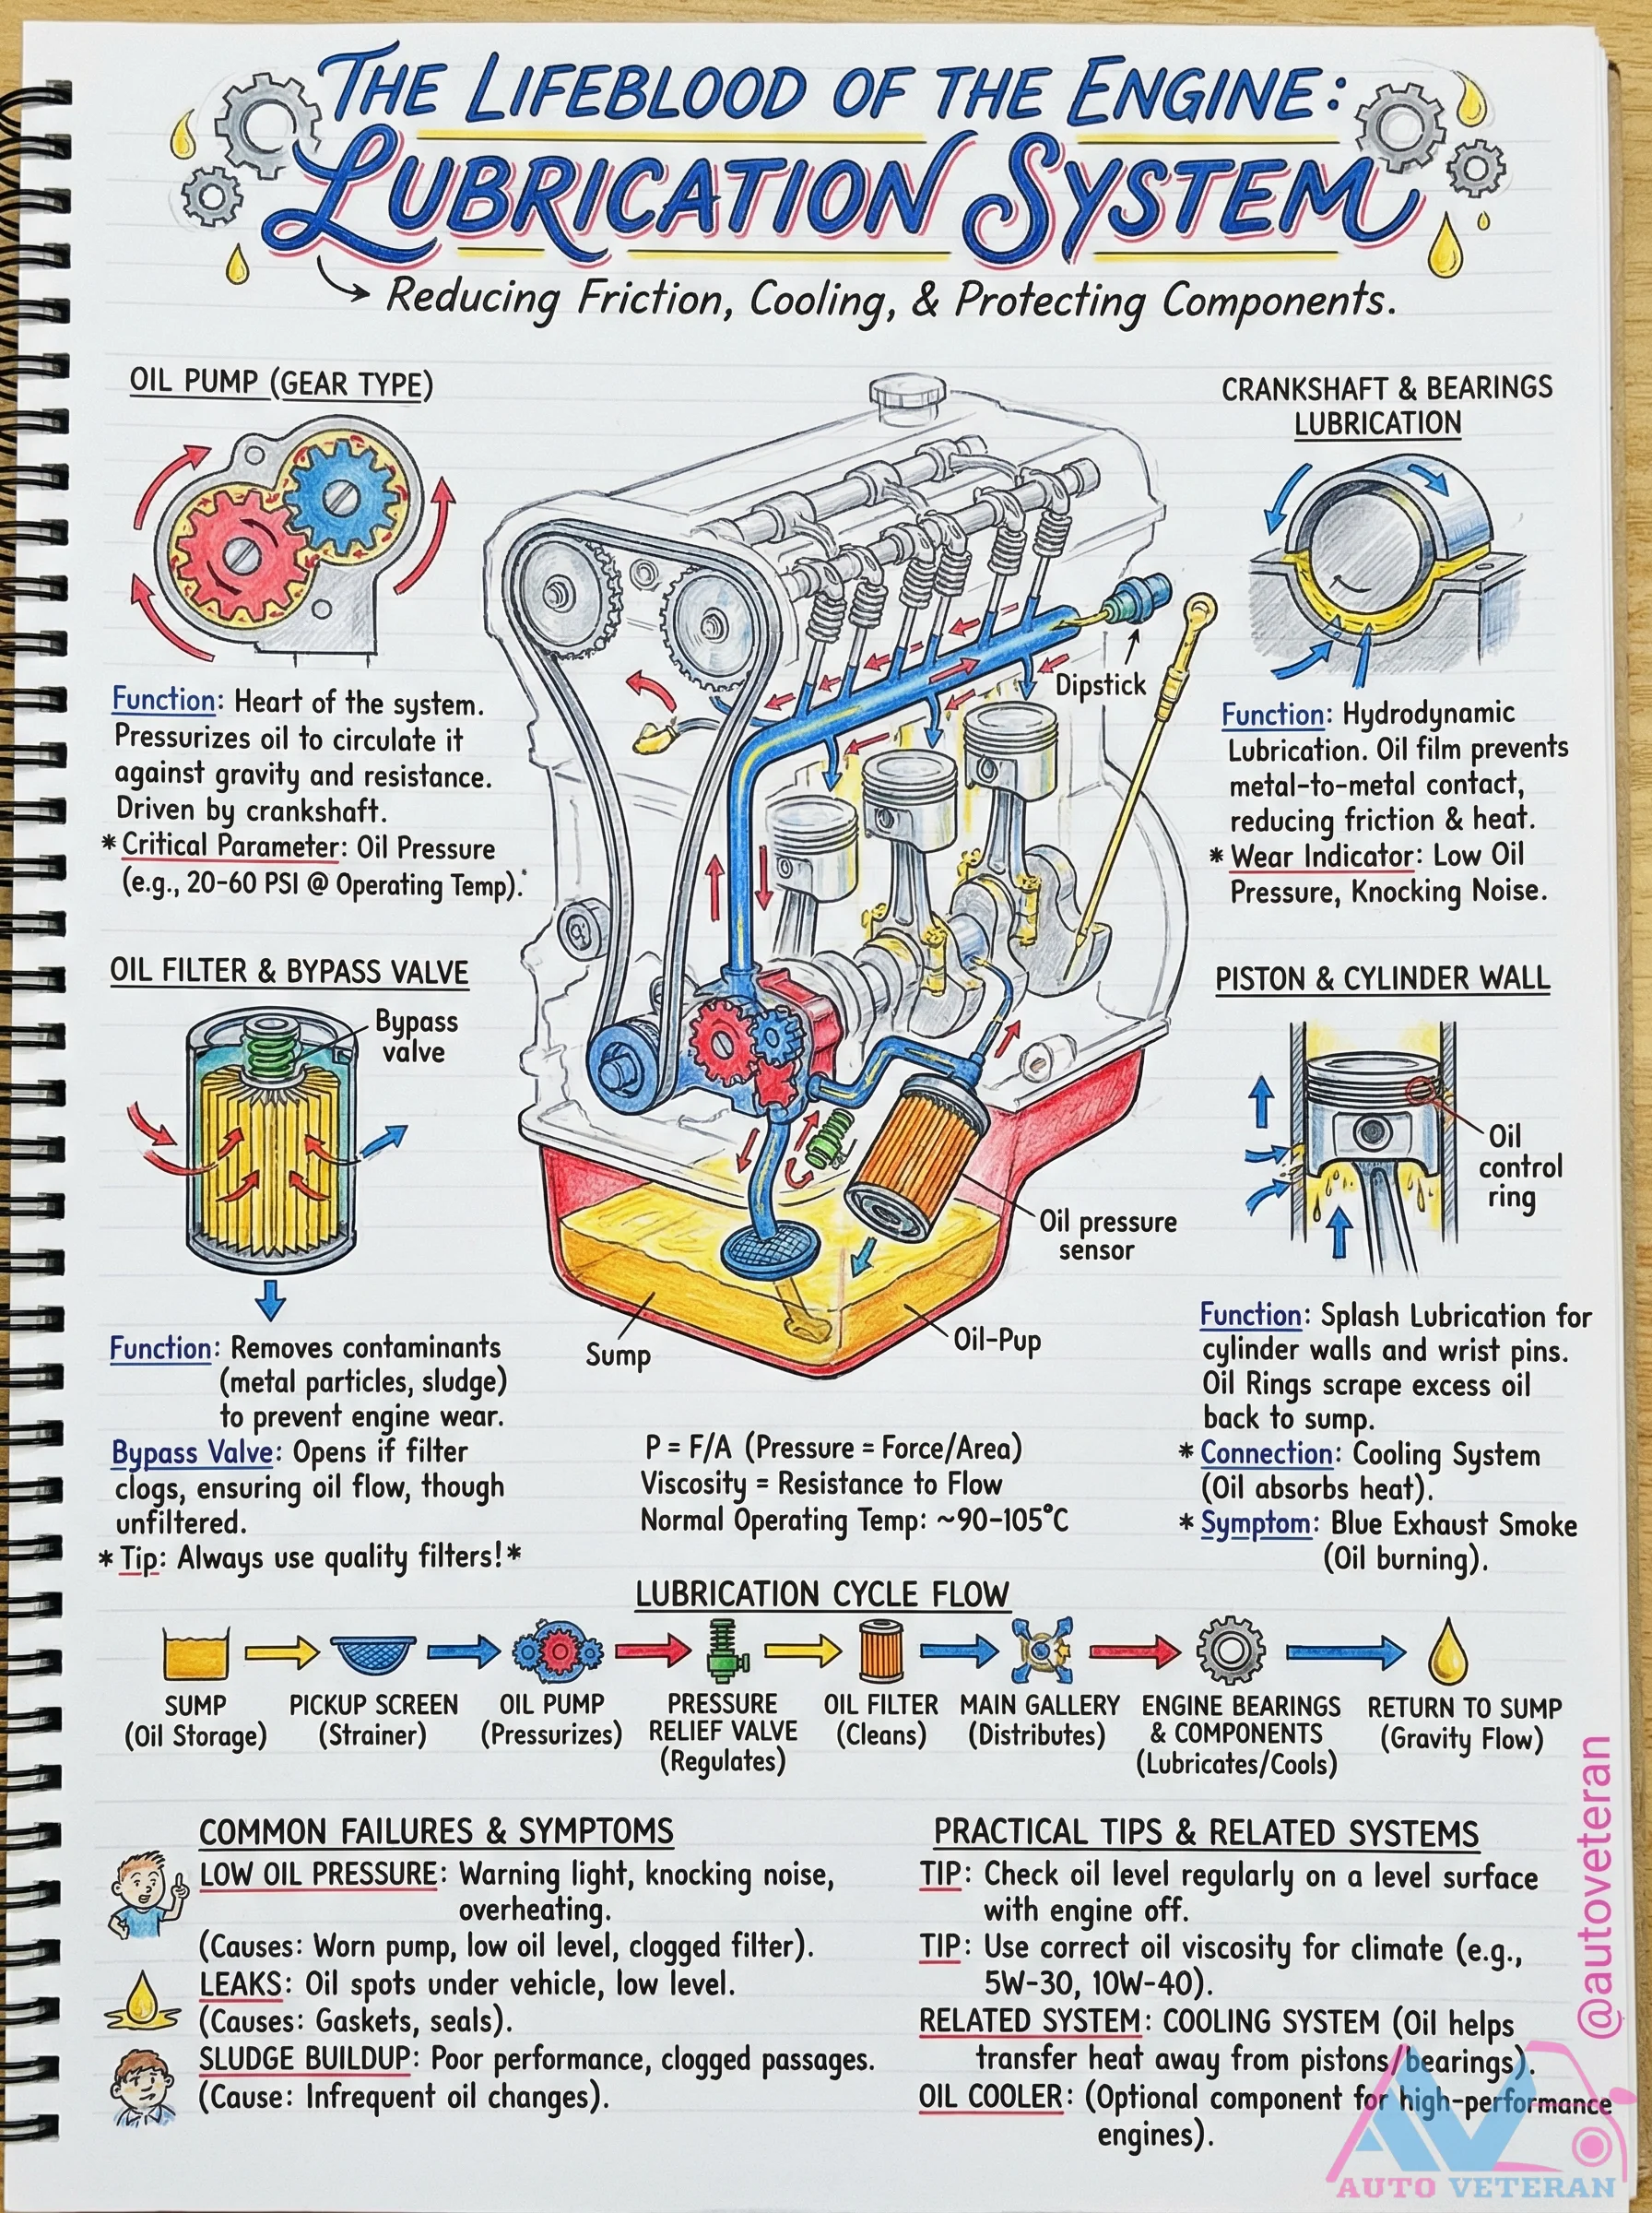
The lubrication system is the lifeblood of your engine, with the gear type oil pump pressurizing oil to 20-60 PSI at operating temperature for hydrodynamic lubrication. Critical components include the crankshaft and bearings, piston and cylinder walls with splash lubrication, and the oil filter with its bypass valve. Common failures manifest as low oil pressure with knocking noises, oil leaks under the vehicle, and sludge buildup from infrequent changes, while symptoms like blue exhaust smoke indicate oil burning. Practical tips emphasize checking oil levels on level surfaces and using correct viscosity oils such as 5W-30 or 10W-40 for climate conditions, with the cooling system working alongside to transfer heat away from pistons.
Engine Lubrication System Steps and Failure Symptoms
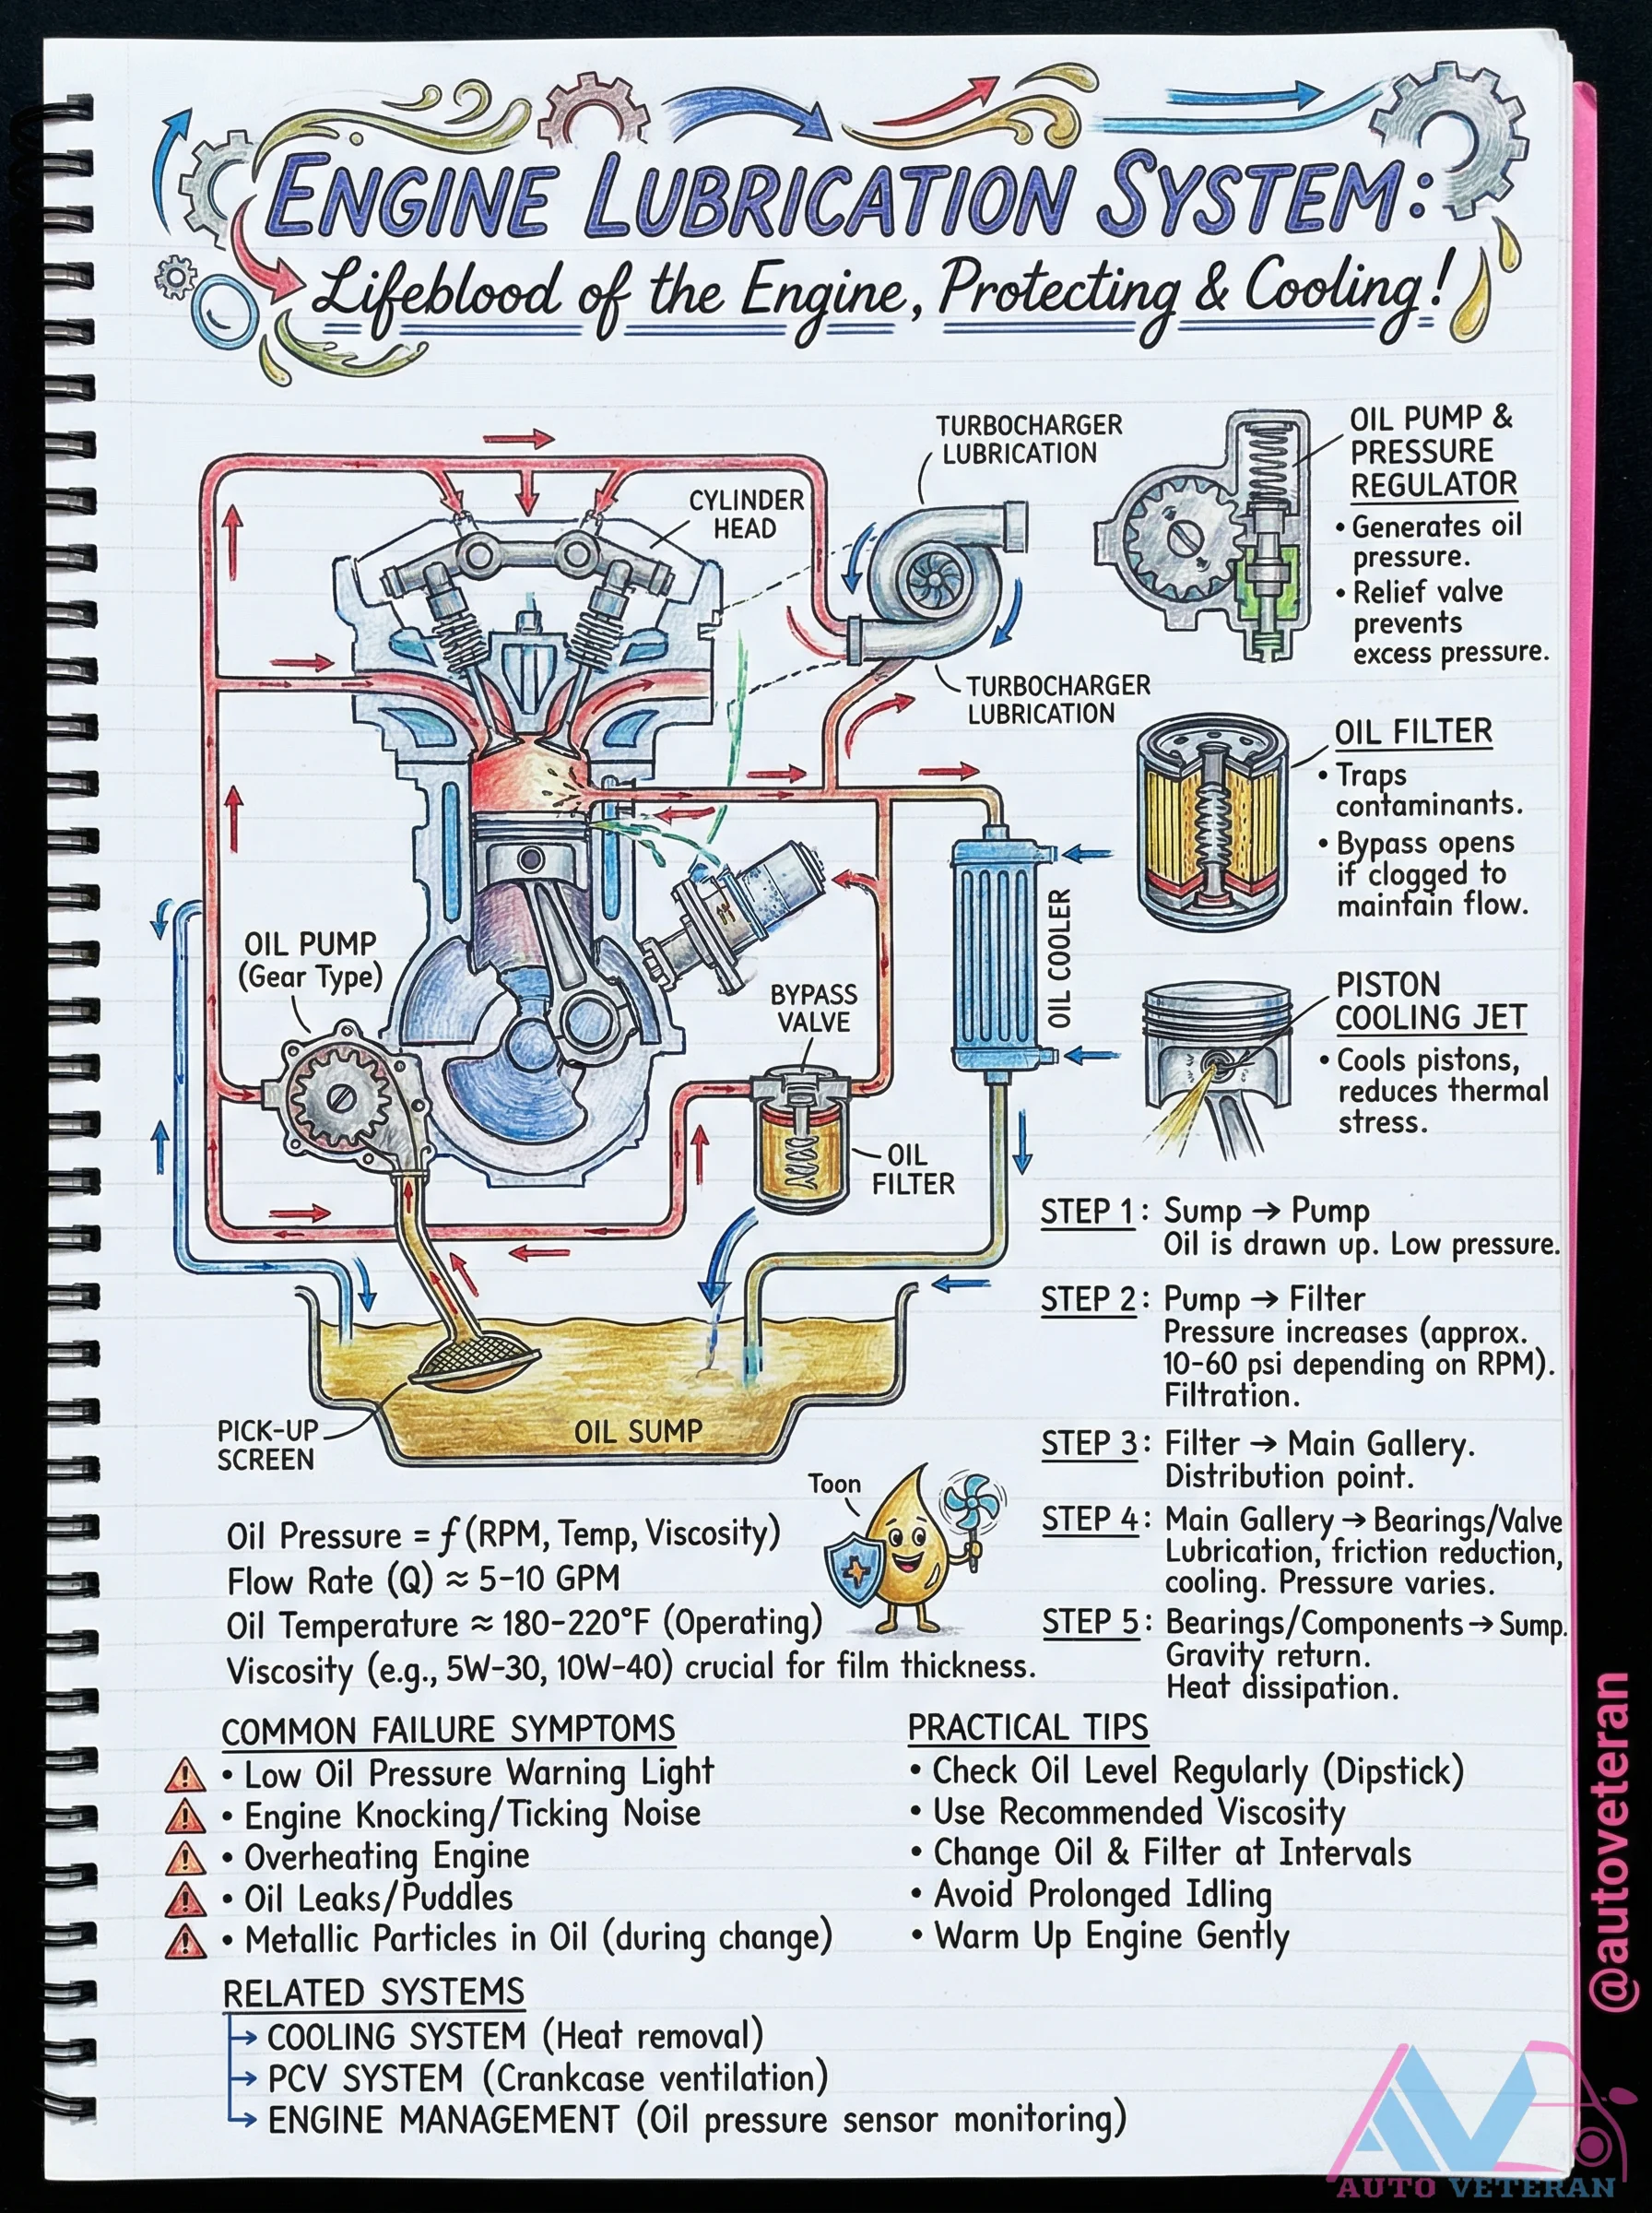
The engine lubrication system operates through a precise five-step sequence, starting with oil being drawn from the sump at low pressure, then filtered with pressure increasing to approximately 10-60 PSI depending on RPM, distributed through main galleries, lubricating bearings and components with flow rates around 5-10 GPM at operating temperatures of 180-220°F, and finally returning to the sump. Common failure symptoms include low oil pressure warning lights, engine knocking noises, oil leaks, and metallic particles in oil during changes. Practical maintenance tips emphasize regular oil level checks using the dipstick, using recommended viscosity oils like 5W-30 or 10W-40 for proper film thickness, avoiding prolonged idling, and warming up the engine properly. The system integrates with cooling systems for heat removal, PCV systems for crankcase ventilation, and engine management systems for oil pressure sensor monitoring.
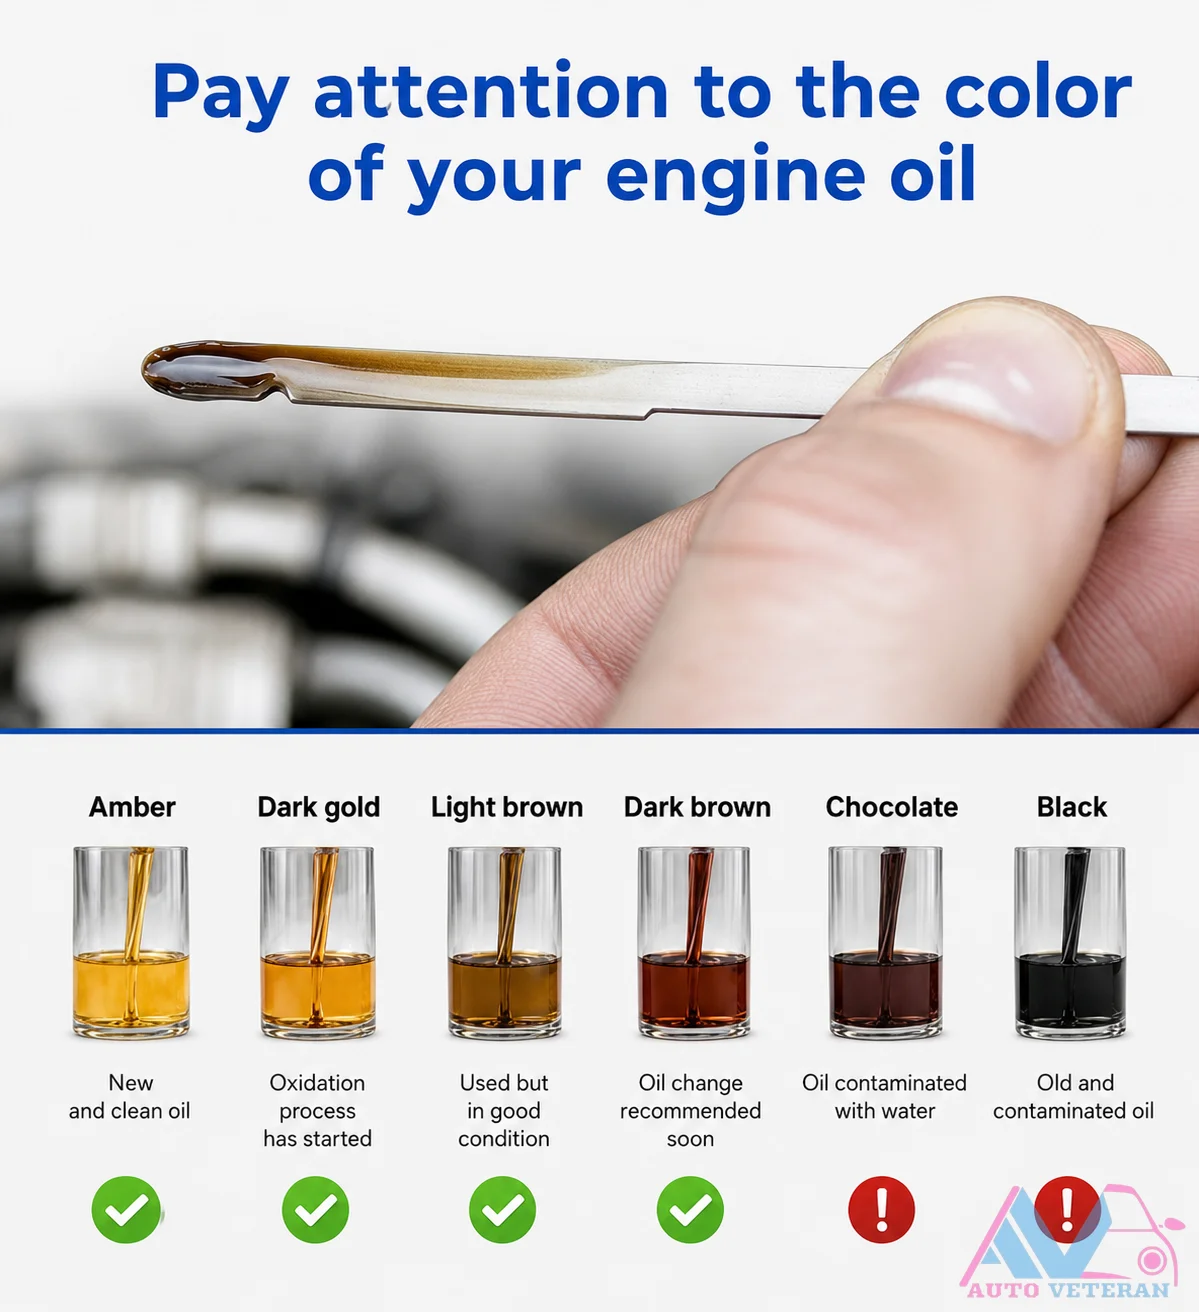
Engine Oil Color Condition Guide
This color chart shows how engine oil changes from amber when new to black when heavily contaminated, with visual stages for when an oil change is recommended versus urgent; chocolate brown indicates oxidation while black suggests old or water contaminated oil requiring immediate service.
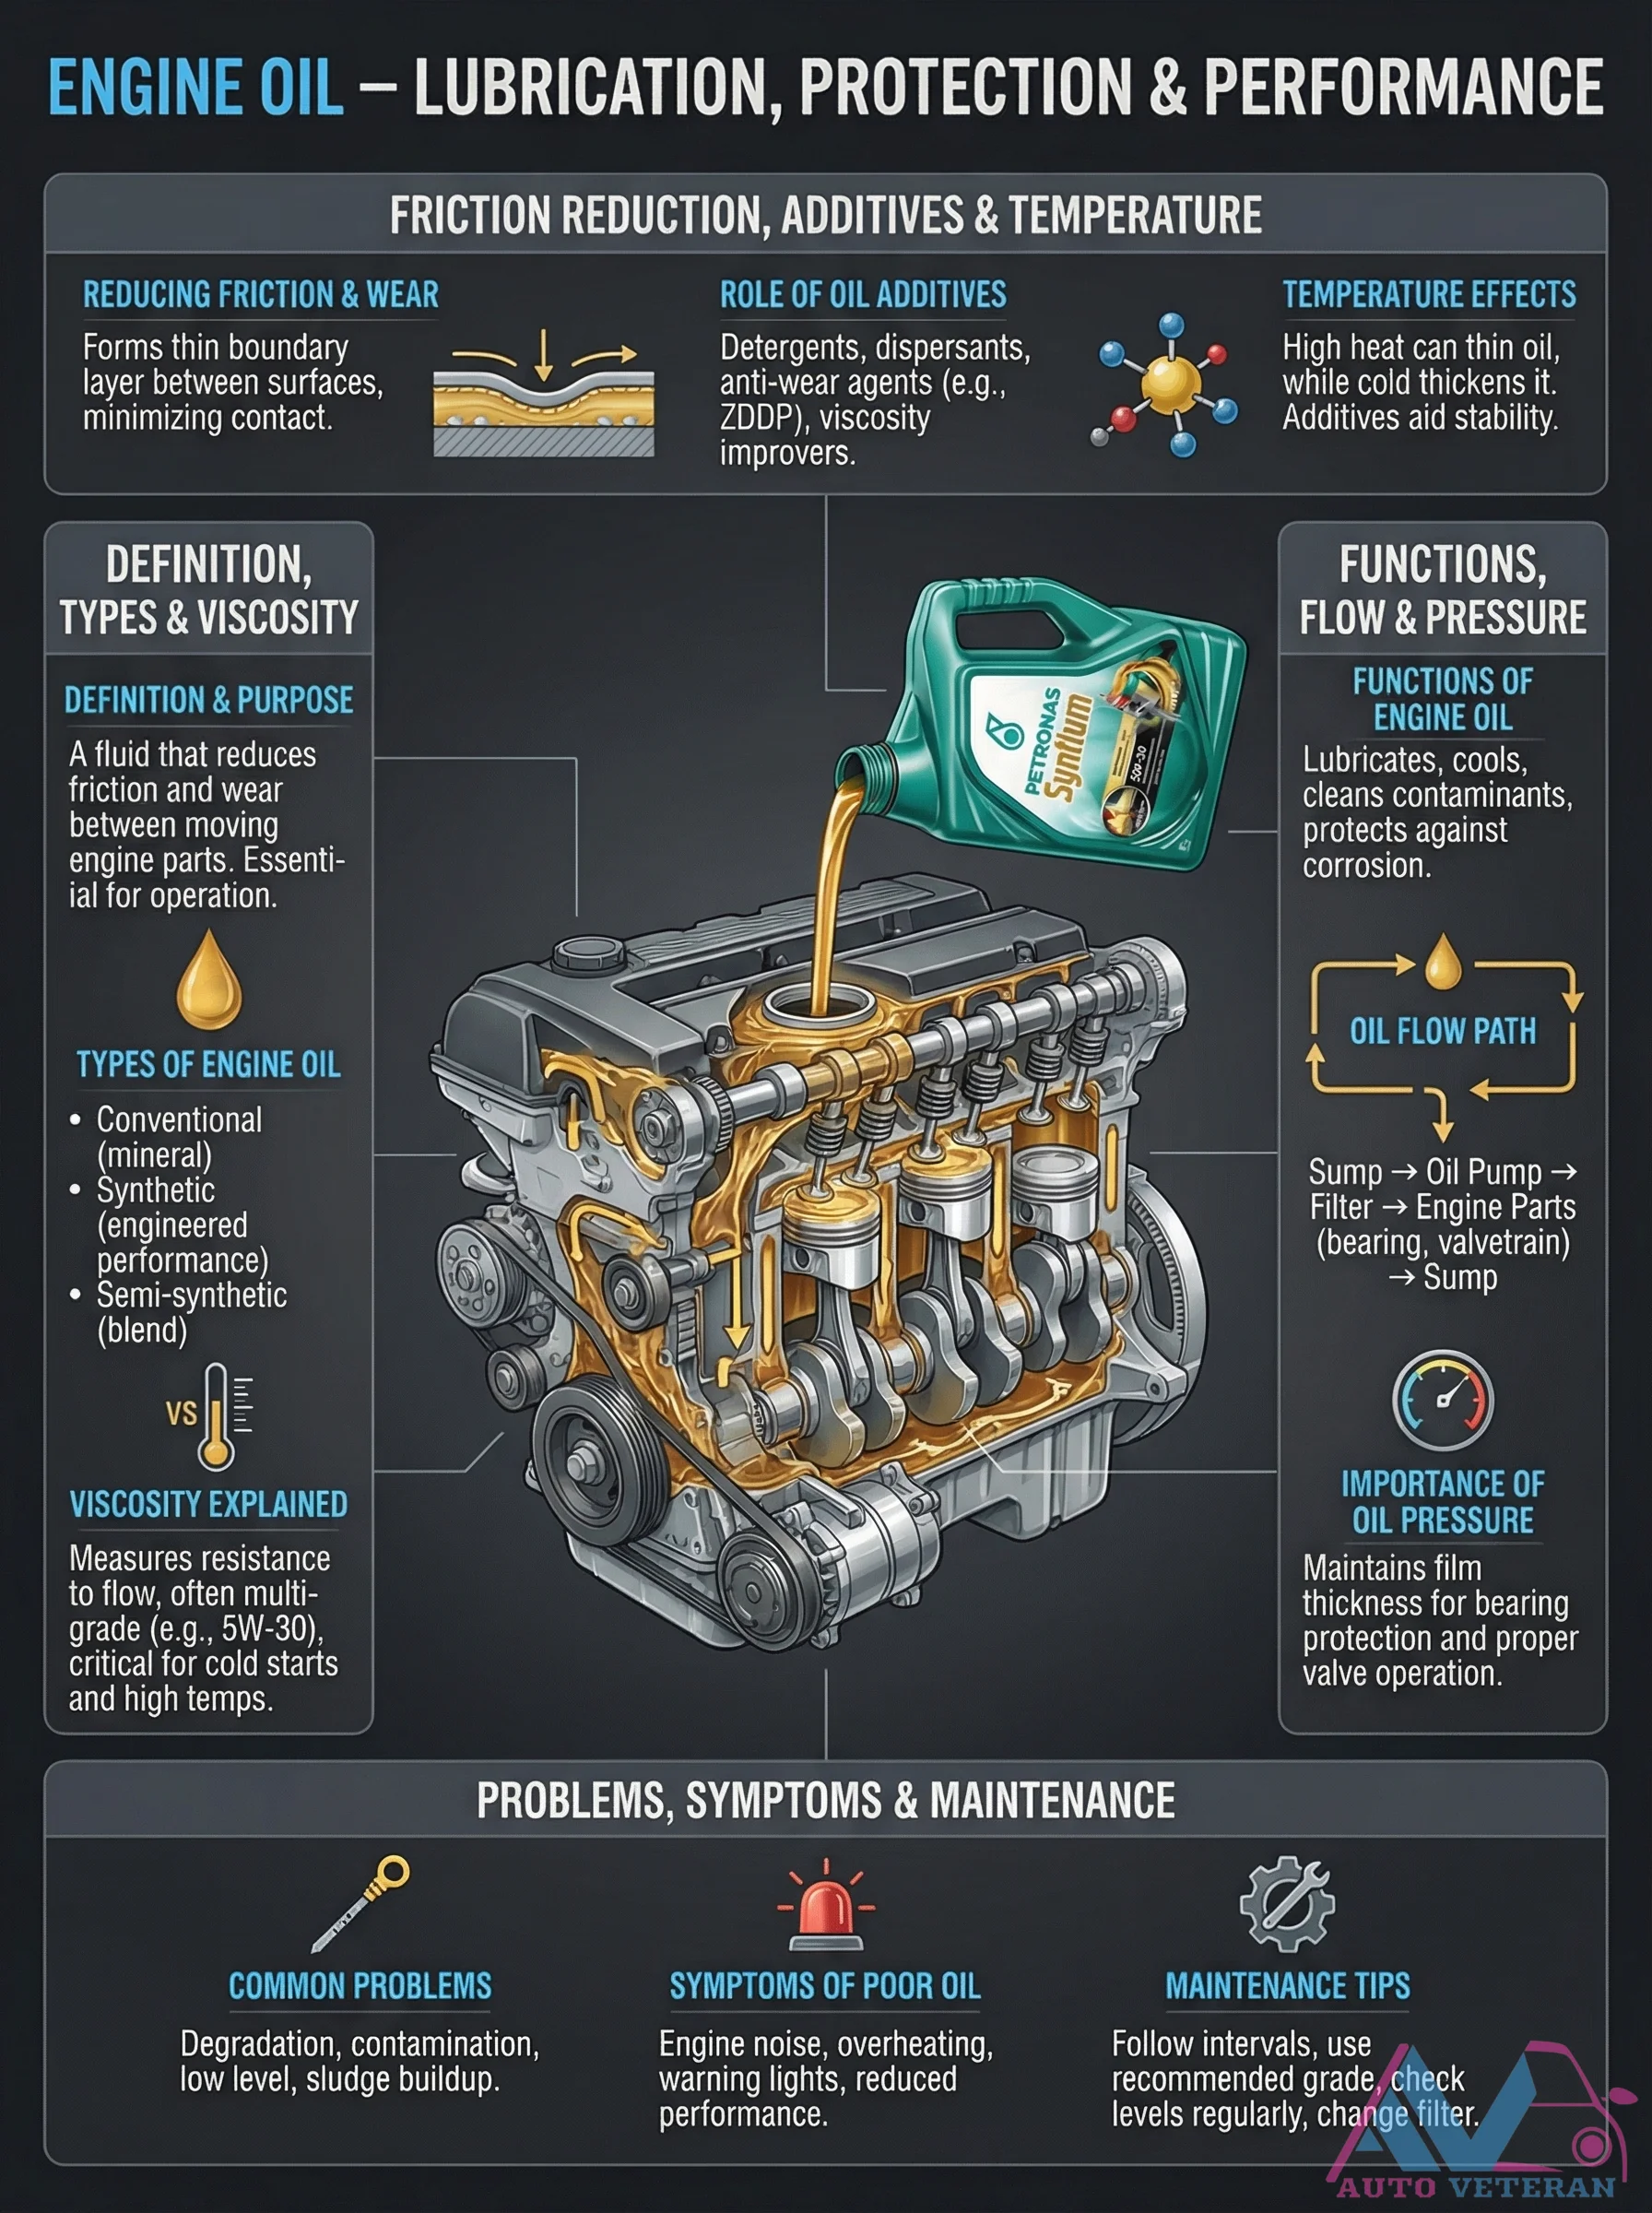
Engine Oil Functions, Additives, and Viscosity Explained
Engine oil serves as the lifeblood of your vehicle, performing multiple critical functions beyond simple lubrication. It forms a thin boundary layer between moving surfaces to drastically reduce friction and wear, while also cooling engine components and cleaning contaminants. Modern oils rely on sophisticated additive packages including detergents, dispersants, anti-wear agents like ZDDP, and viscosity improvers that maintain performance across temperature extremes. The oil's viscosity rating, such as 5W-30, determines its flow characteristics and resistance to thinning at high temperatures or thickening in cold conditions. Proper oil pressure ensures adequate film thickness for bearing protection and valve operation. Regular maintenance with the correct oil grade prevents degradation, contamination, sludge buildup, and the associated symptoms of engine noise, overheating, and reduced performance.
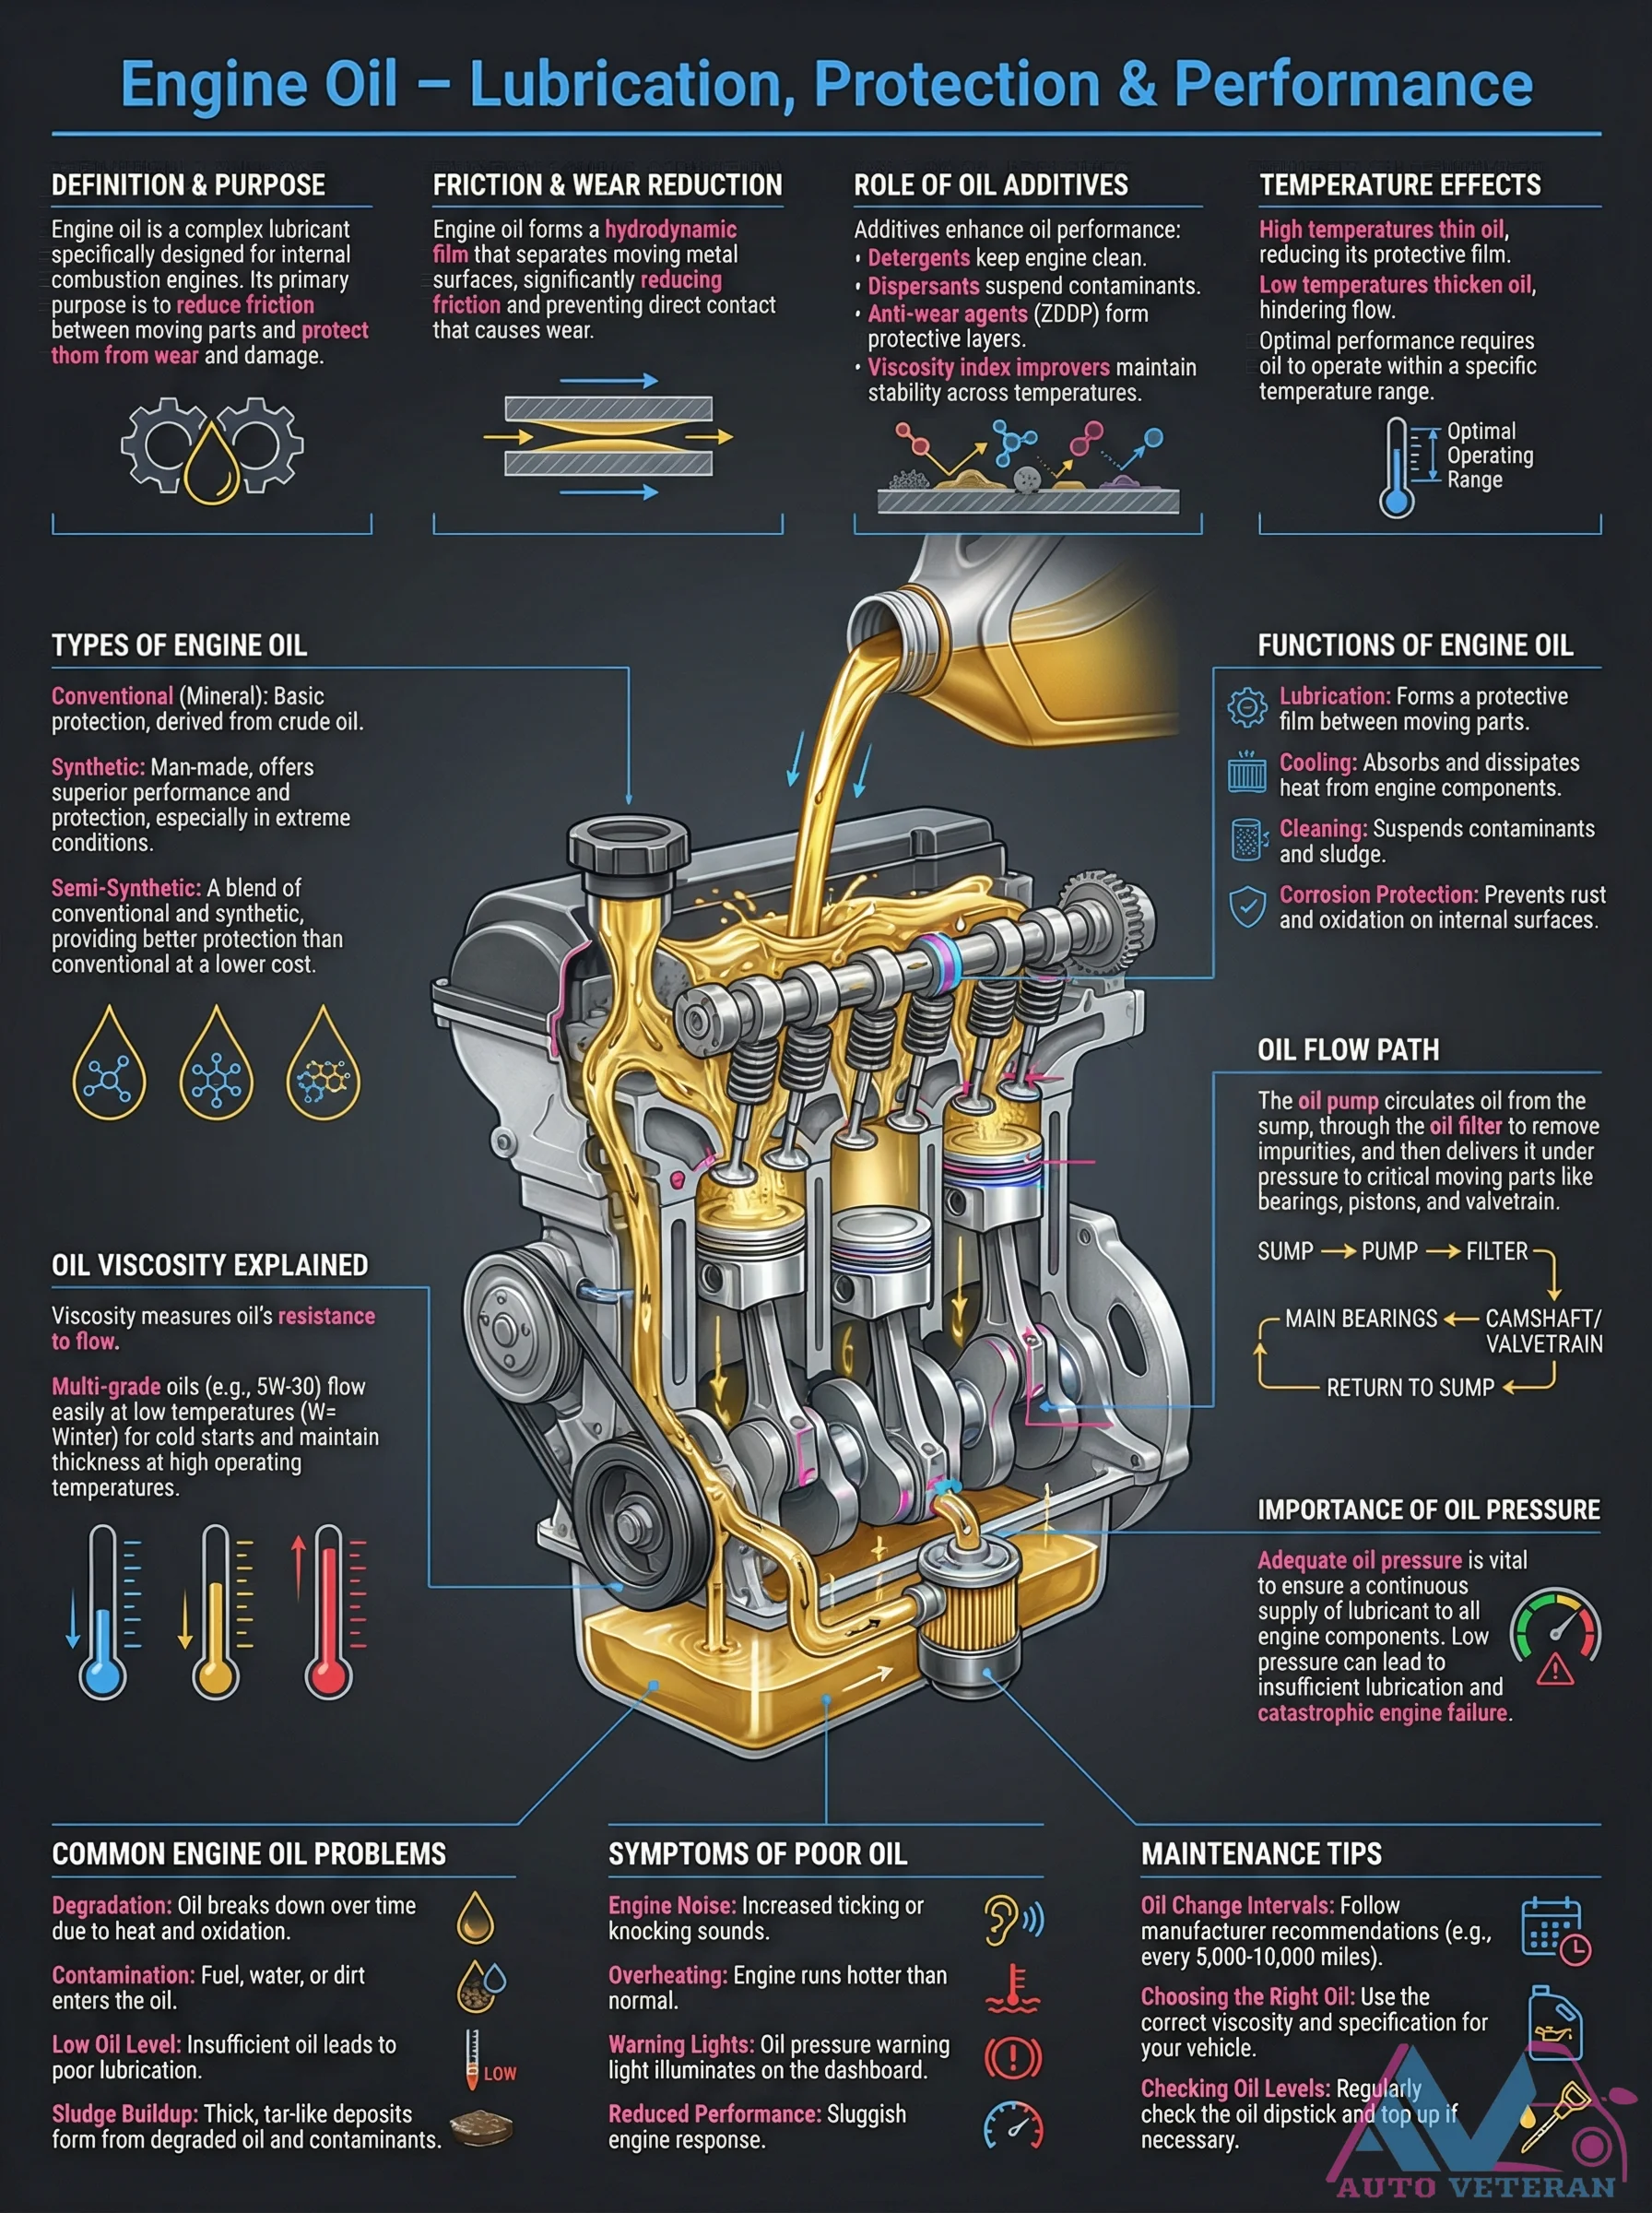
Engine Oil Functions, Viscosity, and Maintenance
Engine oil serves as a specialized lubricant crucial for internal combustion engines, designed to reduce friction and wear through hydrodynamic films and protective additives like detergents, dispersants, and anti-wear agents. It also performs cooling by dissipating heat, cleaning by suspending contaminants for filtration, and corrosion protection by neutralizing acids. Viscosity, measured by grades such as 5W-30, indicates flow resistance at low and high temperatures, with multi-grade oils offering stability across extremes. Proper oil pressure is essential for adequate delivery to components like bearings and pistons, while common issues include degradation, contamination, low levels, and sludge buildup, leading to symptoms like engine noise, overheating, warning lights, or exhaust smoke. Maintenance tips emphasize following manufacturer-recommended change intervals, regularly checking oil levels via the dipstick, and selecting the right oil type, such as conventional, semi-synthetic, or synthetic, based on engine specifications.
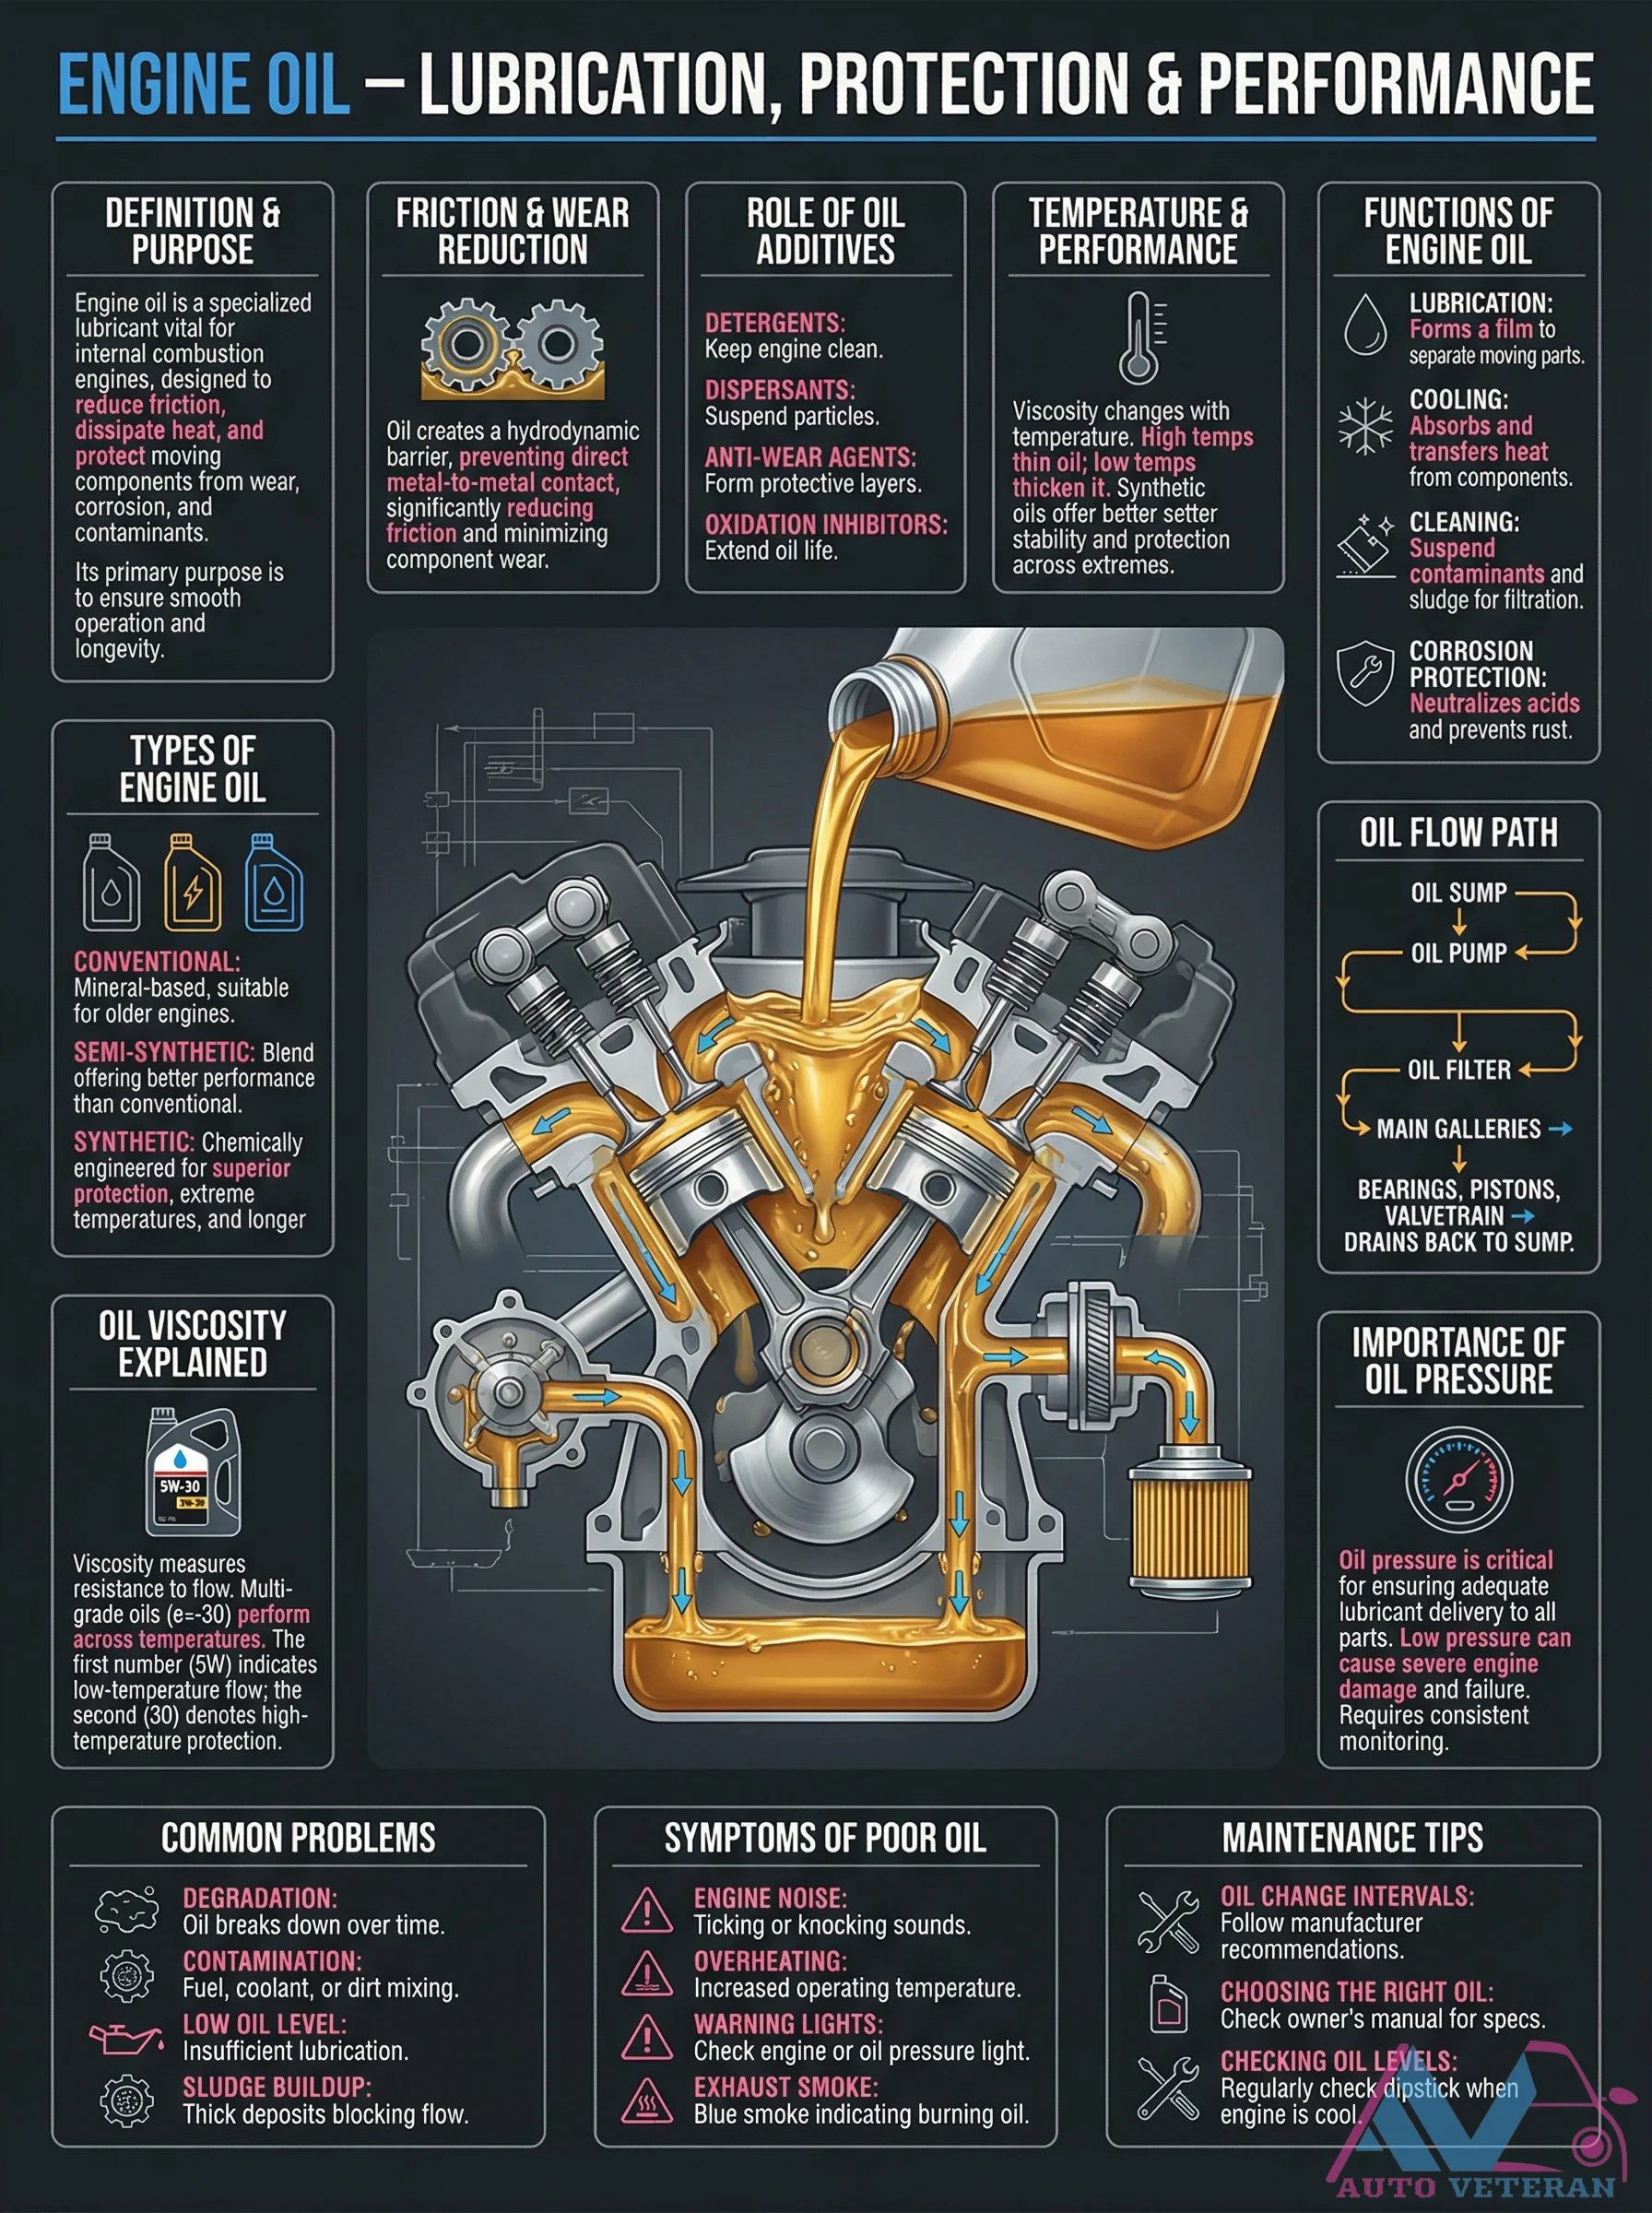
Engine Oil Lubrication Protection and Performance Explained
Engine oil serves as a complex lubricant specifically designed for internal combustion engines, forming a hydrodynamic film that separates moving metal surfaces to significantly reduce friction and prevent direct contact that causes wear. Additives enhance oil performance, with detergents keeping engines clean, dispersants suspending contaminants, and anti-wear agents like ZDDP forming protective layers. Temperature effects are critical, as high temperatures thin oil while low temperatures thicken it, with optimal performance requiring operation within a specific temperature range. The oil flow path involves circulation from the sump through the filter to critical components like bearings, pistons, and the valvetrain, with adequate oil pressure vital to prevent catastrophic failure. Common problems include degradation from heat and oxidation, contamination from fuel or water, and sludge buildup, leading to symptoms like engine noise, overheating, warning lights, and reduced performance. Maintenance tips emphasize following oil change intervals, choosing the correct viscosity and specification, and regularly checking oil levels to ensure proper lubrication and protection.
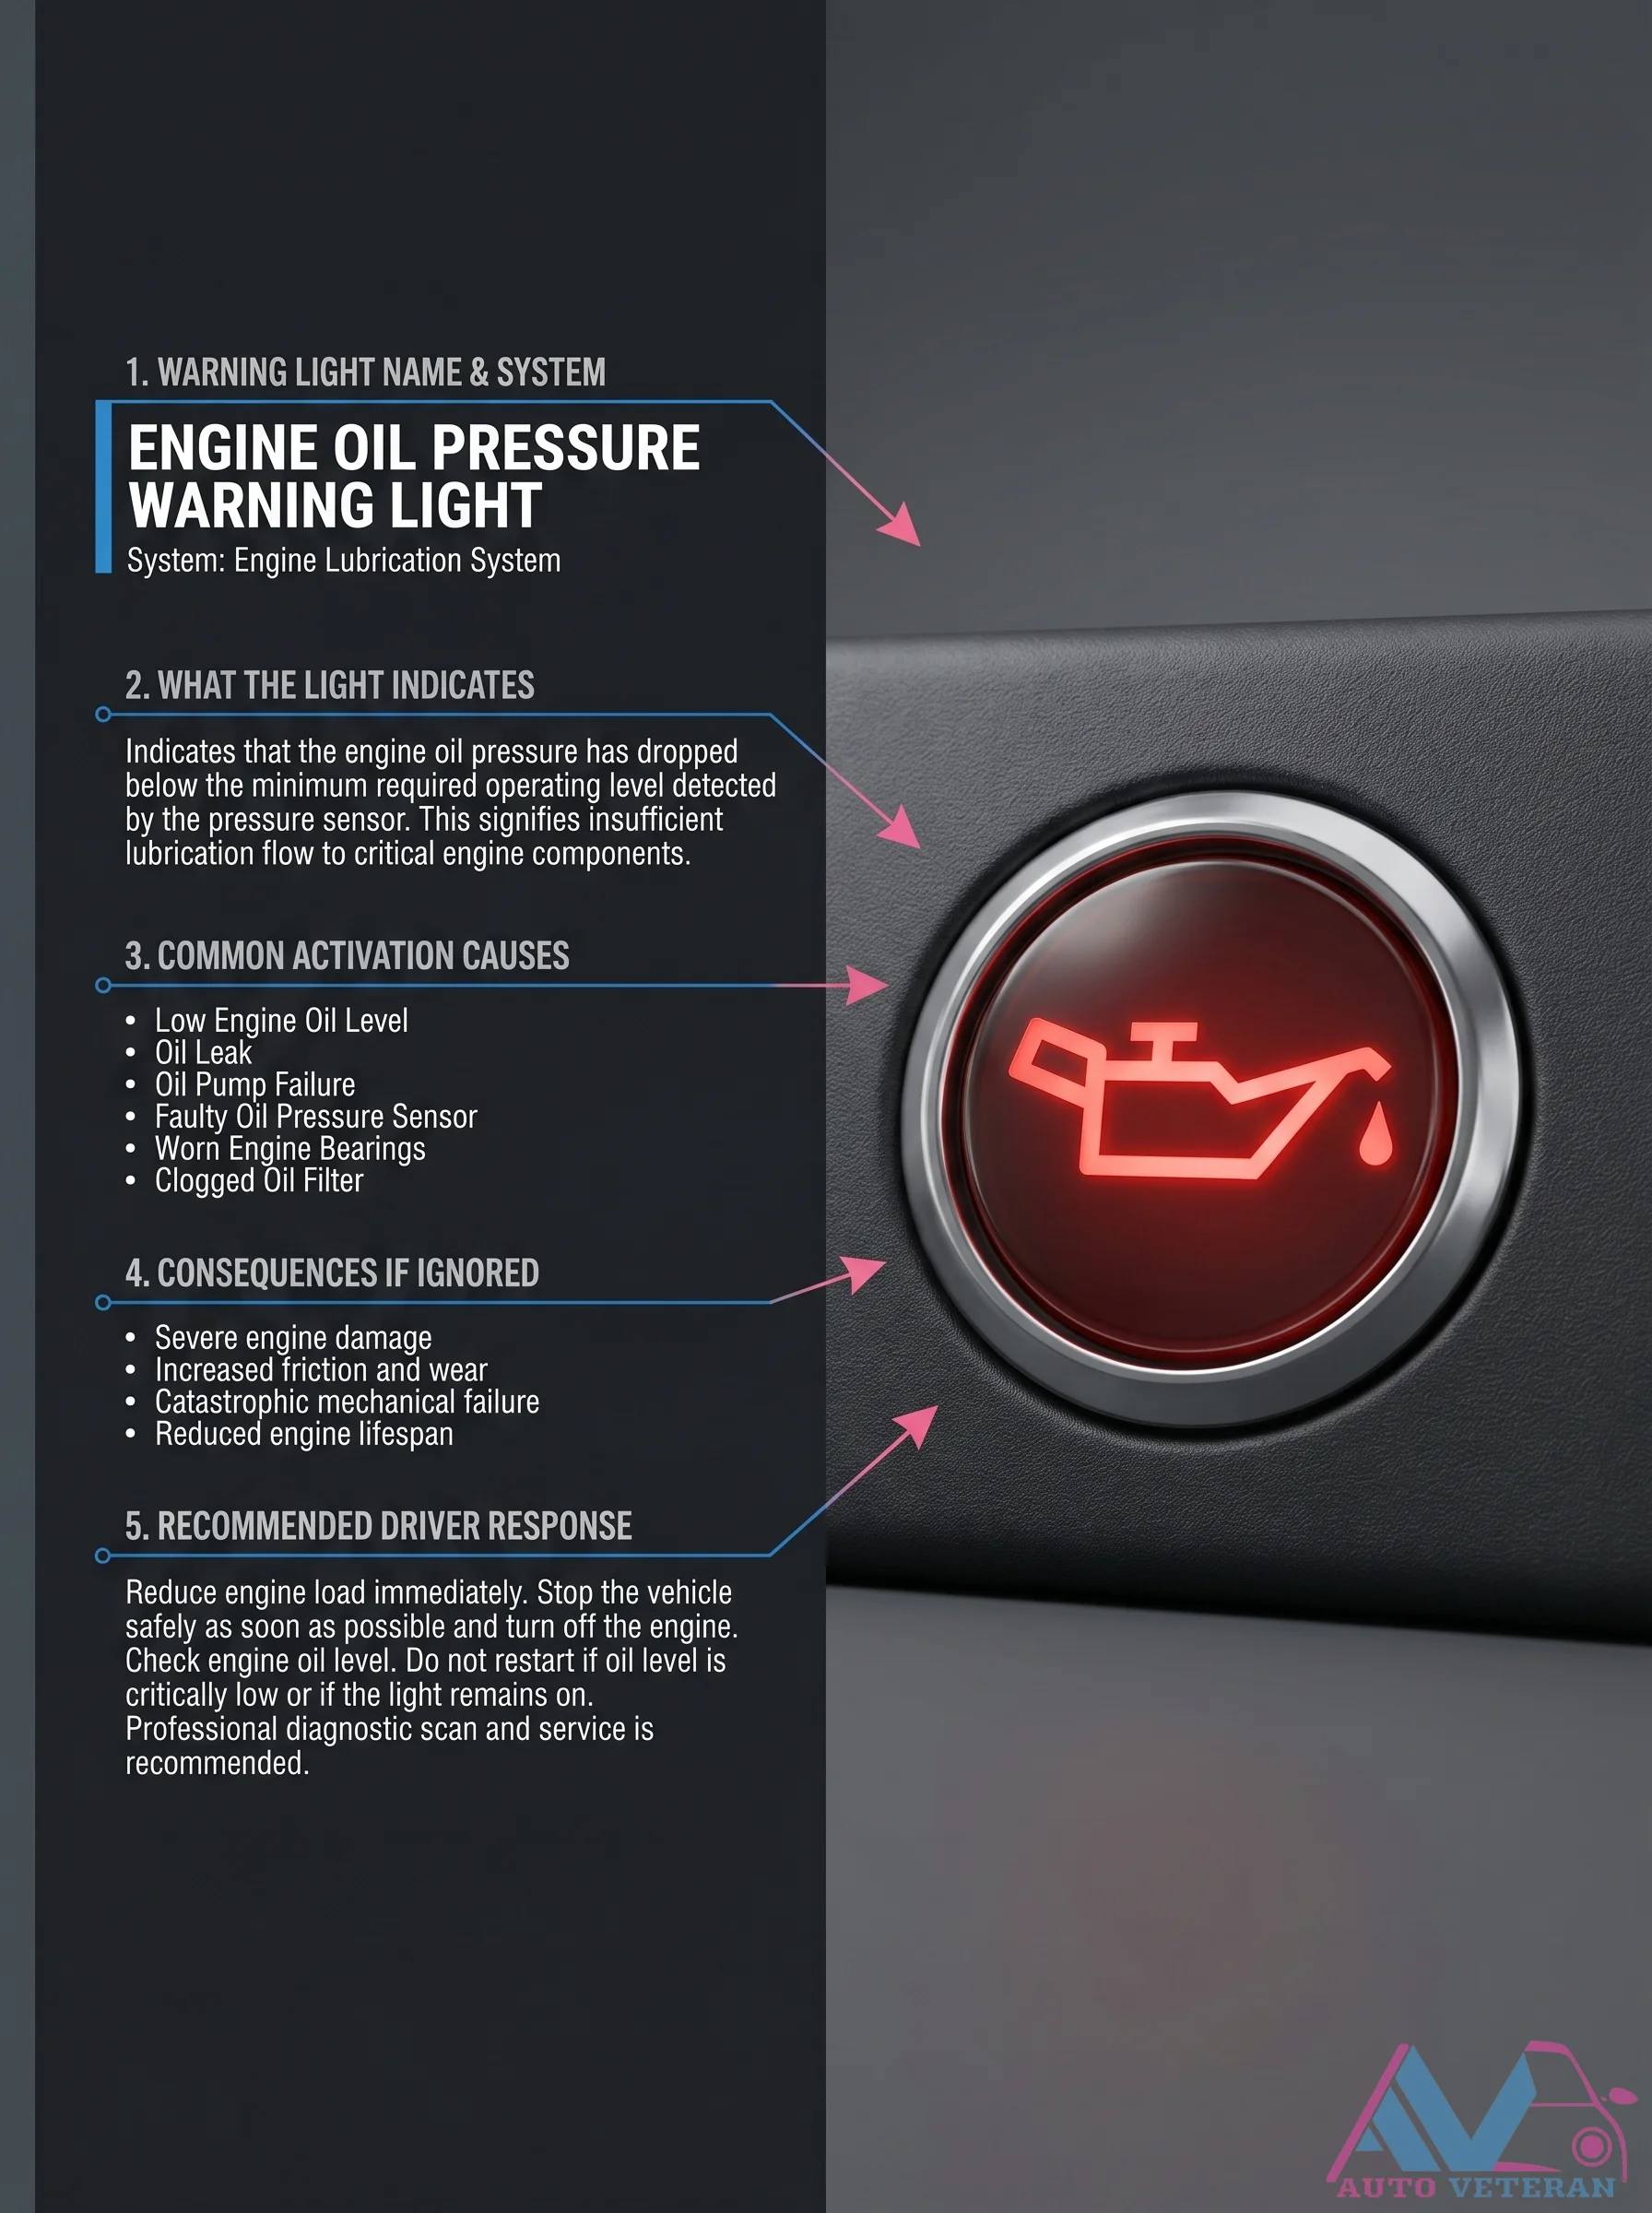
Engine Oil Pressure Warning Light Guide
The Engine Oil Pressure Warning Light alerts you that oil pressure has dropped below safe levels, threatening critical engine components with inadequate lubrication. Common triggers include low oil level, oil leaks, a failing oil pump, a faulty sensor, worn bearings, or a clogged filter. Ignoring this light can lead to severe engine damage, increased friction, catastrophic failure, and a shortened engine lifespan. If the light activates, immediately reduce engine load, stop the vehicle safely, turn off the engine, and check the oil level. Do not restart if the level is critically low or if the light stays on; seek professional diagnostic service.
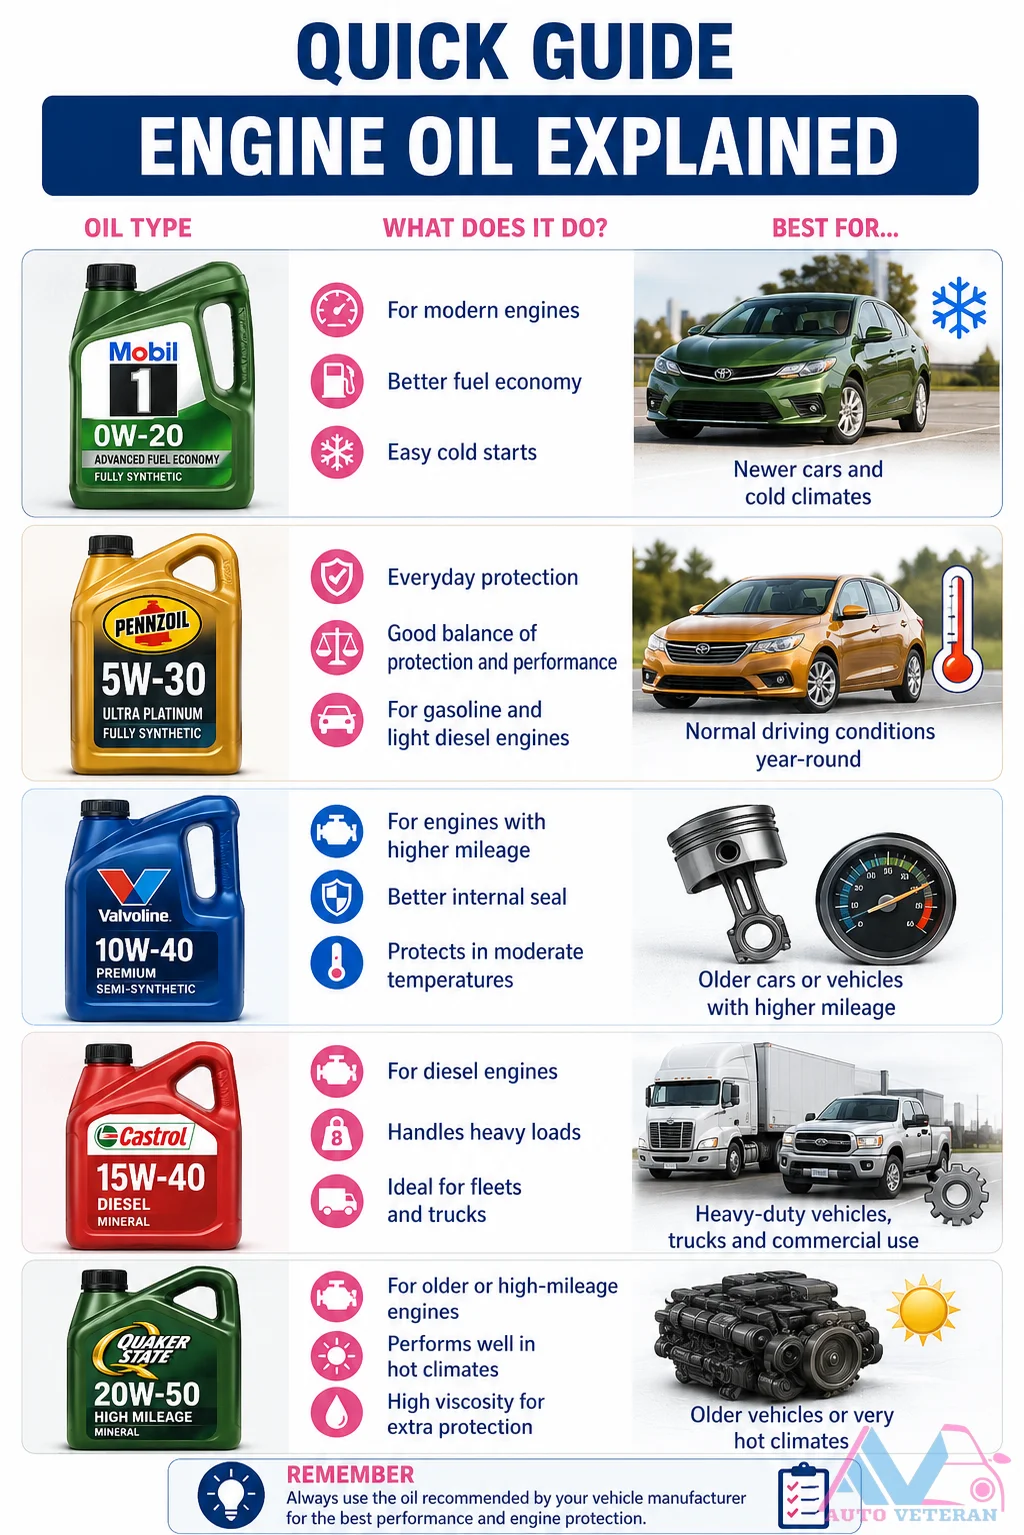
Engine Oil Type Guide Summary
This guide explains common engine oil types and their best uses. For modern engines, 0W-20 synthetic oil offers better fuel economy and easy cold starts, ideal for newer cars and cold climates. 5W-30 provides a good balance of protection and performance for gasoline and light diesel engines under normal driving conditions. 10W-40 semi-synthetic protects moderate temperatures and suits older cars or high-mileage vehicles. 15W-40 diesel oil handles loads for heavy-duty trucks and commercial use. 20W-50 high viscosity oil performs well in hot climates, often used in high-mileage or older vehicles. Always use the manufacturer recommended oil for best performance and protection.
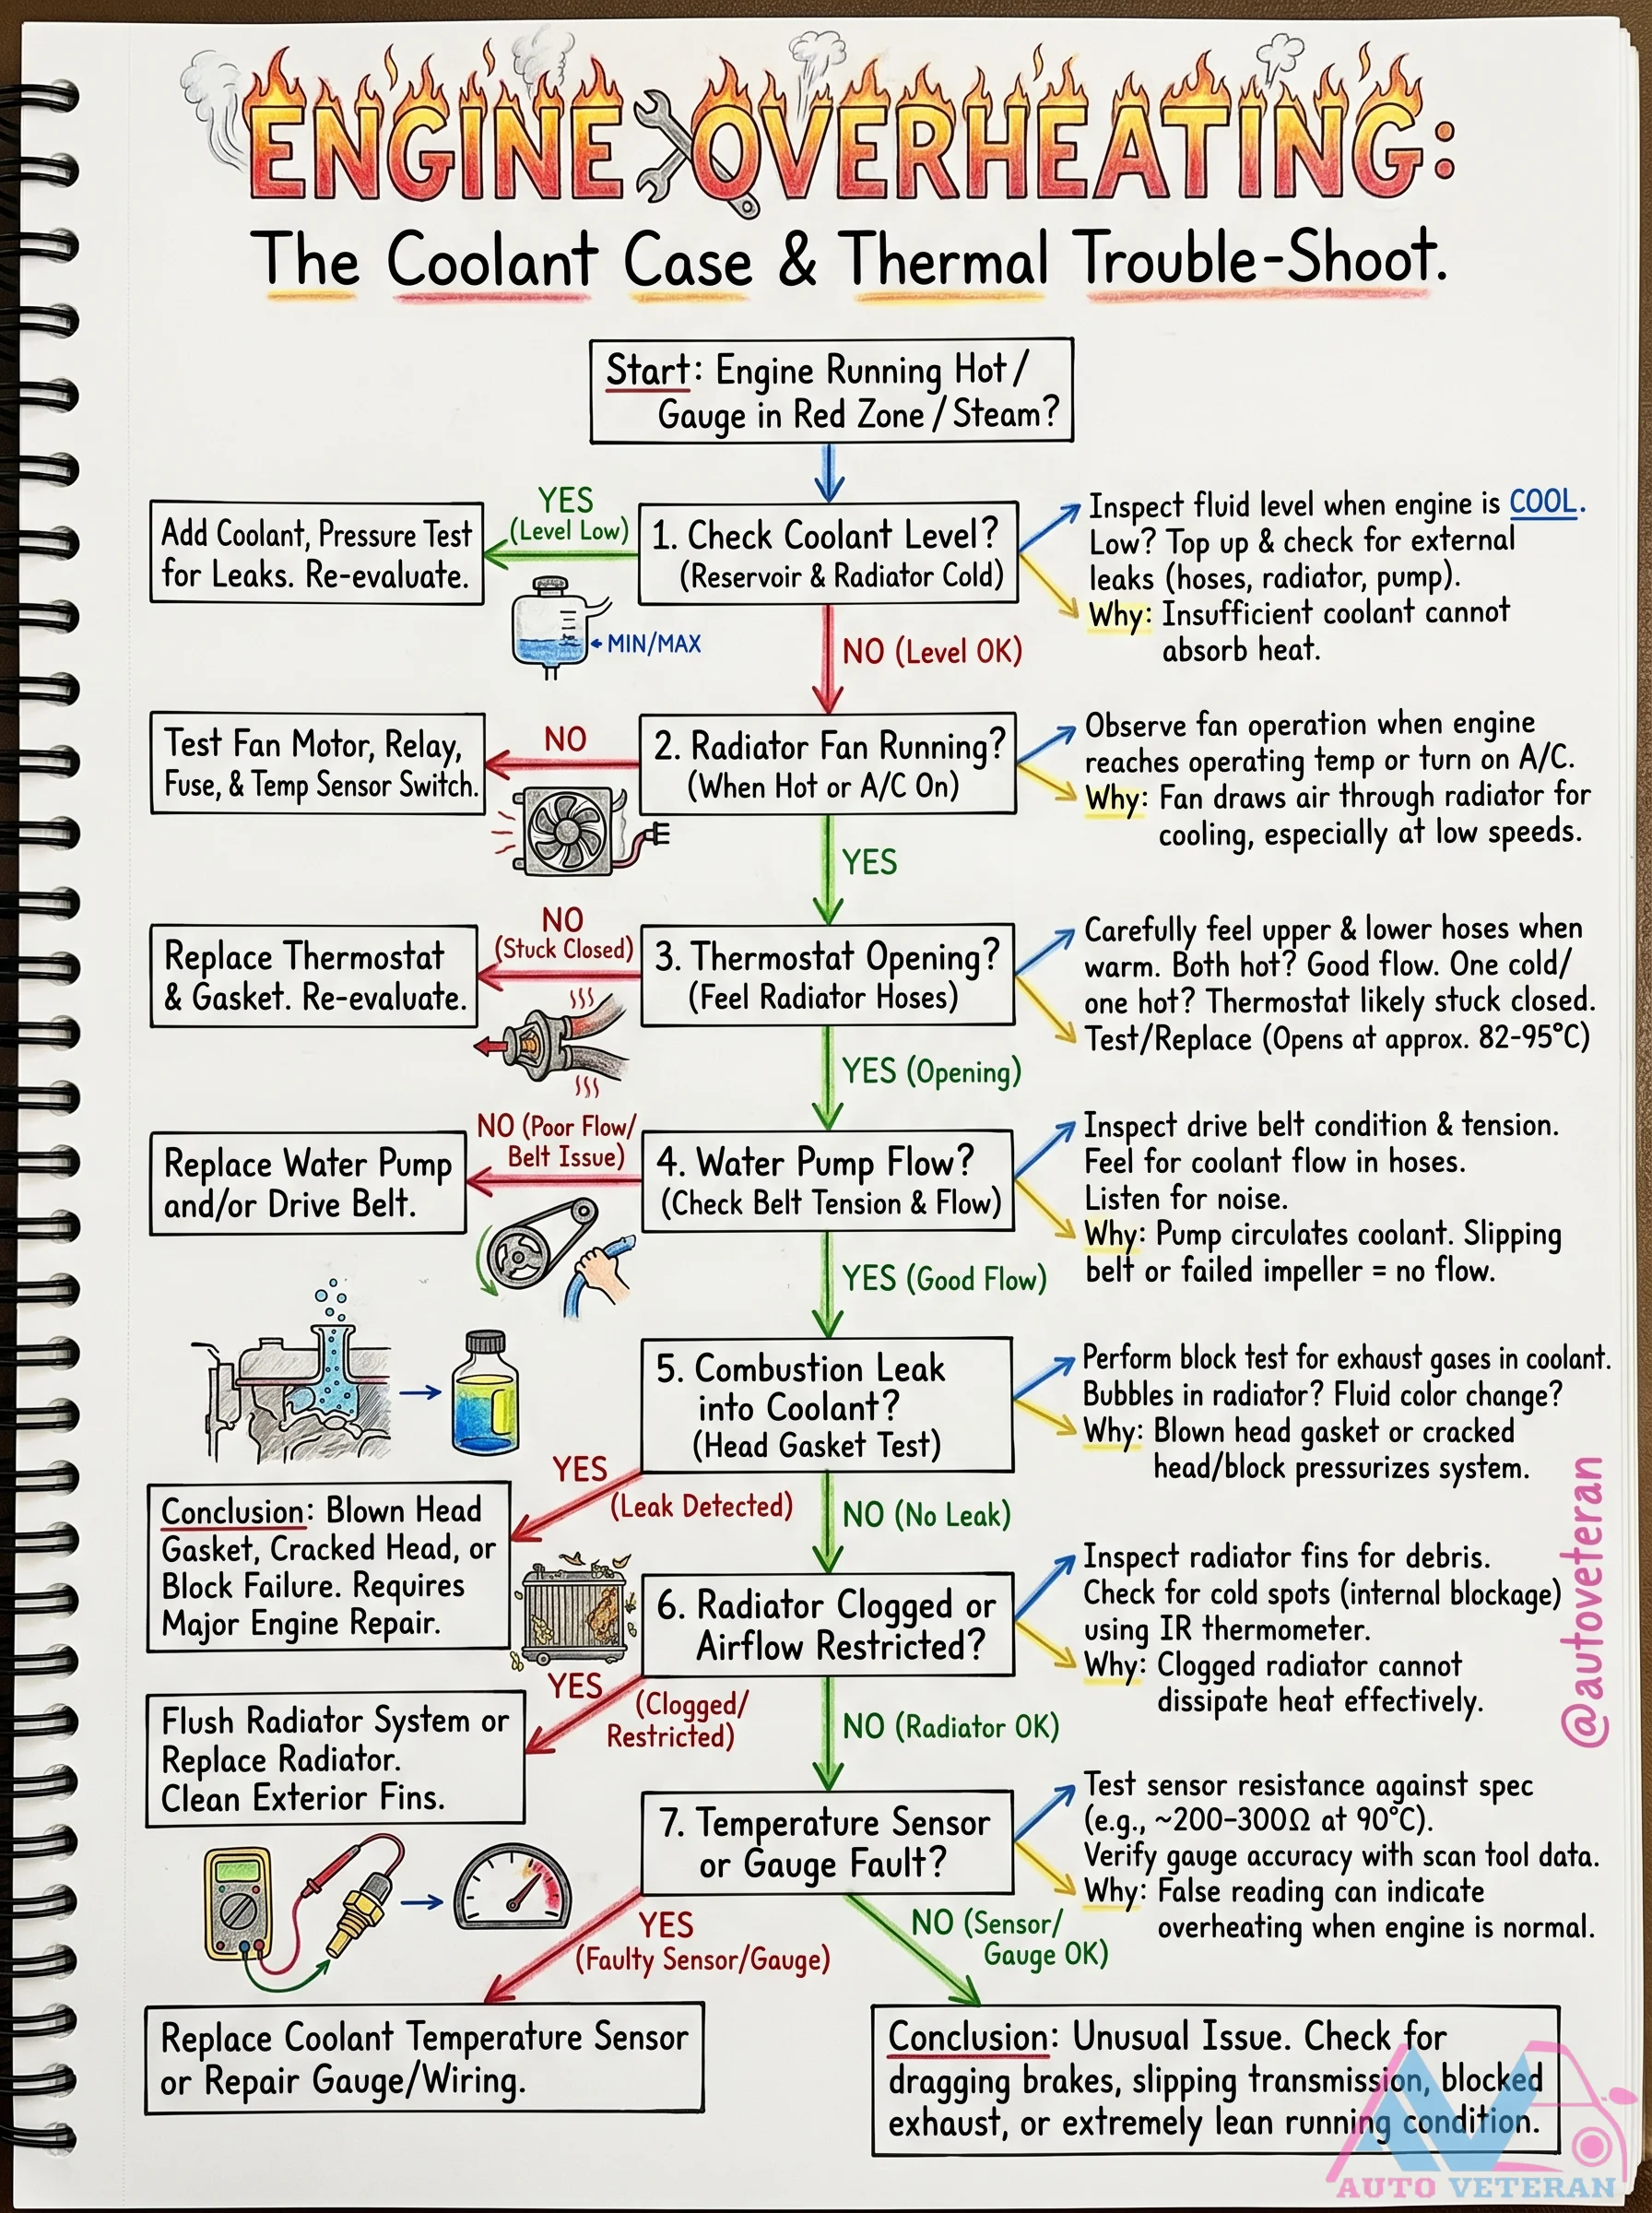
Engine Overheating Coolant Case Troubleshooting
When your engine temperature gauge climbs into the red zone, follow this systematic coolant case trouble shooting flow. Start with checking coolant level and inspecting for external leaks in hoses, radiator, and water pump. If the fan isn't running when hot or A/C is on, test the fan motor, fuse, and sensor switch. A thermostat stuck closed will cause one radiator hose to stay cold while the other is hot, requiring replacement. Poor water pump flow may be due to a failed impeller or loose drive belt. Perform a block test for exhaust gases in the coolant to detect a blown head gasket or cracked head. Check for radiator clogging with an IR thermometer and clean external fins. Finally, test the coolant temperature sensor resistance against specs to rule out false readings.
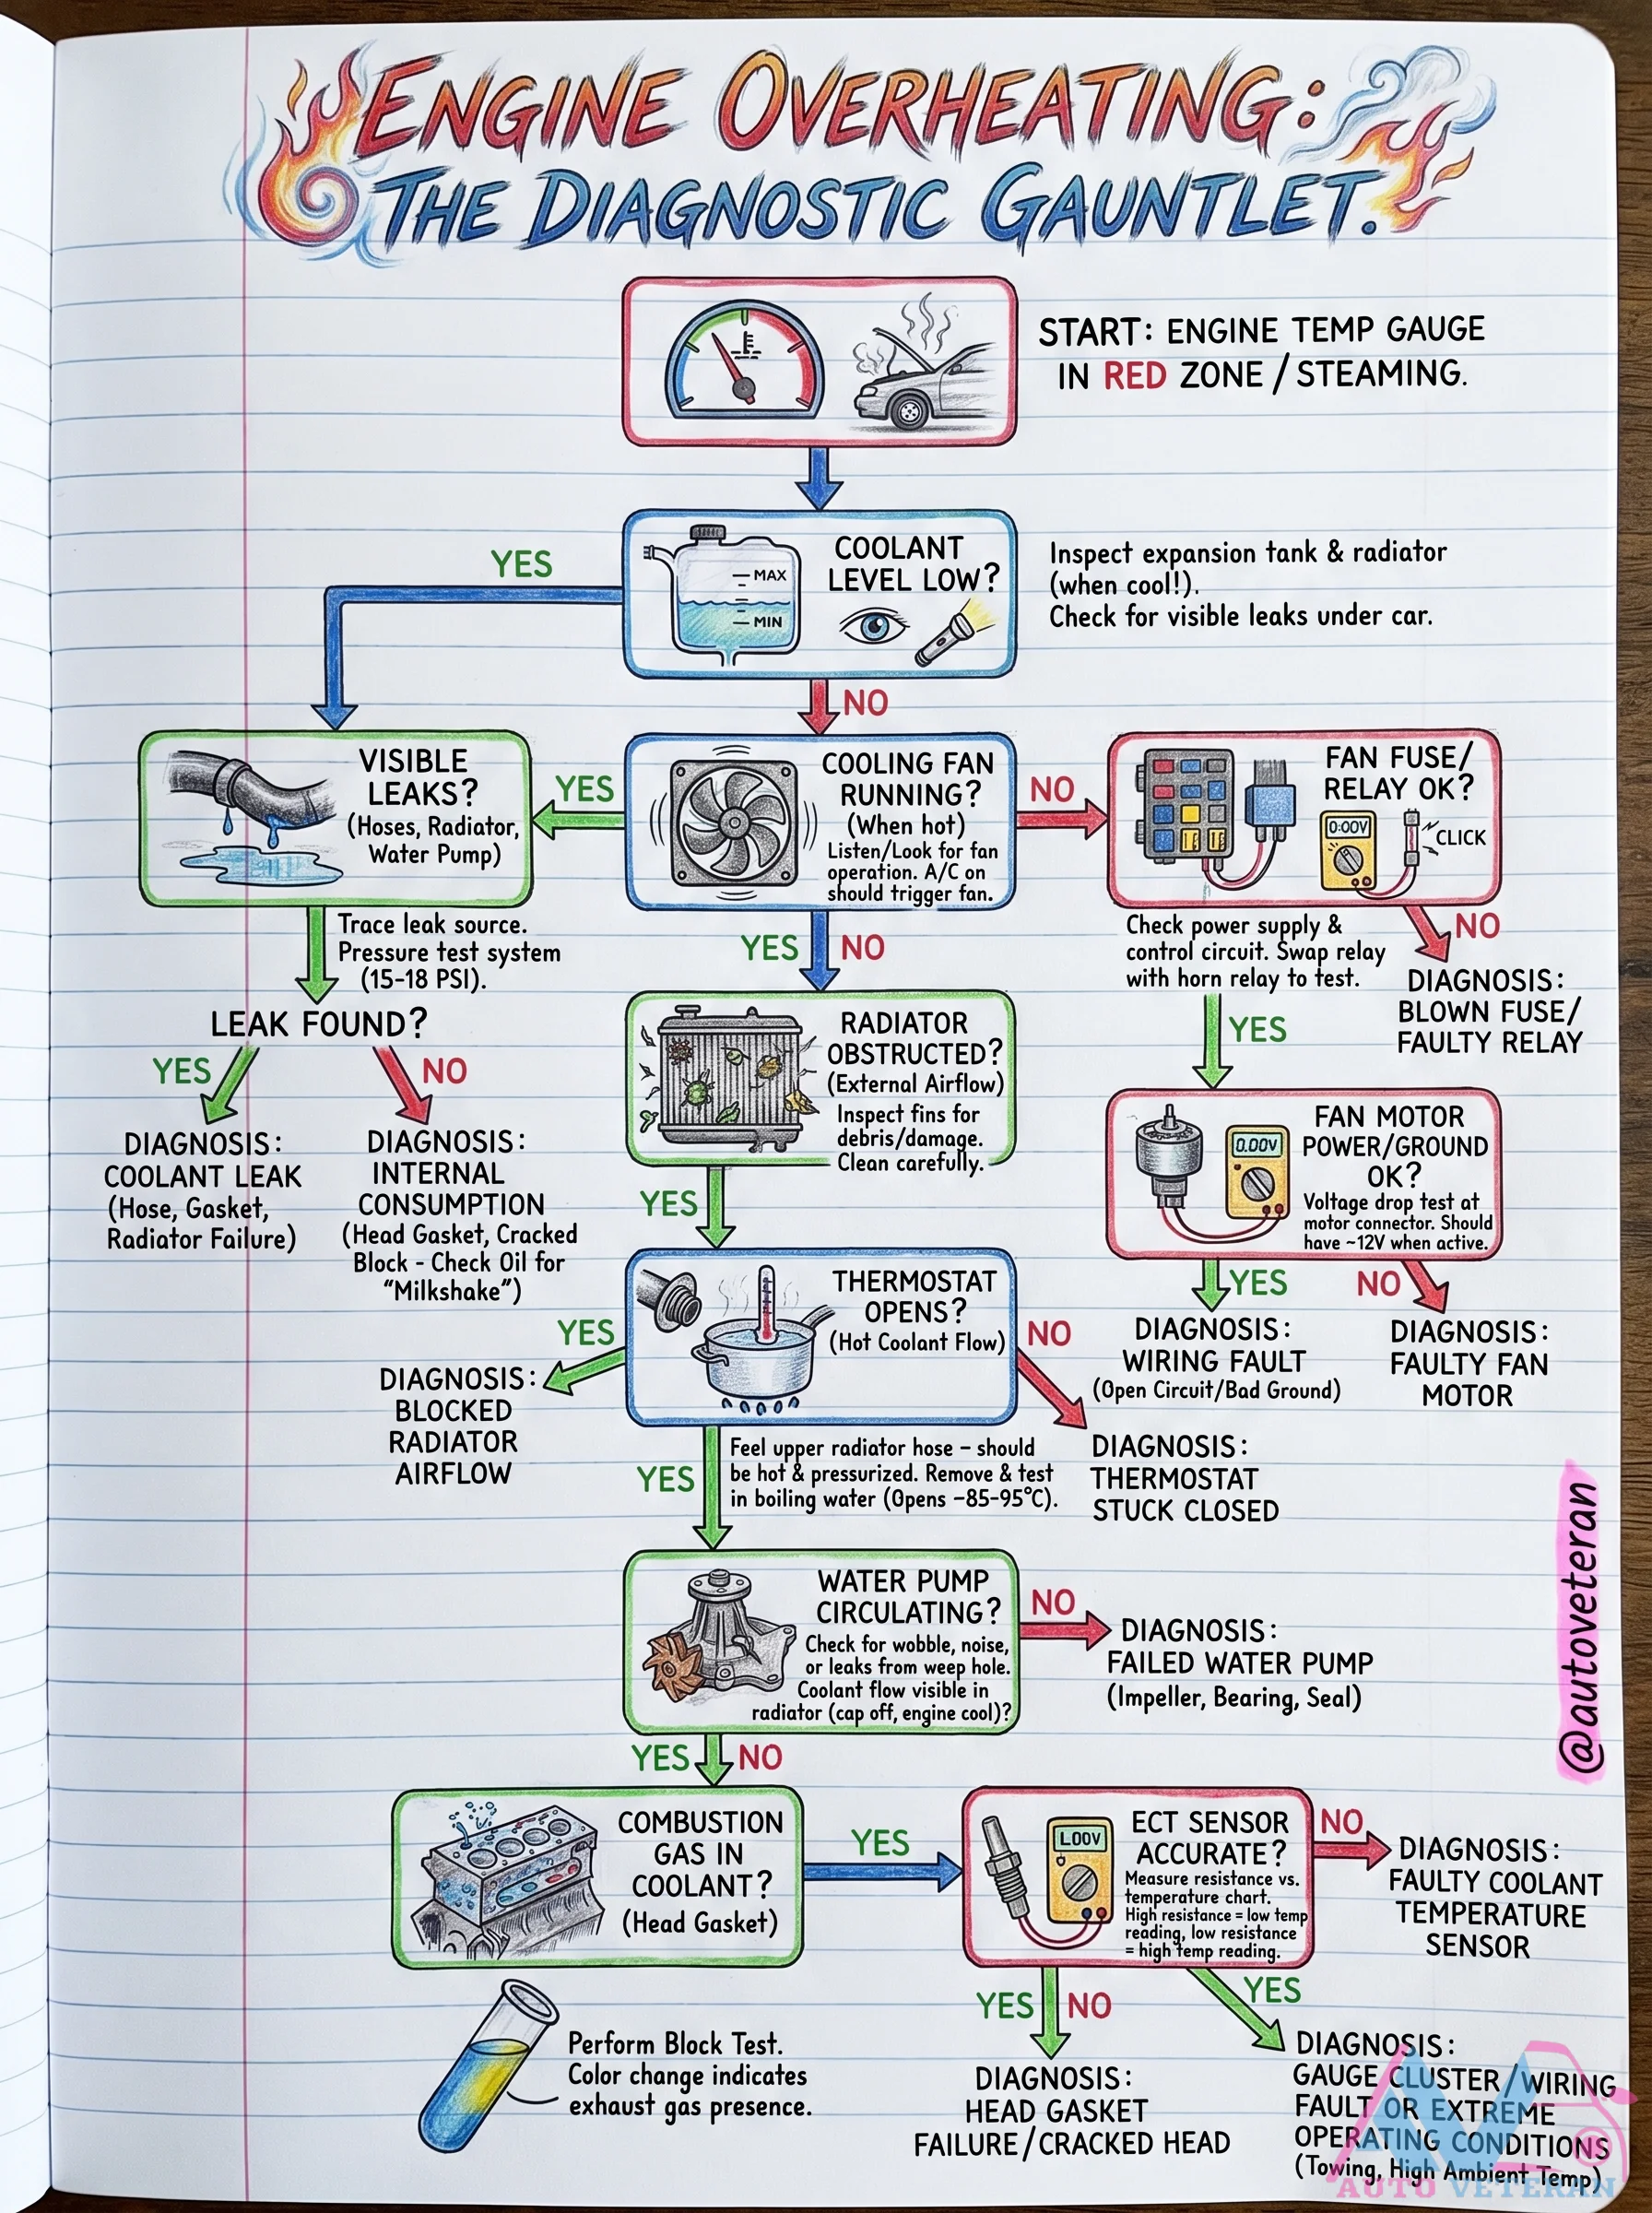
Engine Overheating Diagnostic Gauntlet Flowchart
This diagnostic flowchart guides you step by step through the most common causes of engine overheating, starting with the temperature gauge in the red zone and visible steam. It systematically checks coolant level, visible leaks, cooling fan operation and its fuse, relay, and motor, radiator obstruction, thermostat opening temperature, water pump circulation, head gasket failure via combustion gas in coolant, and faulty coolant temperature sensor. Each branch leads to a specific diagnosis such as coolant leak, fan motor failure, stuck thermostat, faulty water pump, blown head gasket, or sensor inaccuracy, making it an essential tool for DIY troubleshooting.
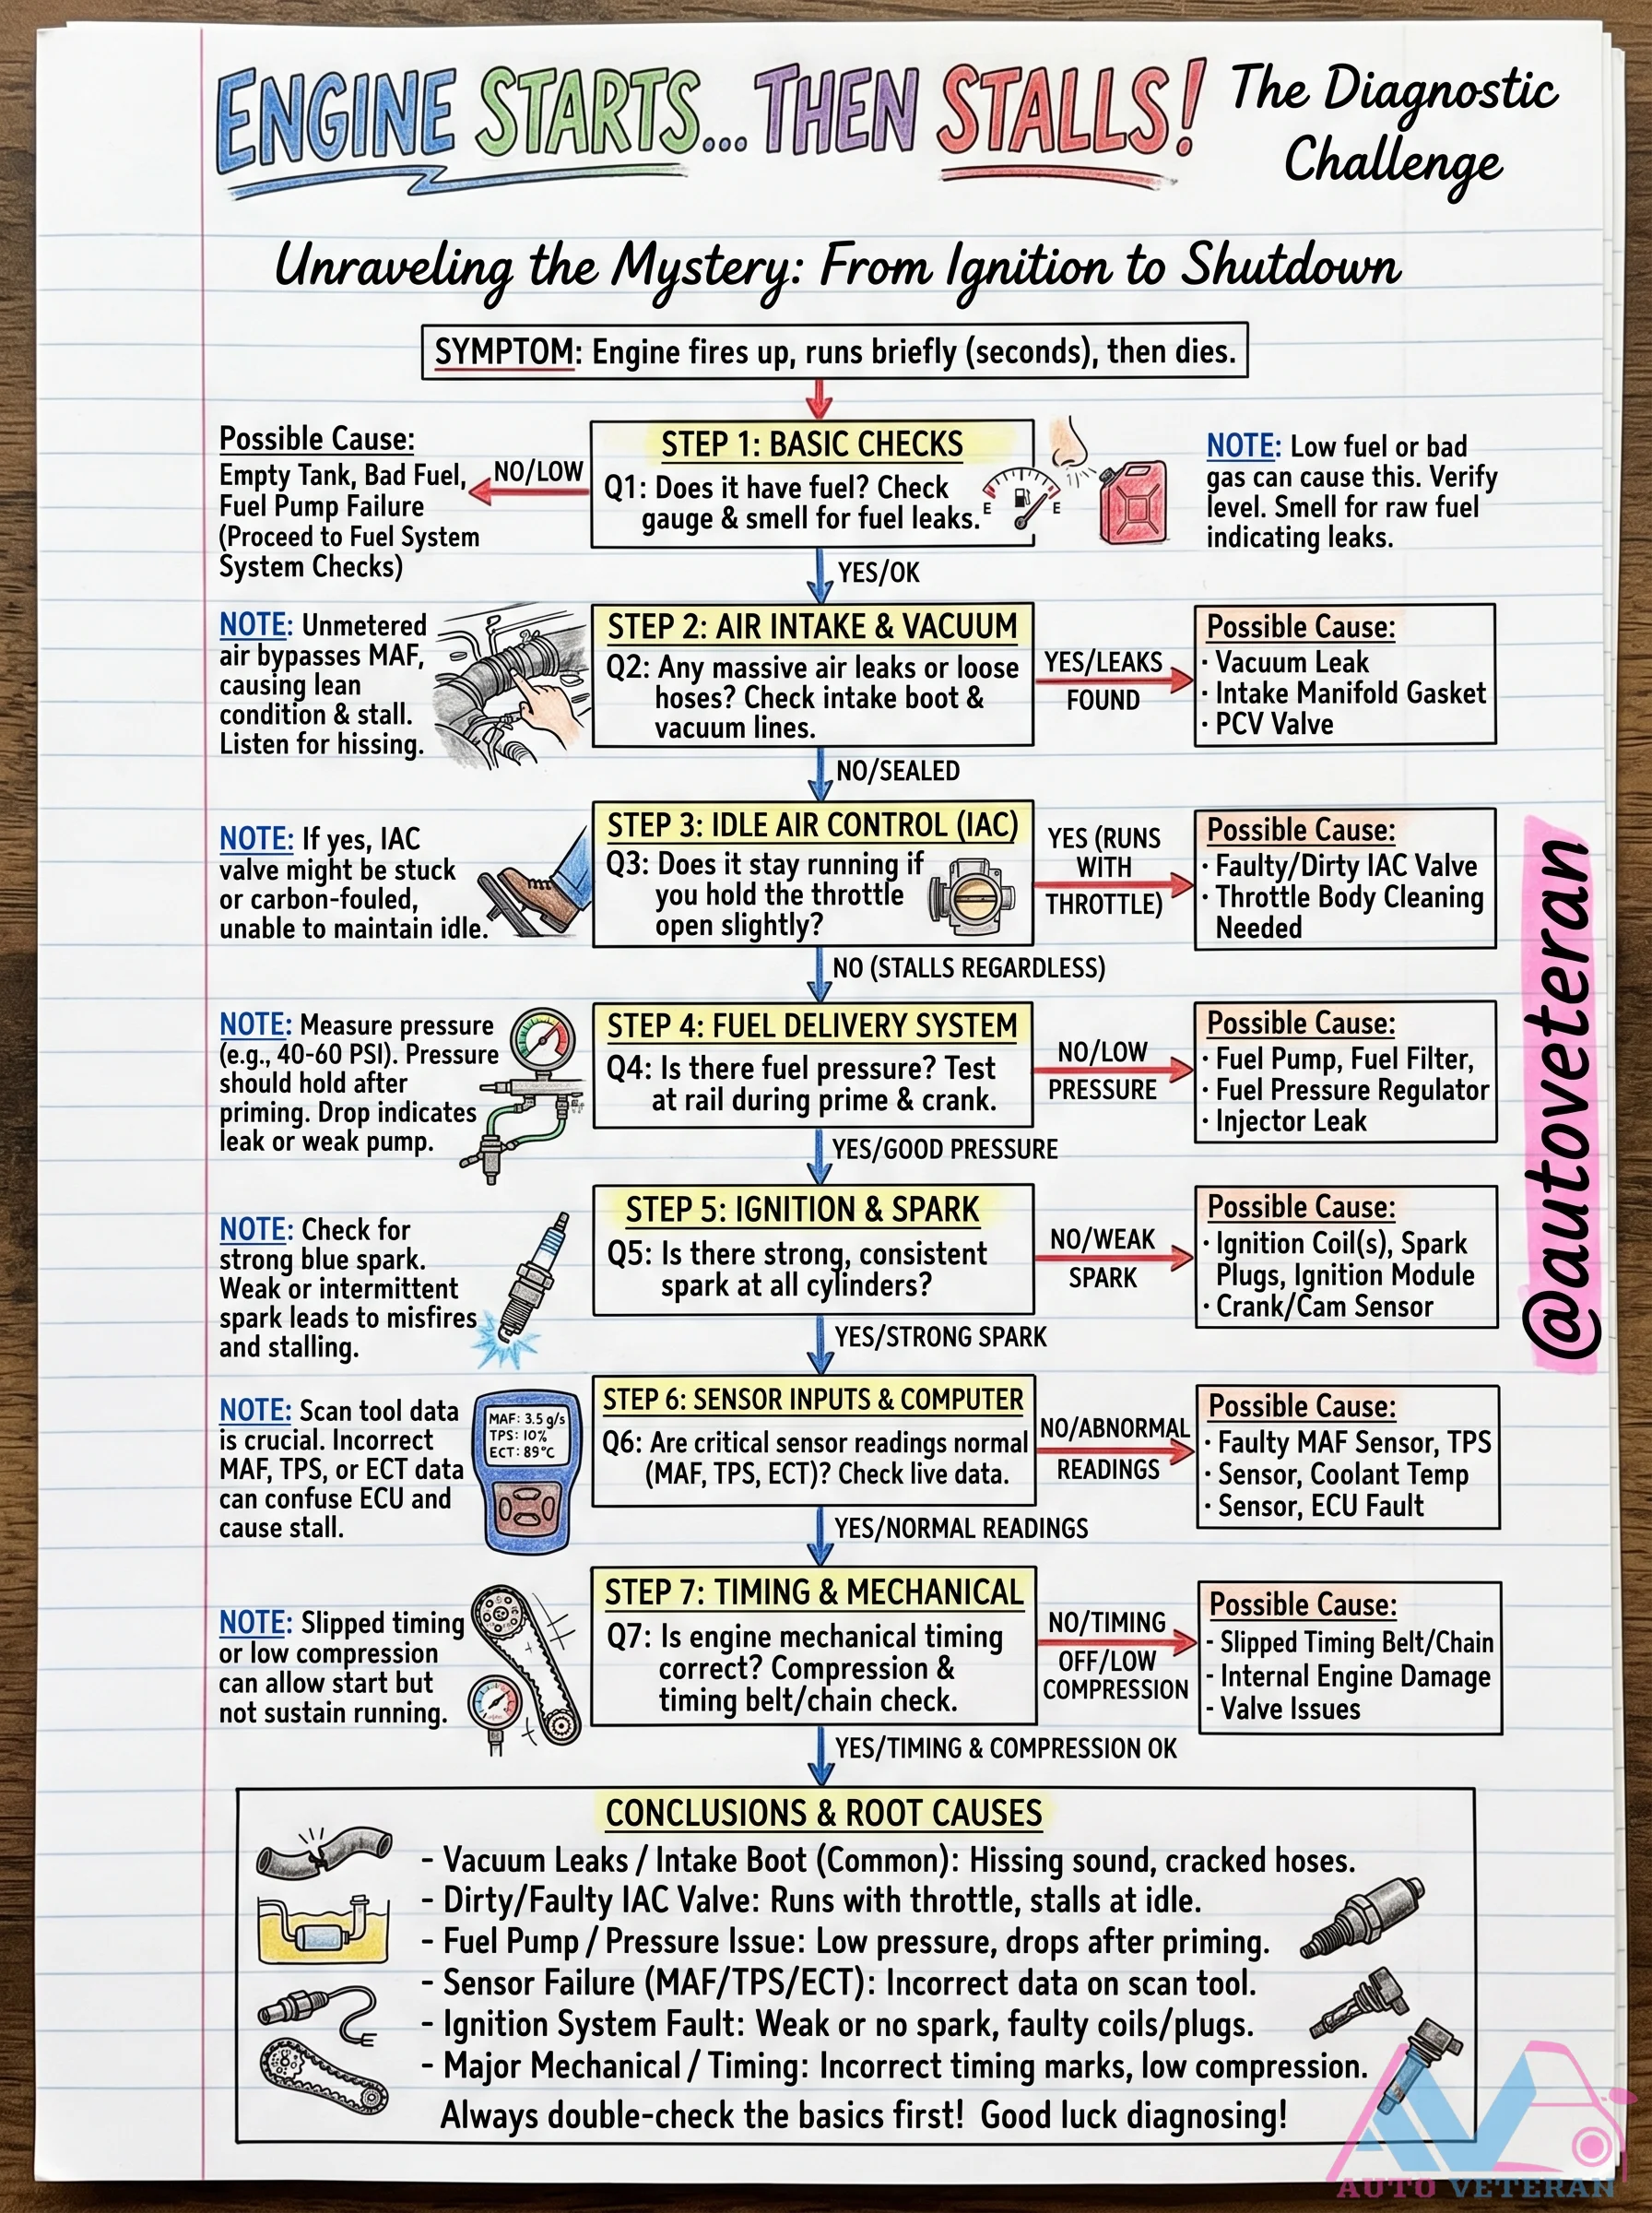
Engine Starts Then Stalls Diagnostic Guide
Your engine fires up but dies after a few seconds. This comprehensive diagnostic flowchart takes you step by step from basic checks like fuel level and leaks through air intake vacuum leaks, idle air control valve function, fuel delivery pressure, ignition spark strength, sensor inputs such as MAF TPS and ECT, and finally mechanical timing and compression. Common root causes include vacuum leaks in the intake boot, a dirty IAC valve that cannot maintain idle, weak fuel pump pressure, faulty sensors feeding incorrect data to the ECU, weak spark from coils or plugs, and slipped timing belt or chain. Follow these steps logically to isolate the exact reason for the stall without wasting time.
Engine Thermostat Wax Pellet Working Principle
The wax pellet thermal element is the heart of engine thermostat operation, expanding when heated to push the piston and open the valve for radiator coolant flow. This precise temperature regulation maintains optimal operating temperature, balances warm-up and cooling efficiency, and prevents overheating while ensuring peak engine performance and longevity.
Engine Thermostat Working Principle Step by Step
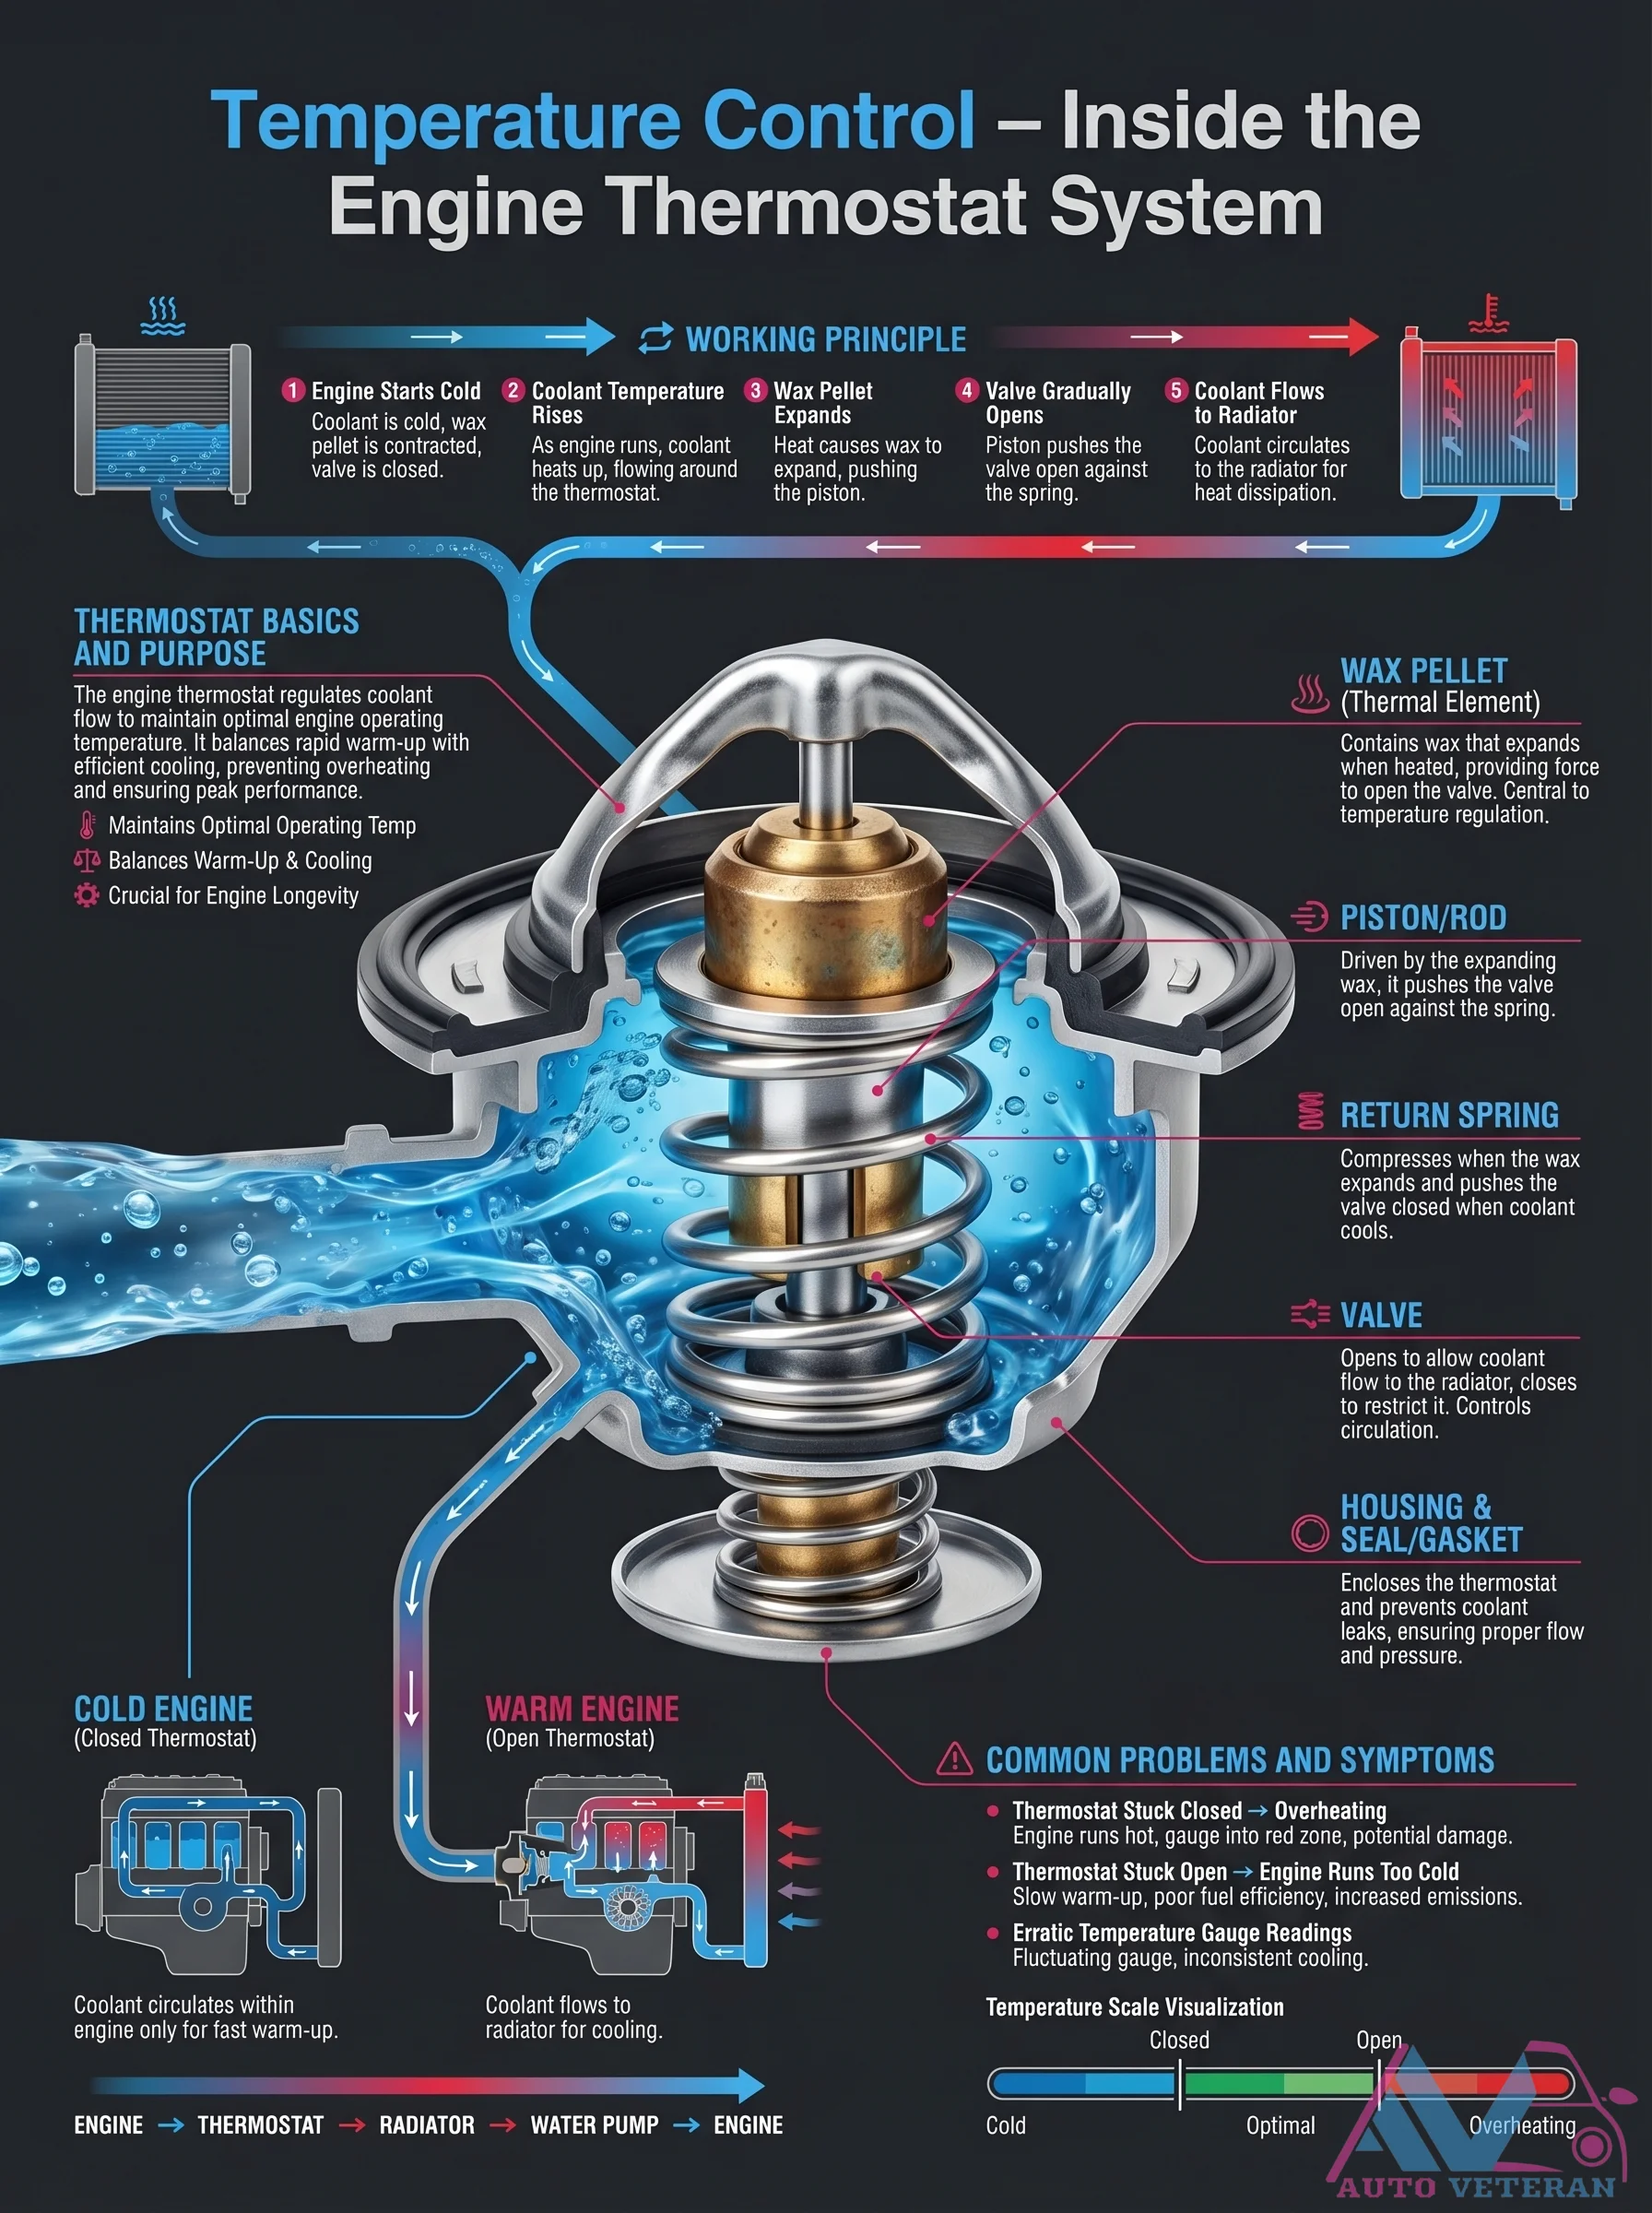
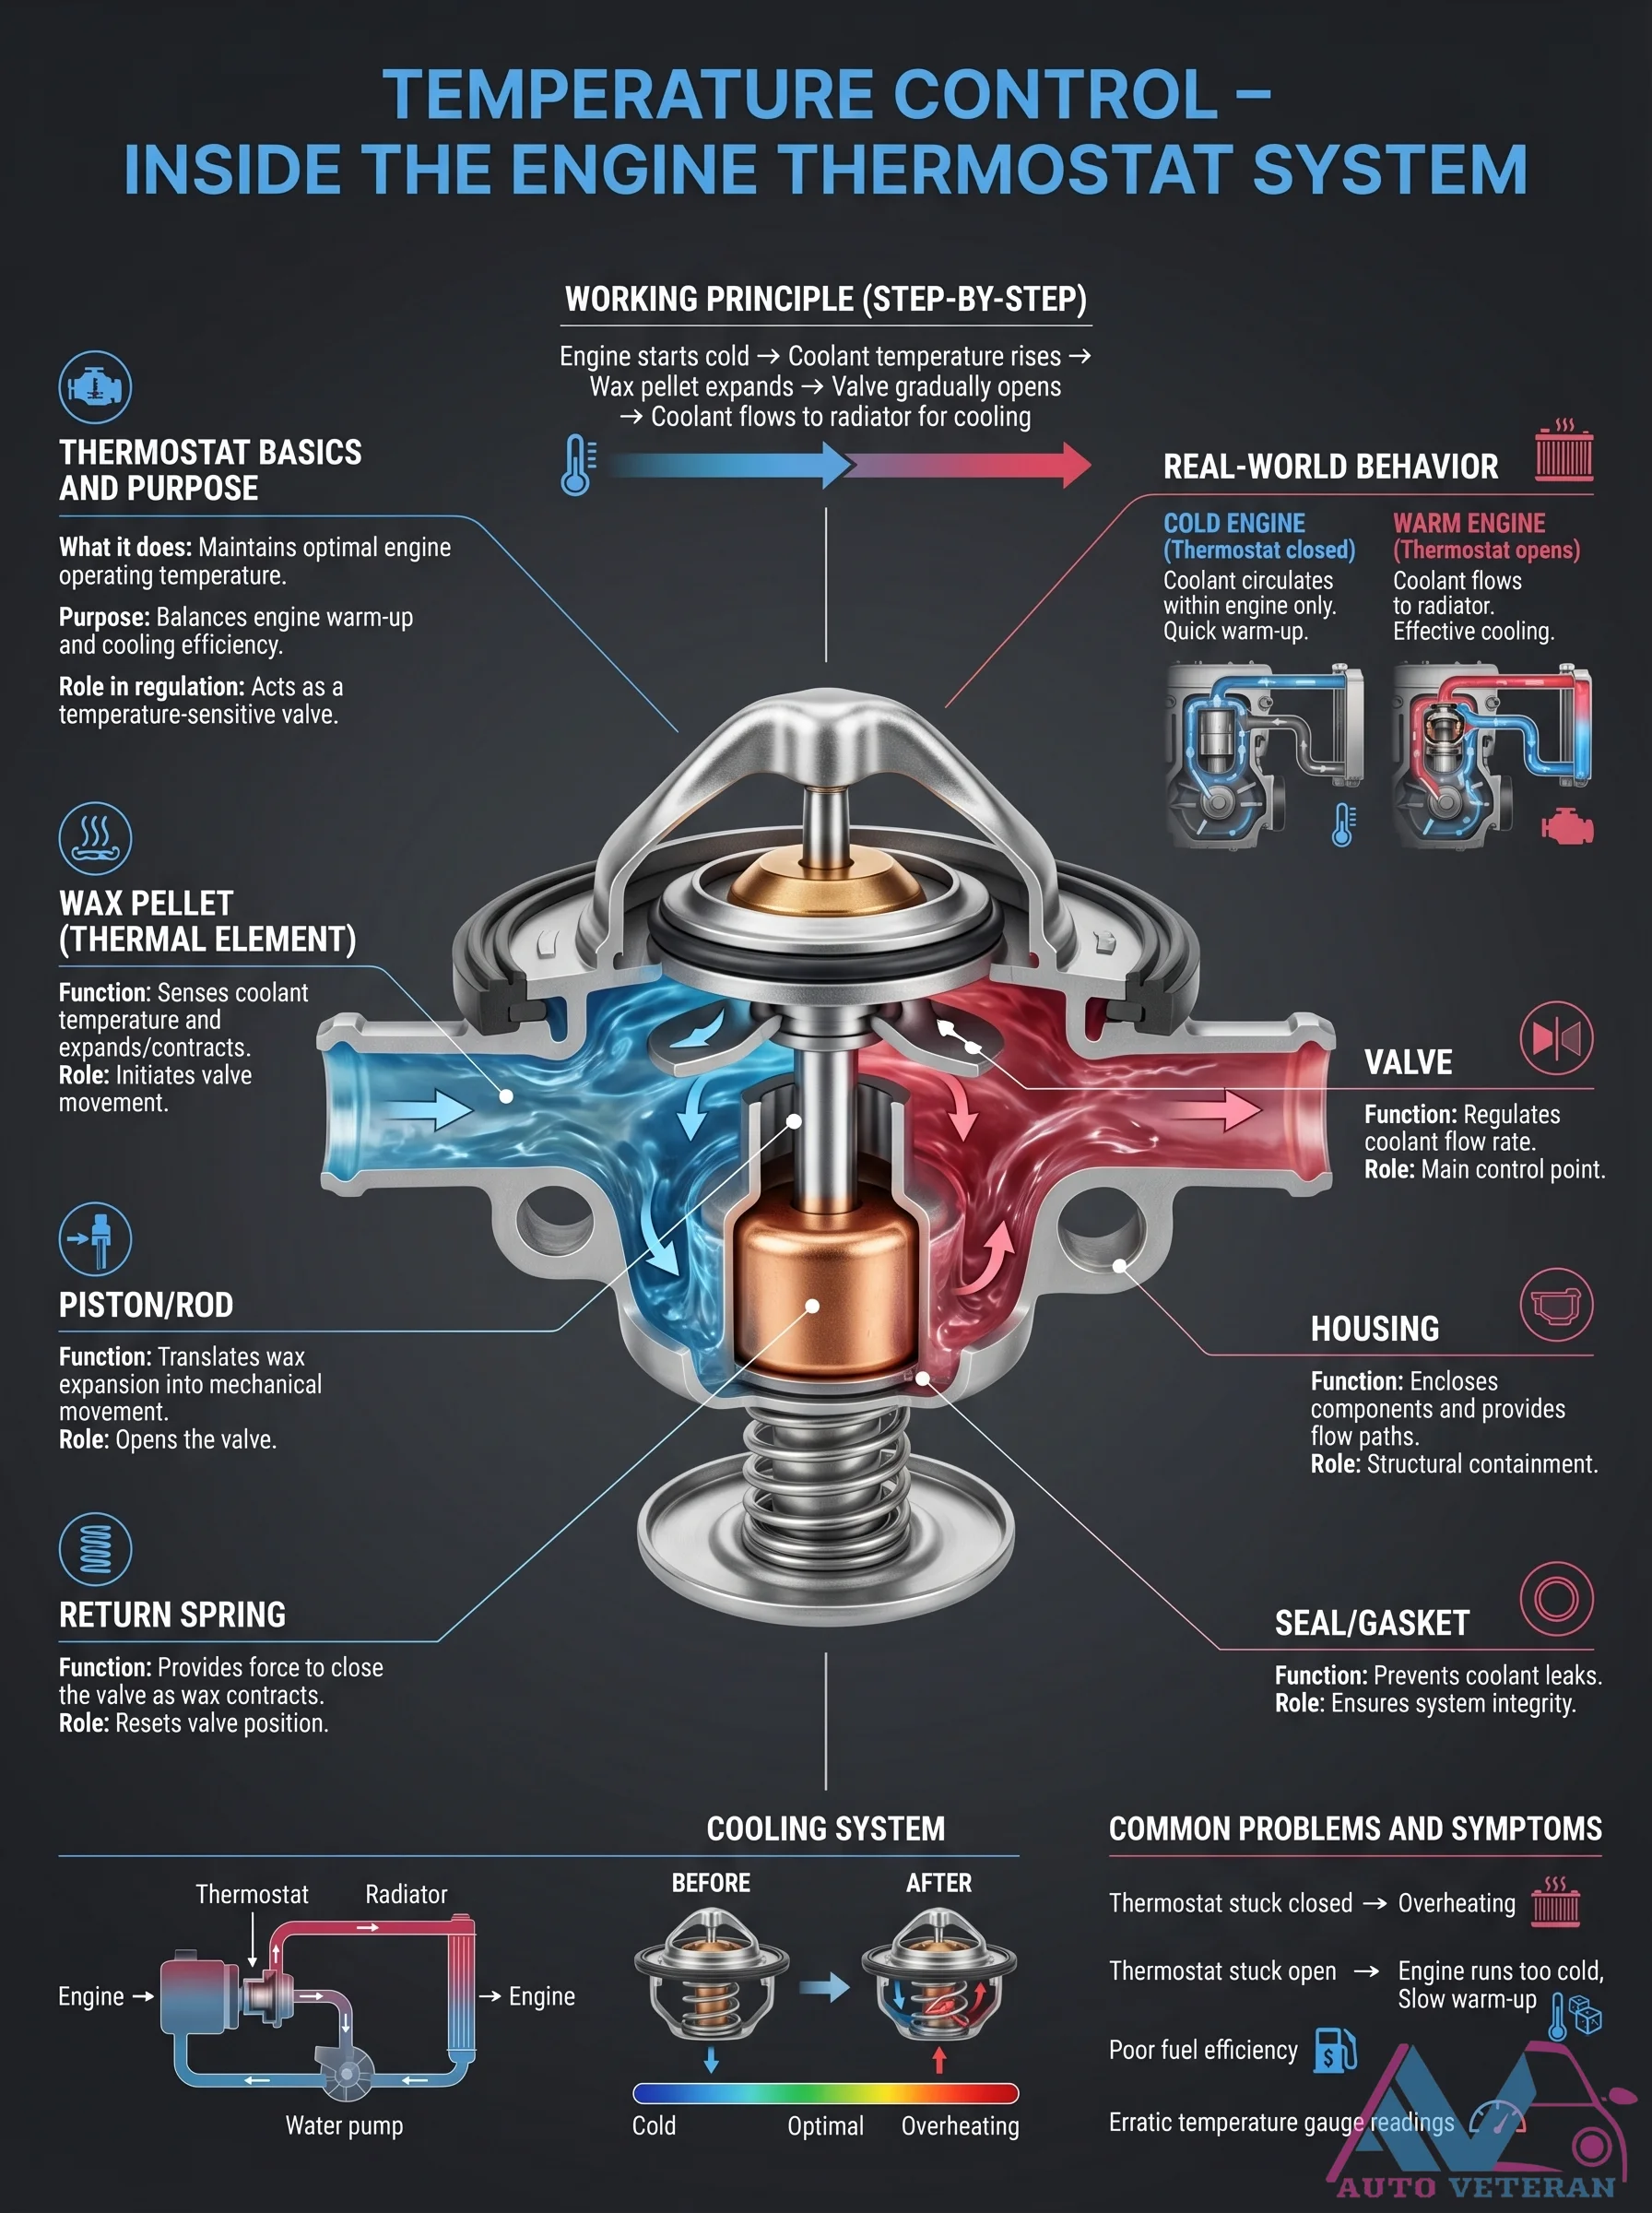
The engine thermostat operates through a temperature sensitive wax pellet that expands as coolant temperature rises, gradually opening a valve to allow coolant flow to the radiator. This step by step process begins with a cold engine where the thermostat remains closed for quick warm up, then transitions to a warm engine state where it opens for effective cooling. Key components include the wax pellet thermal element that senses temperature, the valve that regulates coolant flow rate, the piston or rod that translates expansion into mechanical movement, the housing that contains components, the return spring that resets valve position, and the seal or gasket that prevents coolant leaks. The system maintains optimal operating temperature by balancing engine warm up and cooling efficiency. Common problems include thermostat stuck closed leading to overheating, or thermostat stuck open causing slow warm up, poor fuel efficiency, and erratic temperature gauge readings.
Engine Thermostat Working Principle Step-by-Step
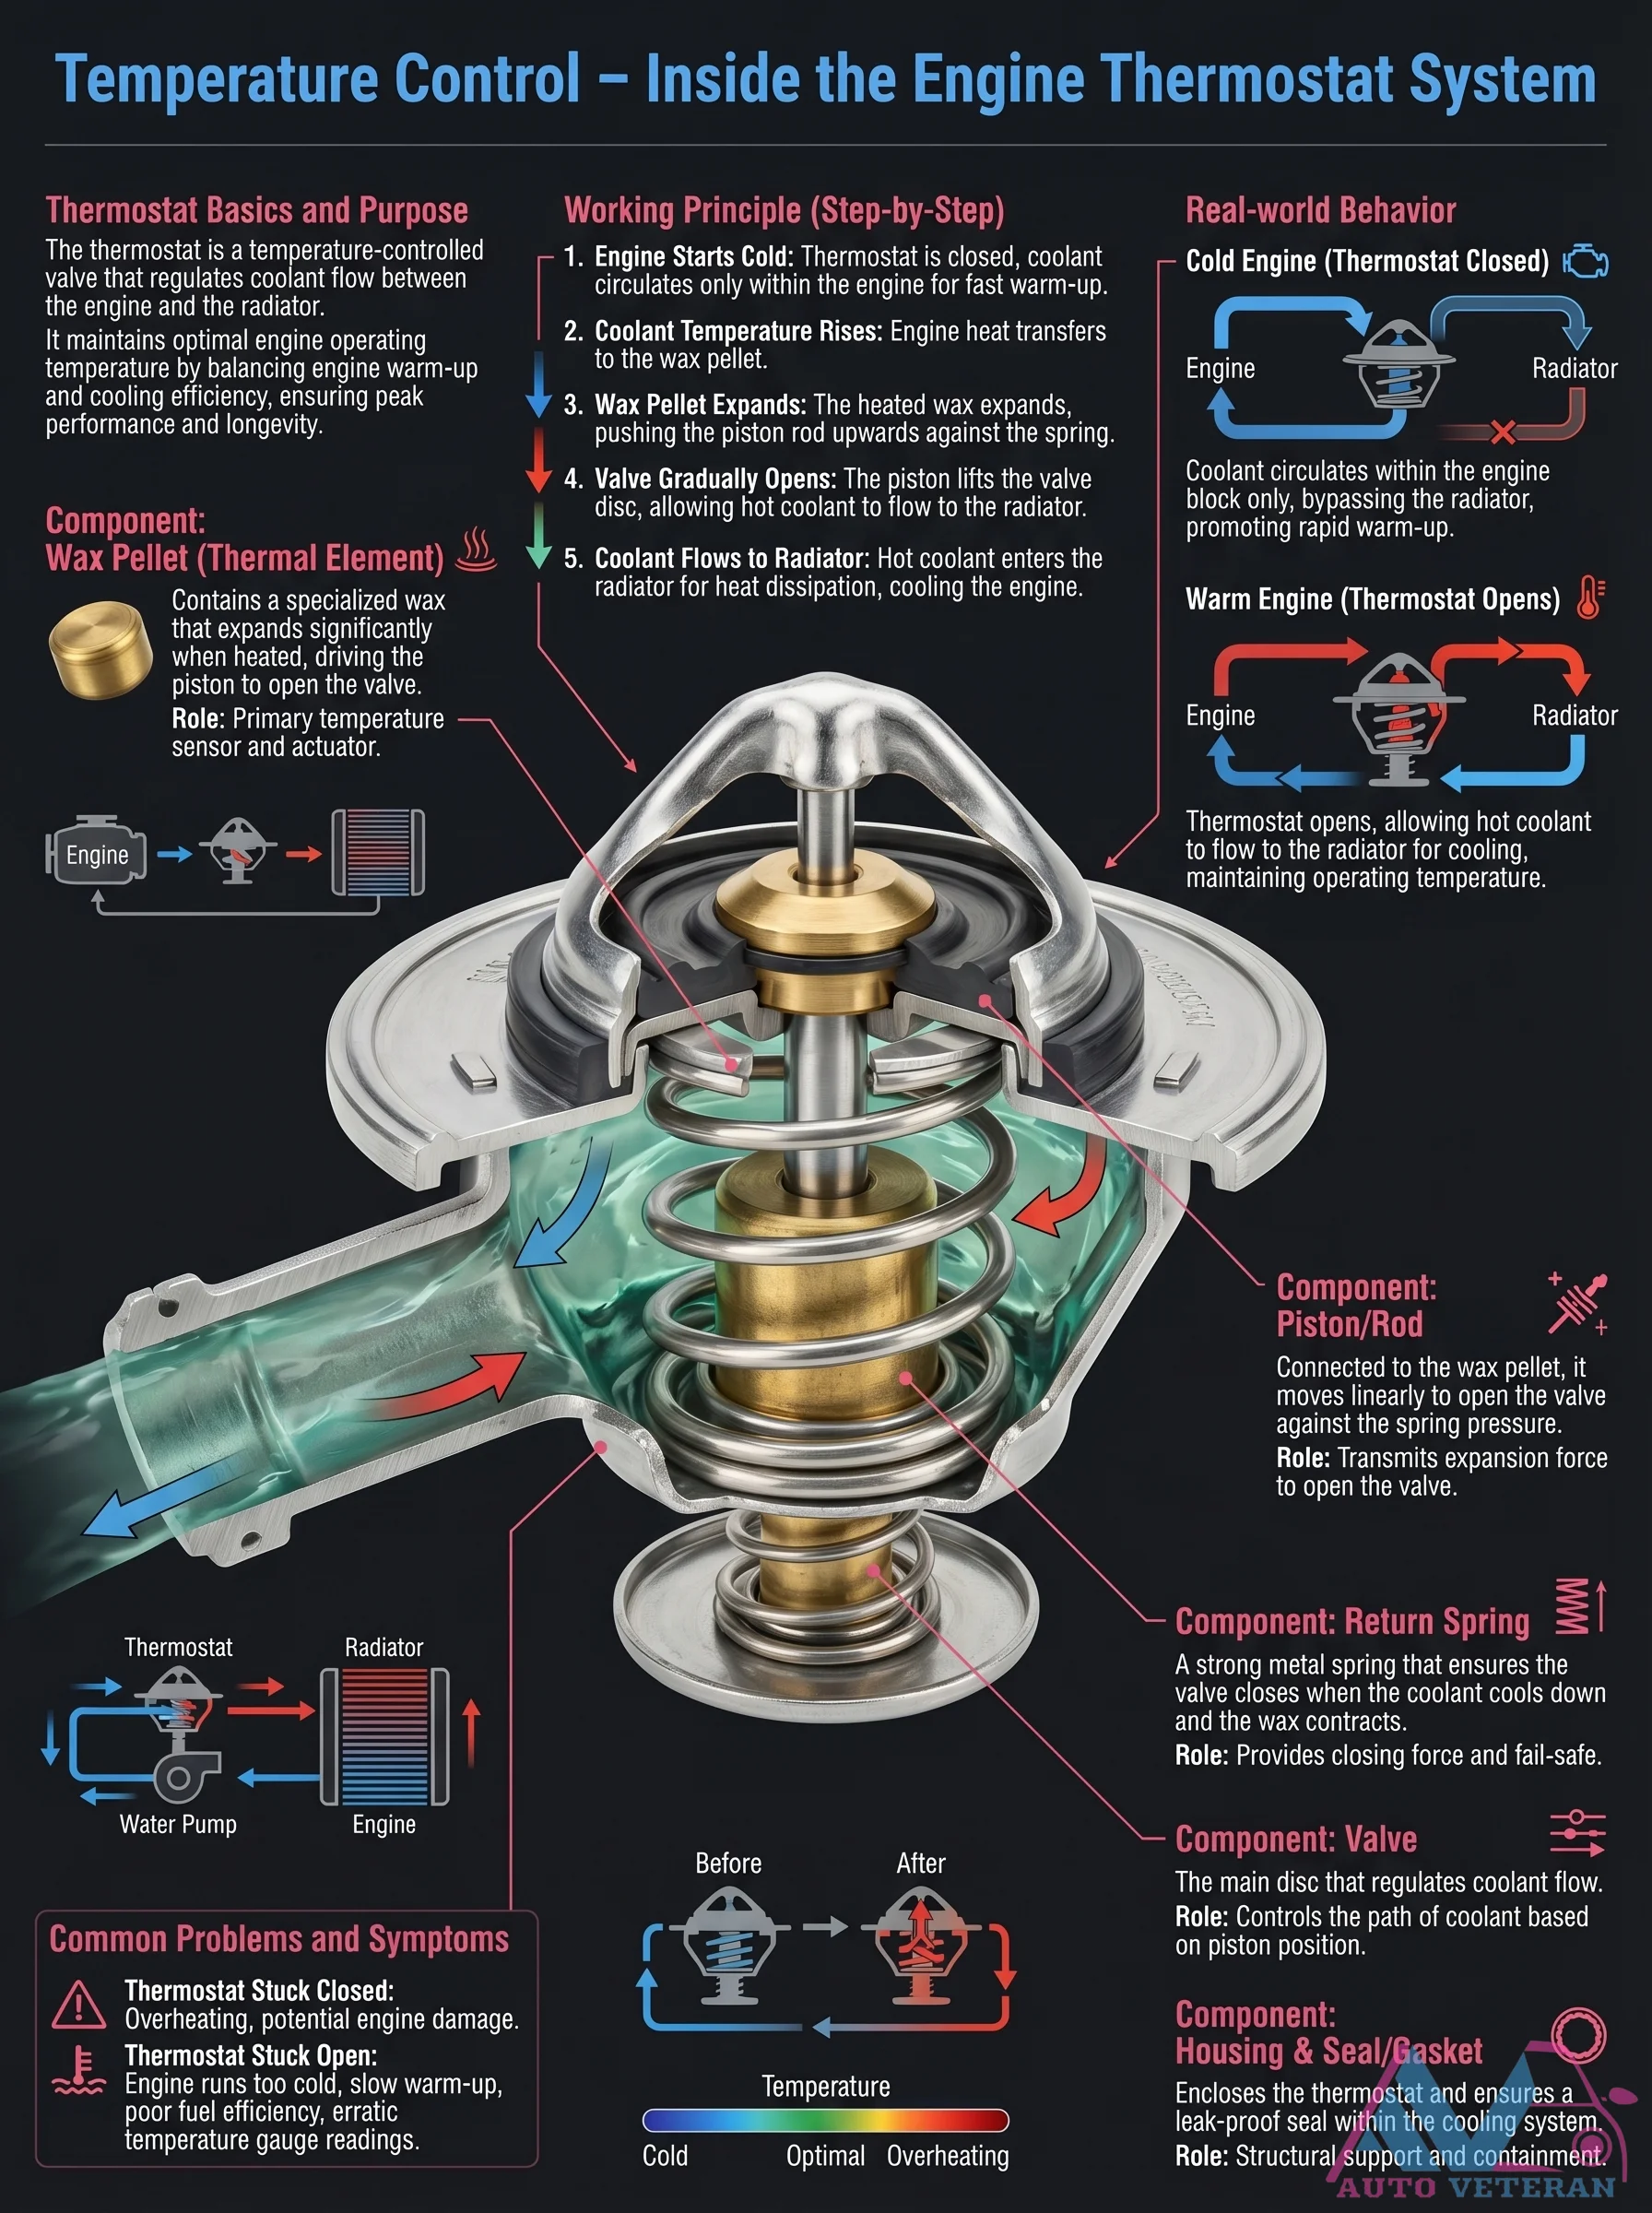
The engine thermostat operates through a precise temperature-controlled mechanism that regulates coolant flow between the engine block and radiator. When the engine starts cold, the thermostat remains closed, allowing coolant to circulate only within the engine for rapid warm-up. As coolant temperature rises, heat transfers to the wax pellet inside the thermostat. This specialized wax expands significantly when heated, pushing the piston rod upward against the return spring pressure. The piston then lifts the valve disc, gradually opening the pathway for hot coolant to flow to the radiator for heat dissipation. Once the engine reaches optimal operating temperature, the thermostat maintains this balance between warm-up and cooling efficiency. The return spring provides closing force when coolant cools and the wax contracts, ensuring the valve closes properly. This entire process ensures engine performance, fuel efficiency, and longevity by maintaining consistent operating temperatures.